Author Archives: geoff

Specify a custom active power plan and force Windows to use it

We all use different kind of power plans on our system according to our requirement. When we’re going to watch movies or play games on our system we choose High Performance power plan, and when we to save battery for long use, we use Power Saver.

If you consider a multi-user system, there may be exist the scenario when you select a power plan which you find useful and in your absence someone else who used the system changed the power plan which you find destructive. In such a case, placing a restriction to modify the power plans by others on your system became necessary.

Force Windows to use Specific Power Plan

Use-Specific-Power-Plan-0

In this article, we’ll show you the way to force Windows to use a specific power scheme so that users can’t modify the active power plan from normal settings. Basically, this restriction can be applied using Local Group Policy Editor. This method works for Windows Vista and later Windows editions. Here is how to restrict user from changing active power plan:

Specify a custom active power plan

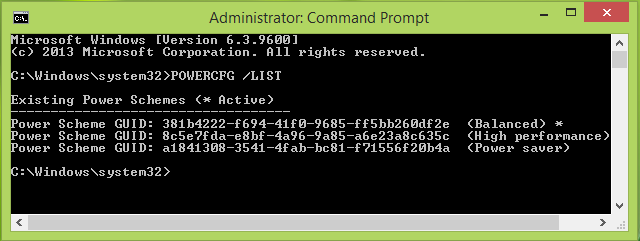
1. Open administrative Command Prompt. Type POWERCFG /LIST and hit Enter to get list of available power schemes; here * implies active plan. Please note down the GUID for the plan you’d like to set as a specific plan.

Use-Specific-Power-Plan

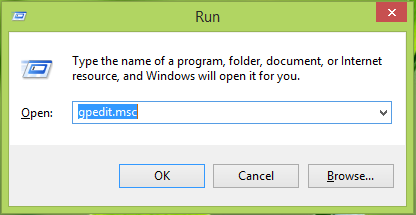
2. Press Windows Key + R combination, type put gpedit.msc in Run dialog box and hit Enter to open the Local Group Policy Editor.

Prevent-Store-Apps-From-Pinning-To-Start-Screen-When-Installed

3. In the left pane, navigate here:

Computer Configuration -> Administrative Templates -> System -> Power Management

Use-Specific-Power-Plan-11

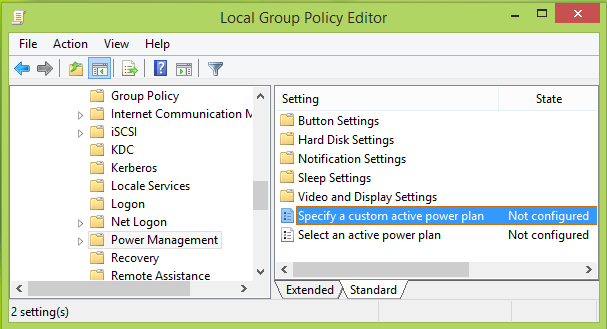
4. In the right pane of the window shown above, double click Specify a custom active power plan setting which is Not Configured by default to get this:

Use-Specific-Power-Plan-2

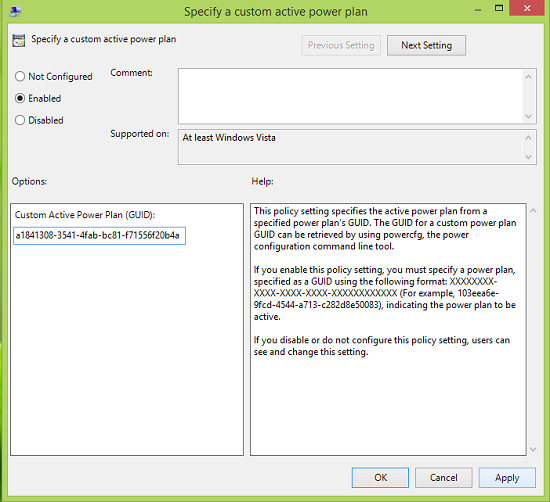
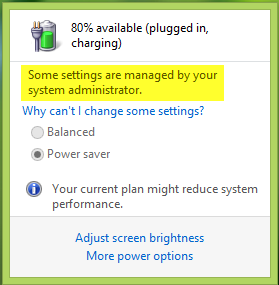
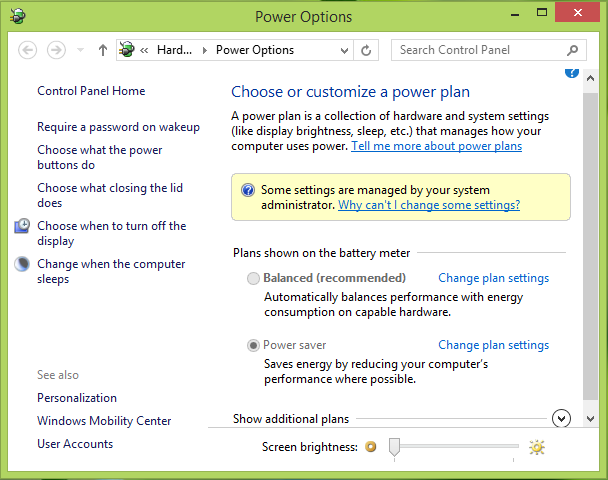
5. In the above shown window, firstly click Enabled and then in the Options section, input the Custom Active Power Plan(GUID) as we copied from step 1. Click Apply followed by OK. You may close the Local Group Policy Editor now. Now if you try to set power schemes manually by clicking battery icon in the taskbar notification area, you won’t be able to do so:

Use-Specific-Power-Plan-3

Hope you find the tip useful.

“Message from Administrator” in WDS

Using Windows Deployment Services, we talked about approving pending computers.  You might also have noticed on the “pending” screen an empty message from the administrator.

image_678BCEFA

How can you set a message from the administrator?

On the WDS server from an administrators command prompt type:

WDSUtil /set-server /AutoAddPolicy /Message:”To contact your network administrator, please dial 123-4567“

How-To Deploy Adobe Reader with GPO

Download, Customize, and Deployment method of Adobe Reader 11

1.

Preparations

Download the latest EXE package from:
http://www.adobe.com/products/reader/distribution.html
(Apply to distribute Reader – Fill fields – Accept and Submit)
You will find download link in the email.

Download and Install “Adobe Customisation Wizard XI”
http://www.adobe.com/support/downloads/detail.jsp?ftpID=5515

2.

Administrative Install Point

Run the following commands to extract the EXE file:
c:\AdbeRdr11004_en_US.exe -nos_ne -nos_o”C:\Extract”
(update filename to latest version)

msiexec /a C:\Extract\AcroRead.msi
(When the install dialogues prompt for a location, install to ‘C:\Install’)

msiexec /a C:\Install\AcroRead.msi /p C:\Extract\AdbeRdrUpd11004.msp
(When the install dialogues prompt for a location, install to ‘C:\Install’)

Copy ‘setup.ini’ from ‘C:\Extract’ to C:\Install’

3.

Customisation

Open “Adobe Customisation Wizard XI”
File – Open Package (C:\Install\AcroRead.msi)

Personalization tab:
EULA display – Suppress

Installation tab:
Installation – Silently (no interface), Reboot – Suppress

Online tab:
Disable: Updates, Help > Purchase, Help > Digital – Product Improvement, All Adobe online

Click File – Save Package

4.

GPO Deployment

Copy folder “C:\Install” to “\\%UserDomain%\NETLOGON\AcroRead”

Open “Group Policy Management MMC”
Open OU of testing computers – Right-Click and “Create GPO and Link it here”
(no need to upgrade existing package – installer will remove old version anyway)

Name it according to the version – “Deploy_AcroRead_11.0.04”
Edit GPO – Expand “Computer Configuration – Policies – Software Settings”

Right click “Software Installations” and select ‘New – Package’
Browse to “\\%UserDomain%\NETLOGON\AcroRead” and select the MSI

Select deployment method: Advanced
Under “Modifications” tab, press “Add” and select the MST file.
Press OK to save the installation package.

Side-note:
Right-Click the GPO and set “GPO Status” to “User Configuration Settings Disabled” (speed-up startup)

5.

Testing

Assign GPO to Test OU, Run “gpupdate /force” – restart on prompt

If install went OK, assign the GPO to Production OUs.

How-To Deploy Adobe Flash with GPO

Download, Customize, and Deployment method of Adobe Flash 12

1.

Preparations

Download the latest MSI from:
http://www.adobe.com/products/players/flash-player-distribution.html
(Apply to distribute Flash Player – Fill fields – Accept and Submit)
You will find download link in the email.

Download ORCA (MSI Editor)
http://www.technipages.com/wp-content/uploads/2007/11/orca.Msi

2.

Customize MSI

Open the MSI file in ORCA editor
Open Table “Property”
Change ISCHECKFORPRODUCTUPDATES from 1 to 0
Change RebootYesNo from Yes to No
Save and Close

3.

GPO Deployment

Copy MSI to “\\%UserDomain%\NETLOGON\Flash12”
Open Group Policy Management console

Create new GPO “Deploy_Flash12.X”
Expand “Computer Configuration – Policies – Software Settings”
Right click “Software Installations” and select ‘New – Package’
Browse to “\\%UserDomain%\NETLOGON\Flash12” and select the new MSI
Select deployment method: Assigned – Click OK

4.

Testing and Assigning

Assign GPO “Deploy_Flash12.X” to Test OU
Run “gpupdate /force” – restart on prompt

If install went OK, assign the GPO to Production OUs.

Download: ORCA MSI Editor

Orca MSI Editor allows you to edit the properties of any MSI file. With this tool, you can change the title and text within the installer an look at how and where the files are delivered.

Download the Orca MSI then install it. Once installed you can right-click any MSI and select “Open with Orca”.

This tool used to be a part of Microsoft Developer Tools but is now retired and no longer supported by the company. Use it at your own risk. If you’re going to link to the file from your website, please link to this page and not the file directly, otherwise I’ll have to remove it.

Sysprep on windows 2003 r2 sp 2

This is only a note to remind me how to sysprep a windows server 2003.

To sysprep a windows 2003 R2 image, follow the below action :

  • Insert CD1
  • go to  Support\Tools\Deploy.cab
  • select everything and extract them to c:\sysprep ( a folder that you have created it)
  • Double click sysprep.exe.

041613_0450_syspreponwi1

  • Keep the default settings (Options un-selected, shutdown mode: shutdown)
  • click on Reseal

041613_0450_syspreponwi2

  • And press Ok

041613_0450_syspreponwi3

Set the default Organisational Unit for new computers in Windows Server

Once you have your domain and group policies set up, it can become frustrating to constantly have to remember to move a new computer into the correct OU.

Luckily in Windows 2003 Server and above, you can set a default OU:

  1. <code>redircmp ou=ComputersOU,dc=mydomain,dc=com</code>

Remember to replace the path with your own domain’s OU path. Also, your domain has to be running in at least Windows Server 2003 native mode – otherwise you will receive an error:

Error, unable to modify the wellKnownObjects attribute. Verify that the domain functional level of the domain is at least Windows Server 2003:
Unwilling To Perform
Redirection was NOT successful.

To change this:

  • On the server go to Administrative Tools > Active Directory Domains and Trusts.
  • Right-click on your domain name, and click on Raise Domain Functional Level.
  • Set the domain level to at least 2003

Now you should be ready to go!

Sysprep your Windows OS for more than 3 times

If you attempt to sysprep a machine for acquisition of an Image and the machine crashes during the sysprep process it is likely that the image has been sysprepped more than 3 times.

Symptoms of this issue

run sysprep.exe with /generalize /oobe switches and the process is running for few seconds when then the sysprep window disappears. Opening the sysprep log file under \sysprep\Panther the logfile contains this line:

Date Time, Error [0x0f0073] SYSPRPRunExternalDlls:Not running DLLs; either the machine is in an invalid state orwe couldn’t update the recorded state, dwRet = 31

This error indicates that the image has been syspreped more than 3 times

First check if you can re-arm by running:

slmgr.vbs /dlv

and check the re-arm counter. if it set to zero you need to do the following: http://support.microsoft.com/kb/929828 (set the <SkipRearm>1</SkipRearm> like in the example, note: this option will make the product key window to appear in the setup process).
You can also try running : slmgr.vbs -rearm, to rearm Windows.

Reset the sysprep count to zero

1 – Change few keys in the registry:

HKEY_LOCAL_MACHINE\SYSTEM\Setup\Status\SysprepStatus\GeneralizationState\CleanupState:2

HKEY_LOCAL_MACHINE\SYSTEM\Setup\Status\SysprepStatus\GeneralizationState\GeneralizationState:7

HKEY_LOCAL_MACHINE\SOFTWARE\Microsoft\Windows NT\CurrentVersion\SoftwareProtectionPlatform\SkipRearm:1

2 – Reset MSDTC

Start -> Run : msdtc -uninstall (wait few seconds)

Start -> Run : msdtc -install (wait few seconds)

3 – Restart the machine
4 – You can now run:

sysprep.exe /generalize /oobe


VNC Deployment via Group Policy

I have had a few people ask how to deploy VNC via group policy. If you have a large network where you want to install VNC on a large amount of computers this would be an ideal solution.

For this guide i used TightVNC – the website is here: tightvnc.com

I decide to go for TightVNC becuase

  • Easy to use
  • Free
  • Ability to hide the icon in the system tray
  • Built in access control options
  • Very lightweight
  • Ability for the end user to approve connections
  • Fully compatible with Windows 7

I have tested this on the following systems

  • Windows XP x32
  • Windows 7 x32
  • Windows 7 x64
  • Windows 8 x32
  • Windows 8 x64
  • Windows 8.1 x32
  • Windows 8.1 x64
  • Windows Server 2008 R2

With the below guide, anything in red are paths you need to change to make it suitable for deployment in your network.
Once this script has installed VNC it is designed to automatically quit when you run it again.

Creating the installer files

  1. Create a network share on a server to store the script and installers. You will need to give the group “Domain Computers” the right to read and execute.
  2. Download TightVNC v2.0.2 and save it in the above share and install onto 1 computer.
  3. On the computer you installed TightVNC, configure to how you like it (eg set a password). Click Here for Documentation & Click Here for FAQ
  4. Once configured go to regedit and export the following folder. “HKEY_LOCAL_MACHINE\Software\TightVNC” & save it in the above share. To export right click the TightVNC folder and press export.
  5. Open NotePad and copy the below code. Please change the red areas to the path of your network share. The script will remove the VNC stuff from the program files to stop users from playing. If you do not want to do this remove the last line of the code.
    Code:
    if exist "C:\Program Files (x86)\TightVNC" goto :eof ELSE
    if exist "C:\Program Files\TightVNC" goto :eof ELSE
    "c:\vnc\tightvnc-2.0.2-setup.exe" /S
    regedit /S "c:\vnc\tightvnc.reg"
    net stop "TightVNC Server"
    net start "TightVNC Server"
    rmdir /s /q "C:\Documents and Settings\All Users\Start Menu\Programs\TightVNC\"
  6. Save the file in your shared folder. You need to save it as a .bat file. For example mine is called installvnc.bat

Adding to a group policy

  1. Open up an appropriate group policy that applied to your computers or create a new one.
  2. Navigate to: Computer Configuration > Policies > Windows Settings > Scripts > Startup
  3. Press add, then browse and find the .bat file we created before in the shared folder. Then press ok & ok again.
  4. Make sure the following group policy is enabled. Computer Configuration > Policies > Administrative Templates > System > Logon > Always wait for the network at computer startup & Logon

When your computer startup it should install VNC and be configured.

Enjoy!

Find Computer Name User is Logged Onto

To automatically log users that login to domain based computers:

  • Create a Share on a Server and give right NTFS and Share permissions
  • Create a Batch file in which you put this script: echo user: %username% computer: %computername% date: %date% >> \\Server\Share\info.txt
  • Use group policies to apply this Batch file as a logon script

At the end you will get in the text file info.txt:

  • The user name
  • The used computer
  • The date of logon

For instant discovery of what PC a user has logged into:

Right click My Computer – Click Manage – Expand Shared Folders – Click Sessions

This will provide the username and the IP of the PC they are logged into

You can then go to DHCP under Administrative Tools and view the leases to see the PC name

View from within Server 2008 R2:

425842