Author Archives: geoff

Suggested Max Memory Settings for SQL Server

It is pretty important to make sure you set the Max Server memory setting for SQL Server to something besides the default setting (which allows SQL Server to use as much memory as it wants, subject to signals from the operating system that it is under memory pressure). This is especially important with larger, busier systems that may be under memory pressure.

This setting controls how much memory can be used by the SQL Server Buffer Pool.  If you don’t set an upper limit for this value, other parts of SQL Server, and the operating system can be starved for memory, which can cause instability and performance problems. It is even more important to set this correctly if you have “Lock Pages in Memory” enabled for the SQL Server service account (which I always do for x64 systems with more than 4GB of memory).

These settings are for x64, on a dedicated database server, only running the DB engine, (which is the ideal situation).

Physical RAM                        MaxServerMem Setting
2GB                                           1500
4GB                                           3200
6GB                                           4800
8GB                                           6400
12GB                                         10000
16GB                                         13500
24GB                                         21500
32GB                                         29000
48GB                                         44000
64GB                                         60000
72GB                                         68000
96GB                                         92000
128GB                                       124000

If you are running other SQL Server components, such as SSIS or Full Text Search, you will want to allocate less memory for the SQL Server Buffer Pool. You also want to pay close attention to how much memory is still available in Task Manager. This is how much RAM should be available in Task Manager while you are under load (on Windows Server 2003):

Physical RAM            Target Avail RAM in Task Manager
< 4GB                               512MB – 1GB
4-32GB                              1GB – 2GB
32-128GB                            2GB – 4GB
> 128GB                              > 4GB

You can use T-SQL to set your MaxServerMemory setting. The sample below sets it to 3500, which is the equivalent of 3.5GB. This setting is dynamic in SQL Server 2005/2008, which means that you can change it and it goes into effect immediately, without restarting SQL Server.

— Turn on advanced options
EXEC  sp_configure‘Show Advanced Options’,1;
GO
RECONFIGURE;
GO

— Set max server memory = 3500MB for the server
EXEC  sp_configure‘max server memory (MB)’,3500;
GO
RECONFIGURE;
GO

-- See what the current values are
EXEC sp_configure;

You can also change this setting in the SSMS GUI, as you see below:

d3ca9ddc3320b216b59350a5daa2d869

Finally, I have learned that it is a good idea to temporarily adjust your MaxServerMemory setting downward by a few GB if you know you will be doing a large file copy on your database server (such as copying a large database backup file).

Change RemoteApp Icon in RDS 2012R2

Browse to %WINDIR%\RemotePackages\CPubFarms\CPubRemoteApps on each server holding the RD Connection Broker role and you will see all the .ico files.

In the following example, I have a RemoteApp called ‘Notepad’.  If i want to change the icon I’d remove “notepad.ico” and copy another .ico file of my choice and rename it to “notepad.ico”.
This will replace the icon for the RemoteApp in your Remote Apps and Desktop Connections application on the next refresh. For RD Web Access you’ll have to stop and start the Web application on the RD Web Access server.

This will only work for .ico files. If your icon is in a .exe or .dll you’ll still have to use powershell.

Cloned machine WSUS error

To fix WSUS errors with a cloned machines that was not sysprepped you will need to firstly delete the machine form the WSUS console then run he following commands on the PC/server that has been cloned:

gpupdate
net stop wuauserv /y
net stop BITS /y
rd C:\WINDOWS\SoftwareDistribution /s /Q
del "c:\windows\windowsupdate.log"
regsvr32 WUAPI.DLL /s
regsvr32 WUAUENG.DLL /s
regsvr32 WUAUENG1.DLL /s
regsvr32 ATL.DLL /s
regsvr32 WUCLTUI.DLL /s
regsvr32 WUPS.DLL /s
regsvr32 WUPS2.DLL /s
regsvr32 WUWEB.DLL /s
regsvr32 msxml3.dll /s
net start wuauserv /y
wuauclt.exe /resetauthorization /detectnow

Then restart the PC/Server and re-run Windows Update

STOP 0x0000007B on P2V Windows 7 upwards

Got a STOP 0x0000007B on booting a VM after you P2V. With automatic reboot on error enabled, it also manifests itself as a Windows Boot Manager error, Status: 0xc0000225, Info: The boot selection failed because a required device is inaccessible.
http://minasi.com/forum/topic.asp?TOPIC_ID=31980

Good old fashioned mass storage driver issue. The hitch is that drivers are there but not enabled in an effort to improve boot performance. The article on Minasi’s site offers a pretty good explanation for Hyper-V, and the same applies to VMware.

To fix:

  1. Mount the Windows install disk and boot to it.
  2. At the first screen (Language Selection), hit Shift-F10 for a command prompt.
  3. Run Regedit.
  4. Load the system hive from the VM’s disk:
    1. Highlight HKEY_LOCAL_MACHINE
    2. File > Load Hive
    3. Select &lt c: &gt \Windows\System32\config\system (name it something like “asdf”)
  5. Expand HKEY_LOCAL_MACHINE\asdf\ControlSet1\Services\intelide
  6. Change the data for value “Start” from “3” to “0”.
  7. File > Unload Hive.
  8. Exit regedit.
  9. Reboot the VM.


P2V Using DISK2VHD for HyperV

The ability to convert existing Physical hosts to Virtual machines is often the biggest return on investment benefit to justify the case for virtualisation.  Taking a legacy platform often on older, unsupported hardware and software, and converting it to a virtual machine running with many other machines, but on new, high capacity hardware taking up less space and power is a key driver for virtualisation.

Older systems consuming a relatively high amount of energy and space for what is now very low processing power, can be converted to VM’s hosted on much more powerful hardware for a similar footprint but with much increased agility through the well understood benefits of virtualisation.

A recent project The Full Circle (www.thefullcircle.com) undertook as part of our private cloud practise, was to rationalise several older HP ProLiant DL360 servers (one had a BIOS dated 08/03/2001 – over 10 years old!) each taking 1U of rack space, some with dual power supplies, dual network adaptors, mirrored disks, etc. all generating high heat output (which in turn has high cooling costs).

Online Windows server capture using Sysinternals Disk2vhd utility

If you haven’t got Microsoft’s Virtual Machine Manager suite and you don’t want to spend many hours backing up the source server, creating a blank VM, installing a base O/S and then hoping a restore will work without hours of troubleshooting disparate hardware issues… really?!?!  there is a handy alternative from those clever folks at Sysinternals – disk2vhd.

From Sysinternals “Disk2vhd is a utility that creates VHD (Virtual Hard Disk – Microsoft’s Virtual Machine disk format) versions of physical disks for use in Microsoft Virtual PC or Microsoft Hyper-V virtual machines (VMs). The difference between Disk2vhd and other physical-to-virtual tools is that you can run Disk2vhd on a system that’s online. Disk2vhd uses Windows’ Volume Snapshot capability, introduced in Windows XP, to create consistent point-in-time snapshots of the volumes you want to include in a conversion.”


Overall P2V process as easy as 1,2,3…

Of course it’s not as easy as 1,2,3… this process may take from only a couple of hours to a couple of days per server but its a straightforward process with no fundamental ‘gotchas’ – although in-between application licensing, network infrastructure issues, and later VM contention (disable those traditional backup agents!) – this part may prove to be the simplest part of the process, which is:

  1. Capture of source physical host/server
    1. Audit hardware and software build
      (recommend paid tools such as Belarc, but also include built-in such as systeminfo – knowing the local machine Administrator account rather than a domain account could be useful although not mandatory although you do need an admin account)
    2. Full Backup! (whilst no changes planned to source machine a backup maybe useful later)
    3. Clean-up the source machine (old profiles, programs, recovery points, temp files (could use CCleaner or just cleanmgr.exe), and always defrag! – great tip from Khwajakhurram in the comments))
    4. Disk conversion from physical source to Virtual Hard Disk file target (VHD)
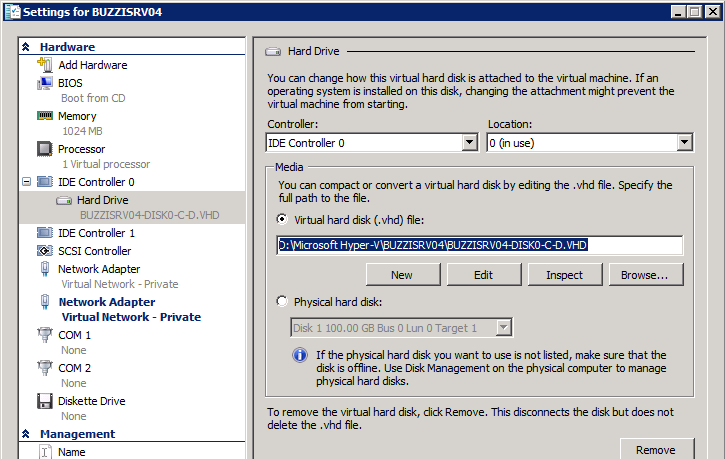
  2. Build of Virtual Machine / VM hardware to be a near-as match to the source hardware in terms of major physical resources such as CPU, Memory, Disk, and Network
    1. Attach the created VHD file, note this will be one Disk that may contain multiple partitions (recommend capturing individual volumes to separate VHDs)
  3. Clean-up of new virtual machine hardware and system software
    1. Install the Hyper-V Integration Services (may have pre-reqs..) and restart
    2. remove superfluous hardware devices, drivers, and system software (may require several restarts)
    3. Setup networking (you will have lost the physical adapters)
    4. May wish to change storage properties e.g. converting from a Basic to Dynamic Disk in order to Shrink a volume, etc…
    5. Check the event logs for any errors to determine if serious or can be ignored
    6. Test, test, test!
    7. Activate Windows (the ‘hardware’ will have changed significantly)
Steps in more detail..
Running disk2vhd

You don’t even need to permanently install the tool on the source machine, simply browse to http://technet.microsoft.com/en-us/sysinternals/ee656415 and click ‘Run Disk2vhd

image44

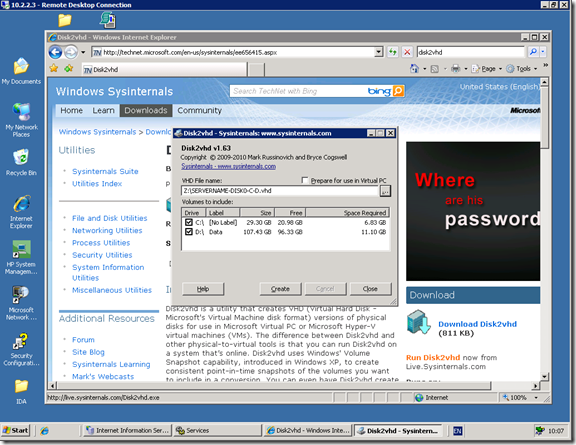
choose your source drives, enter a suitable target destination with sufficient space and click create – this may take some time (as in several hours depending on size, speed, network, etc.)

Setting up the captured hard disk

The disk captured by disk2vhd will be a single hard disk image of the selected partitions/volumes, this may be fine if they combine less than 127GB as the first Hyper-V bootable disk has to be attached to the IDE controller (with a disk limit of 127GB)

However, for production use we recommend splitting your disks in the virtual world as you would in the physical – capture each volume to a separate VHD e.g. HOSTNAME-diskN-c_system.vhd, HOSTNAME-diskN-d_data.vhd, etc.

image13


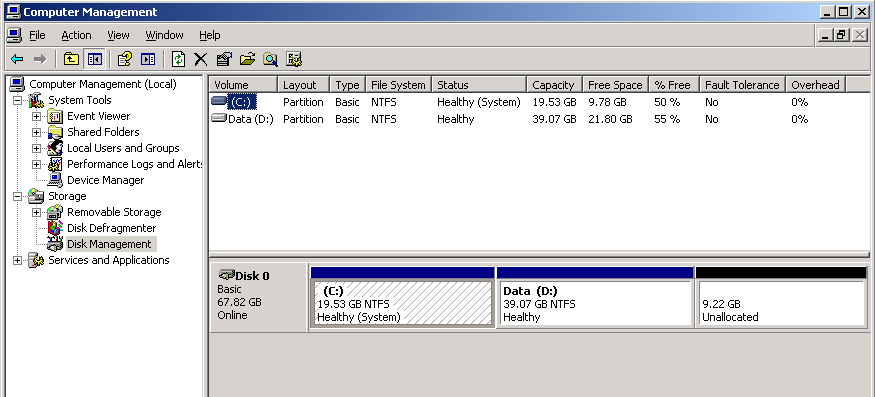
Here’s a grab of a SCSI based system which had 2x73GB SCSI disks as a single RAID disk

image14

P2V for Windows Server 2003 onto Hyper-V

Windows Server 2003 machines require Service Pack 2 to be installed before the Hyper-V Integration Services can be installed – get ready to install using the keyboard as until the IS bits are installed you have no mouse!

Removing superfluous hardware devices, drivers, and system software

You need to get familiar with removing hidden devices and how to show non-present devices by following the Microsoft KB ‘Device Manager does not display devices that are not connected to the Windows XP-based computer’ basically:

set devmgr_show_nonpresent_devices=1

start devmgmt.msc

And then show hidden devices, to allow removal of the no longer supported devices, below shows the main areas to cover from a HP ProLiant server to VM:

image8

I’m fairly confident to remove ALL hidden/greyed-out devices, especially if its a device that has been replaced by another ‘active’ / non-hidden instance of the same name e.g.

image6

Note – this is a tedious process working through all greyed-out devices – suggest using the keyboard to save time (cursor to device, delete, enter, use of home & end keys, then repeat – many times! 😉

If you delete something in error don’t worry – you can always re-scan for hardware changes or restart the machine – you’ll be doing a few restarts during the process anyway…

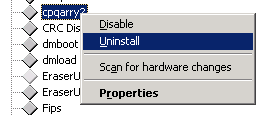
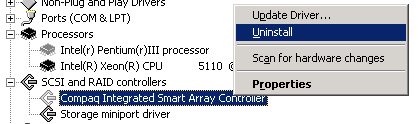
Some things should be removed that are not hidden

Some devices won’t be hidden, but if you know your hardware and device drivers fairly well you should be able to spot the obvious candidates for removal, e.g. the Compaq Smart Array Controller drivers used for managing the hardware disk array.. cpqarry2 is definitely one to go..

image12

but most will (be hidden), including related components…

image9

(I think the Pentium III chip can go in this case! Winking smile)

Note – some of these may prompt for a restart, I normally bank several restarts together, but some system software to be removed may require a restart to uninstall cleanly..

System software uninstallation and many restarts

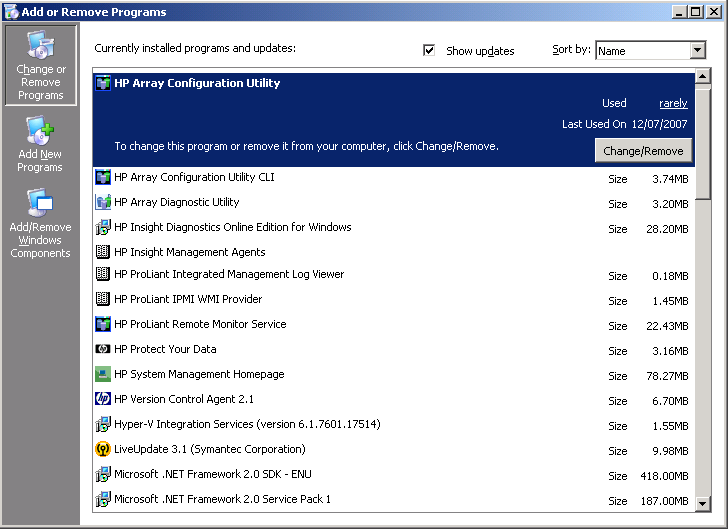
Most server systems may also have significant software components to uninstall, in this case several HP components that talk to proprietary HP systems management components that will no longer be present in the virtualised machine.

image3


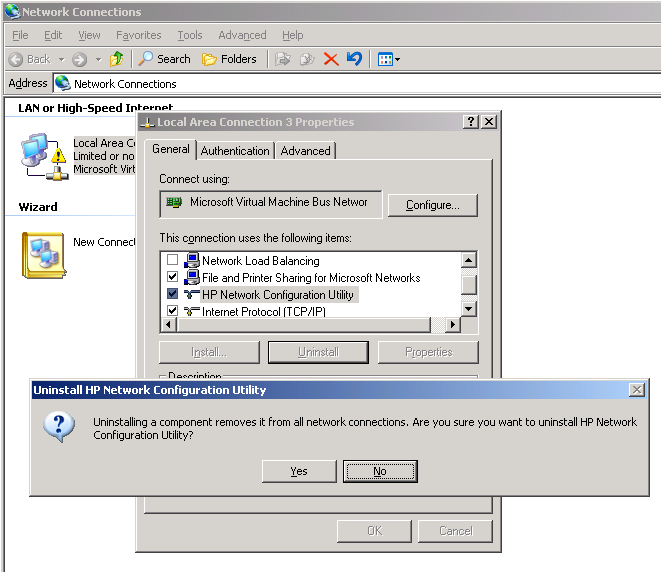
HP Network Teaming Utility – where is that software?

The HP Network Teaming Utility – easily spotted on most HP Windows server systems by the image10  logo in the system-tray, however the software is not that easily found as doesn’t appear in Add/Remove Programs nor is removed from Device Manager.

Open network connections (ncpa.cpl) and select the ‘HP Network Configuration Utility’ then select Uninstall – you should be prompted to uninstall per:

image15

You’ll be prompted for a restart, and by now the system probably deserves one!


Recreate your Network connections

Its time to dig out that systeminfo report, as that’s going to have a concise listing of the source server’s network settings in terms of IP addresses, etc. – if you’re converting from large-frame/iSCSI with VLANs etc. then that scenario is slightly beyond the scope of this post – sorry, but some things have to be billable!

Errors on start-up?

You are bound to get some start-up errors at the end of the process, although hopefully these should be insignificant such as a w32tm service unable to update from NTP or a domain controller due to network changes (e.g. still testing on a private network).  You may also have dependency components that still require removal such as a System Management Controller via the Service Control Manager (typical event id 7000 stuff).

Fire up the Event Viewer (eventvwr) regardless and have a trawl through the event logs, even if you didn’t get a error starting service alert on start-up you may find issues that require further investigation – effort here will be worthwhile for a stable and error free machine.

At the end of the process…

When you’re finished, sit back crack open a can (if you won’t get caught with food and drink in the data center) and have a think what nice new tin you’ll replace all those gaps in the rack with… mine would be Stella… Winking smile  Better still, for you, the company and the planet, return a few racks to the data center manager / co-lo provider, and ask for a bonus from all the carbon you’ve saved Smile


Stoarge Spaces – Storage Pool Is Read Only

With Storage Spaces, if you want to re-use a drive in a new PC the drive will recall the last Pool it was a member of. When you try to erase the disk the following error is shown:

Error deleting virtual disk: The storage pool could not complete the operation because its configuration is read-only.

Get the name of the Storage Pool, also known as the friendly name – for example ‘Pool 1’. Then run in PowerShell:

Get-StoragePool –FriendlyName “Pool 1” | Set-StoragePool –IsReadOnly $false

Then you can delete the storage pool:

Get-StoragePool –FriendlyName “Pool 1” | Remove-StoragePool

The Disk can now be used as a normal drive.

URL HyperLink opens with VMWare Tools instead of Web Browser

Had a strange issue where clients to a RDS Host server were not able to open hyperlinks from Outlook or Word documents.  When clicking a hyperlink Windows would attempt to open it with VMWare Tools instead of the web browser despite what setting was present in default programs.

It turns out that when VMTools is installed to a VMWare Virtual Machine it will create a URL Association that hijacks the default URL handler.  The fix is as follows:

Open regedit on the affected virtual machine.

Navigate to

HKLM\SOFTWARE\VMware, Inc.\VMwareHostOpen\Capabilities\UrlAssociation

Remove the entries there.

Exchange 2013 Move Transport Database

When designing an Exchange 2013 environment I always recommend using an additional disk to store the Transport Database and accompanying transaction log files to a separate disk. When things with SMTP get out-of-control and the Queue database grows too much your boot- and system disk do not fill up.

The Exchange Transport Configuration is stored in a CONFIG file called EdgeTransport.exe.config which is stored in the C:\Program Files\Microsoft\Exchange Server\V15\Bin directory.

When you open this file with Notepad and scroll down you’ll find something like:

<add key=”QueueDatabasePath” value=”C:\Program Files\Microsoft\Exchange Server\V15\TransportRoles\data\Queue” />

<add key=”QueueDatabaseLoggingPath” value=”C:\Program Files\Microsoft\Exchange Server\V15\TransportRoles\data\Queue” />

<add key=”IPFilterDatabasePath” value=”C:\Program Files\Microsoft\Exchange Server\V15\TransportRoles\data\IpFilter” />

<add key=”IPFilterDatabaseLoggingPath” value=”C:\Program Files\Microsoft\Exchange Server\V15\TransportRoles\data\IpFilter” />

<add key=”TemporaryStoragePath” value=”C:\Program Files\Microsoft\Exchange Server\V15\TransportRoles\data\Temp” />

This is shown in the following Figure:

image211

These are the location where you will find the Transport Queue database and the IpFilter database files and their corresponding transaction log files.

You can changes these directories to for example D:\TransportRoles\data\… and after you restart the Transport service the new location is used. The problem is that the ‘old’ Queue database is not moved. When the Transport service is restarted a new Queue database is created in the new location. If you have any (SMTP) mail in the old queue this gets lost.

Microsoft has created a scripts called Move-TransportDatabase.ps1 (located in the $ExScripts directory) which changes the location, moves the Queue Database and restarts the Transport service automatically. The Move-TransportDatabase.ps1 script takes the following parameters:

  • queueDatabasePath
  • queueDatabaseLoggingPath
  • iPFilterDatabasePath
  • iPFilterDatabaseLoggingPath
  • temporaryStoragePath

Resulting in a command like this:

.\Move-TransportDatabase.ps1 -queueDatabasePath ‘D:\TransportRoles\data\Queue’ -queueDatabaseLoggingPath ‘D:\TransportRoles\data\Queue’ -iPFilterDatabasePath ‘D:\TransportRoles\data\IpFilter’ -iPFilterDatabaseLoggingPath ‘D:\TransportRoles\data\IpFilter’ -temporaryStoragePath ‘D:\TransportRoles\data\Temp’

Note: take care about the ‘ character in the different values!

When you run this command you’ll see some requirement information, creation of the new directories, moving the databases and restarting the Transport service as shown in the following Figure:

image212

When you use the Move-TransportDatabase.ps1 script no mail gets lost and the original database is stored on the new location.

The trust relationship between this workstation and the primary domain failed

If you Google “the trust relationship between this workstation and the primary domain failed”, you get plenty of information from support blogs and Microsoft articles; however, most of them ask you to rejoin your machine to the domain. That’s not always possible.

TL;DR

You got this error and you can’t simply unjoin and rejoin because the machine is a Certificate Authority. Run this command from PowerShell:

Reset-ComputerMachinePassword [-Credential ] [-Server ]

What’s the problem and how did I get here?

The underlying problem when you see this error is that the machine you are trying to access can no longer communicate securely with the Active Directory domain to which it is joined. The machine’s private secret is not set to the same value store in the domain controller. You can think of this secret as a password but really it’s some bits of cryptographic data called a Kerberos keytab stored in the local security authority. When you try to access this machine using a domain account, it fails to verify the Kerberos ticket you receive from Active Directory against the private secret that it stores locally. I think you can also come across this error if for some reason the system time on the machine is out of sync with the system time on the domain controller. This solution also fixes that problem.

The standard fix

This problem can be caused by various circumstances, but I most commonly run into it when I reset a virtual machine to a system snapshot that I made months or even years before. When the machine is reset, it is missing all of the automatic password changes that it executed against the domain controller during the intervening months. The password changes are required to maintain the security integrity of the domain.

Support blogs and Microsoft will generally tell you to rejoin the domain to restore the trust relationship. Another option they will give is to delete the computer object and recreate it without a password and rejoin.

Microsoft support article on the topic: http://support.microsoft.com/kb/162797

I’m not a fan of any of these options. This seems heavy handed and sometimes they aren’t even possible.

Recently, when I ran into this problem, the virtual machine that reset was an enterprise certificate authority joined to my test domain. Well, guess what, Microsoft will not allow you to rename or unjoin a computer that is a certificate authority—the button in the computer property page is greyed out. There may be another way to unjoin but I wasn’t going to waste time on it when it isn’t even necessary.

UPDATE: An even better fix (IMO)

Just change your computer password using the Reset-ComputerMachinePassword cmdlet from Powershell v3!

Reset-ComputerMachinePassword [-Credential <PSCredential>] [-Server <String>]

I haven’t looked at this problem for a while, but it seems to come up very often and there has been a lot of positive response. I wanted to point out an improvement (a more up-to-date method) that came from Lord_Arokh. Powershell v3 shipped with a cmdlet for resetting computer passwords. For those with Powershell skills, this is a much better option. Powershell v3 ships with the latest version of Windows and can be downloaded from Microsoft:

http://www.microsoft.com/en-us/download/details.aspx?id=34595

I noticed that on my Windows 8 install, I only received partial help when I issued the Get-Help Reset-ComputerMachinePassword command. You can fix this by opening Powershell with administrative rights and running Update-Help.

You can use the Get-Credential cmdlet for a secure way to generate a PSCredential, which can be stored in a variable and used in a script. You will want to generate a credential for an Active Directory user with sufficient rights to change the computer’s password. The Server parameter is the domain controller to use when setting the machine account password.

Good Luck! Thanks for the update Lord_Arokh.

A better fix

Just change your computer password using netdom.exe!

netdom.exe resetpwd /s:<server> /ud:<user> /pd:*

<server> = a domain controller in the joined domain

<user> = DOMAIN\User format with rights to change the computer password

Here are the full steps:

  1. You need to be able to get onto the machine. I normally just log in with the local Administrator account by typing, “.\Administrator” in the logon window. I hope you remember the password. If you’re creative and resourceful you can hack your way in without the password. Another option is to unplug the machine from the network and log in with domain user. You will be able to do disconnected authentication, but in the case of a reset machine, remember that you may have to use an old password. Your domain user’s cached credential has the same problem as the machine’s private secret.
  2. You need to make sure you have netdom.exe. Where you get netdom.exe depends on what version of Windows you’re running. Windows Server 2008 and Windows Server 2008 R2 ship with netdom.exe you just have to enable the Active Directory Domain Services role. On Windows Vista and Windows 7 you can get it from the Remote Server Administration Tools (RSAT). Google can help you get them. For other platforms see this link: http://technet.microsoft.com/en-us/library/ee649281(WS.10).aspx
  3. Extra steps if the machine is a domain controller. If the broken machine is a domain controller it is a little bit more complicated, but still possible to fix the problem. I haven’t done this for a while, but I think this works:
    1. Turn off the Kerberos Key Distribution Center service. You can do this in the Services MMC snap-in. Set the startup type to Manual. Reboot.
    2. Remove the Kerberos ticket cache. A reboot will do this for you, or you can remove them using KerbTray.exe. You can get that tool here:http://www.microsoft.com/download/en/details.aspx?displaylang=en&id=17657
    3. Post change steps. Do these in conjunction with 5 below:
      • Turn the Kerberos Key Distribution Center Service back on before rebooting.
      • You should reboot the domain controller and then force replication in the Active Directory Sites and Services MMC snap-in.
  4. Run netdom.exe to change the password. Open an administrative command prompt. On Windows platforms with UAC enabled, you will need to right-click on cmd.exe and select “run as Administrator”. Type the following command: netdom.exe resetpwd /s:<server> /ud:<user> /pd:*
  5. Reboot the machine.

Here is more information on netdom.exe: http://support.microsoft.com/kb/325850

I hope this is helpful. This problem comes up every few months for me, so I wanted to document it for my own use. It is difficult to find when you just search for the error you get in the login window.

Windows Server 2012: Deactivating UAC

Deactivating UAC in Windows 2008 R2 was possible via running msconfig (for example winkey+r -> msconfig), going to the Tools tab and launching “Change UAC settings”. There, you select “Never notify” to disable UAC. The same approach is still available in Windows Server 2012, though UAC is still active after you selected “Never notify”. You have the option to turn off UAC via registry by changing the DWORD “EnableLUA” from 1 to 0 in “HKEY_LOCAL_MACHINE\SOFTWARE\Microsoft\Windows\CurrentVersion\policies\system”. You will get a notification that a reboot is required. After the reboot, UAC is disabled.

3187.UACdialog

8228.uacregedit