Author Archives: geoff

Importing a PST into an Exchange 2013 mailbox

Importing an PST should be fairly simple but for those that don’t eat drink and sleep Exchange may forget that you have to grant permission to certain roles, even for a domain admin account.  This is a brand new server with 2008 R2 and Exchange 2013 installed so I hadn’t run it yet:
New-ManagementRoleAssignment –Role “Mailbox Import Export” –User “domainuser”
Replace domainuser with your domain and user account, that should finish up nicely and now you can…wait I still can’t run the command?  Permissions are loaded when the shell starts so you now have to exit the PowerShell window and re-lauch.  Now you can run the New-MailboxImportRequest commandcommand

Now, when you run the command you will see that it is “Queued”

queue

To see the status of the import run Get-MailboxImportRequestStatistics -Identity MailboxMailboxImportName where ‘mailbox’ is the user account from the image above and ‘MailboxImportName’ is the name above.  So for example my command looked like

status


Recover BitLocker keys from AD Recycle Bin

Problem

 You have AD with Recycle Bin enabled.

You are storing BitLocker recovery keys in AD

You have deleted a computer object with BitLocker Recovery information on it

You then restored that computer account from recycle bin.

No BitLocker Recovery information exists on the recovered computer object !!!!! What the heck ?!

Reason

Going back to basics…. do you know where the BitLocker information is stored for a computer object ? They are stored as a child object below the computer object itself.

bitlocker_recovery_1

Now, when the computer get deleted from Active Directory and moved to the AD recycle bin, the links between the child objects and the parent are broken. In the AD recycle bin you will see both computer objects and child objects randomly stored there. If you put your hand in this recycle bin and pull a computer object, you will not see any of its child objects attached to it any more. This is exactly what happened when you restored the AD computer from recycle bin, you will get the computer object without its child objects.

bitlocker_recovery_2

Solution

Lucky for all of us, each child objects of type (BitLocker Recovery Information) will have an attribute called (lastKnownParent). So theoretically if you go to the recycle bin and asked ” i have a parent called ComputerX, so which of you guys are the sons of this computer (which of you has the lastknownParent = ComputerX).

Download Script

Go to your Domain Controller or any machine with ActiveDirectory PowerShell Module, open PowerShell using a domain administrator account (only domain admin can restore from AD recycle bin), run the script from there. Make sure AD PowerShell module exist on that machine.

Do not forget that you may need to run Set-ExecutionPolicy Unrestricted on PowerShell to allow script execution.

I have no single credit writing this script. You can find the script here written by (Norman Bauer). I have also copied the script to my repository so you can download it directly .

Download the script  BitLockerInfo_From_RecycleBin

How does the script work

  • It will ask you about the name of computer to restore
  • Validation check : checking if that computer exists in AD first
  • If not, then the computer may be in recycle bin, search there and report if it is not there also ($deleted = Get-ADObject -IncludeDeletedObjects -Filter {sAMAccountName -eq $computername -and Deleted -eq $True}
  • If the computer in recycle bin, we will going to restore it ($deleted | Restore-ADObject)
  • Then we will search the recycle bin for child objects that have LastKnownParent equals the DistinguishedName for the restored computer ($recoveryinfos = Get-ADObject -IncludeDeletedObjects -Filter {lastKnownParent -eq $restoredobject.DistinguishedName -and Deleted -eq $True -and objectClass -eq ‘msFVE-RecoveryInformation’})
  • If found, for each child object ForEach($recoveryinfo in $recoveryinfos) we are going to  $recoveryinfo | Restore-ADObject

BitLocker Killer Mistakes

Assumptions

You have BitLocker deployment where you backup your BitLocker recovery key to Active Directory.

The wrong thing

When you format a computer, you go to AD, delete the computer account, and create a new one, then you join the formatted machine to domain! Killer mistake indeed!!!

The right thing

When you format a computer, you go to AD, (RESET THE COMPUTER ACCOUNT) , and then join the formatted machine to machine!

What can go wrong if I delete computer account

When you enable BitLocker on a computer drive, the machine will write BitLocker Recovery information on the computer account in AD. So if you delete a computer account, you will delete all BitLocker recovery information. Instead resetting computer account will not.

Common Mistake Scenario

A computer with C and D drive with BitLocker enabled on both of them. You backed up everything in the C drive and since the C drive is big enough, you decided to keep the D and only format the C drive.

You start installing Windows 8 for example on the C drive, you deleted the computer account from AD, and then you created a new one. Then you join the machine to domain, and enable BitLocker on the C drive.

Now you noticed the D drive is encrypted. You went to AD to find a recovery information for that drive. BOOOOM!!! no recovery information since you deleted the computer account and created a new one. Good luck with that.

Remember to always reset computer accounts instead of the old habit of deleting them

Shaking BitLocker – Issues and fixes

I have come across many scenarios where people have their BitLocker Information in AD, and then different funny situation happened along the way that I want to talk about in this blog post.

Problems

Case 1 : What will happen if you rejoin a BitLocker protected computer to the domain

Case 2 : Renaming a computer which has BitLocker

Case 3 : Computer was used by user1, user1 resigned, so you reset his computer account in AD, reformatted the machine, join it to domain and re-enabled BitLocker on it

Case 4 : deleting computer which has BitLocker from AD

Case 5 : Enabling BitLocker before joining the machine to the domain

Case 6 : divergence happened, you have a domain joined machine with BitLocker enabled, and in AD you do not have recovery information for that computer.

Solutions

Case 1,2

if you rename a computer which has BitLocker already turned ON, or If you re-join a BitLocker Encrypted machine, to the domain , nothing will happen to the BitLocker recovery information in Active Directory. You can still see them. (Reference)

Case 3 :

Since the computer object was reset, and not deleted (recommended way), then you will see accumulative BitLocker information under the computer object for the volume encryption keys when the machine was owned by user1, and the volume recovery keys after the format. Nothing bad about this from my point of view.

To know more about why you should always reset computer accounts instead of deleting them, check this post (BitLocker Killer Mistakes)

Case 4 :

If you delete computer object that has BitLocker information on it, then both the computer object and the BitLocker recovery information are moved to the AD recycle Bin if you enable AD recycle bin. Nevertheless, the links between the computer object and the child objects are broken (check this post to know why and how to restore both)

Case 5 , 6 :

Enabling BitLocker before joining the machine to the domain, means that the BitLocker recovery keys for that machine are not stored in Active Directory and this is very dangerous and risky.

This also can happen if BitLocker was enabled and there was no network connectivity to the domain at that moment. Another possibility is that group policy settings to save recovery information to AD was not enabled at the time of encryption.

To ask your machine to backup its recovery keys to Active Directory , do the following steps for each encrypted volume on the machine :

  • Go to that machine, open CMD using elevated admin rights

Type :   manage-bde -protectors -get c:

This command will show you the BitLocker Protectors for the C drive.

  • Search for the Numerical Password item, and copy the ID value. In the below screen shot, the ID value is {21E15846-E03B-4D01-9B98-58A662586947}. This represents the ID of the value that we want to backup to AD. The value it self exist in the Password field. I have hide that field from the screenshot for privacy reasons. Anyway, we only need the ID value.

bitlocker_recovery_keys

  • Now run this command:

manage-bde -protectors -adbackup c: -id {21E15846-E03B-4D01-9B98-58A662586947}

  • Repeat this for all BitLocker drives.
  • To verify that the BitLocker information are now backed up under the computer object in AD, download the (BitLocker Recovery Password Viewer)

How to Install WinPCap for Wireshark on Windows 8

Problem

WinPCap 4.1.3 is required by Wireshark, but is difficult to fully install on Windows 8 or 8.1.  Installation may give an error that it cannot be installed on this version of Windows (or may install without error but not actually work).  This message is misleading and inaccurate.  WinPCap can be installed on Windows 8.

The error message is a common Windows message and the common resolution is to change the application compatibility mode to Windows 7 or Windows XP SP3.  Another common resolution is to use Run As to run the installer as Administrator.  Unfortunately, this neither of these are sufficient to install WinPCap.  Both of these are required, but you will often find that you still can’t install WinPCap.  The real problem is a change to Windows 8 that makes driver installations more restrictive.

Resolution

To install WinPCap on Windows 8 you MUST be logged into Windows as a local machine administrator.  Using Run As is not good enough to install drivers. Since some people (especially early adopters of Windows 8) run their system as a local administrator, the original instructions accidentally work for them.

Don’t forget that you ALSO need the compatibility mode set to Windows XP SP3.

We have found that this resolution applies to all installations that install drivers, in particular the Android ADB driver.  When doing any driver installation, actually login as an Administrator on the Windows 8 machine.

Now you can use Wireshark on Windows 8 and Windows Server 2012.

Access SkyDrive on Windows 8.1 using local accounts

Microsoft integrated its SkyDrive file synchronization and hosting service into the Window 8.1 operating system in a way that it is enabled automatically for users signing in to the system with a Microsoft Account.

Local account users on the other hand — those users who prefer to not use a Microsoft Account — cannot use the implementation and are also not allowed to make use of the official SkyDrive application as it simply won’t install on Windows 8.1.So what options do those users have if they want to access files on SkyDrive, provided that this is their file syncing service of choice?

They can access the data in the web browser, but that is everything but comfortable. While it may be okay for accessing the occasional file, adding, editing or removing files is everything but.

There is however a way to set up SkyDrive on Windows 8.1 if you use a local account, or if you have disabled the integrated version while using a Microsoft Account.

SkyDrive in Windows 8.1

To enable access to SkyDrive on Windows 8.1, and other Windows operating systems for that matter, do the following:

  • Load the official SkyDrive website in your web browser and sign in to the service if you have not done so already.
  • Right-click on Files in the left sidebar and select Copy Link from the context menu.
  • Paste the link into a text document or into the browser’s address bar, and copy the cid number at the end of the link, e.g. https://skydrive.live.com/#cid=xxxxxxxxxxxxxxxxwhere xxx is the cid
  • Open File Explorer in Windows 8.1.
  • Select This PC from the left sidebar.
  • Select Map Network Drive from the ribbon UI.
  • Type https://d.docs.live.net/xxxxxxxxxxxxxx as the folder and replace the xxx line with the cid that you copied before.
  • Select a drive letter for SkyDrive.

skydrive-local-account

  • Click on Finish and wait some time. The message “attempting to connect to” appears. It takes some time, but you will eventually be asked to enter your SkyDrive username and password.

skydrive-sign-in

  • Type the data in and wait again. If you do not want to enter the data in every session, check the “remember my credentials” box.
  • Note: If you use two-factor authentication, you need to type in an app password here that you can create under Security Info on your Microsoft Account page on the Internet.
  • If everything goes alright, you should now see the new SkyDrive folder under This PC in File Explorer.

When you click on it, all of your folders and files become available on Windows 8.1.  This works on other Windows operating systems as well. (via Flgoo)

Closing Words

While you do get access to files hosted on SkyDrive directly in the operating system, you cannot make use of other features that Microsoft implemented on Windows 8.1. This includes the syncing of personalization data for example.

Still, if you use a local account on Windows 8.1, this is one of the best options to integrate SkyDrive on the system.

Change PC name remotely on a Domain

You will need to install the AD Toolkit or any of the MS Suites that include the NETDOM tool or run from a domain controller.

In our domain we have some machines named by user etc (I didn’t set it up that way, but they like it and it helps “personalise” their work experience.) If a staff changed occurred, the old techs would have to set up the new PC in AD with appropriate permissions, take the old PC off the domain, reboot, rename the pc, reboot, add the pc to the domain, and reboot again.

This tool makes renaming a PC in a domain a one-step process. It changes the name on the PC and in AD, then reboots the machine in 10 (or however many) seconds. No need to open the AD console, physically touch, or remote in to the old PC. The EU is warned with a popup and countdown to reboot.

This name change can be achieved by running the following from a command prompt:

netdom renamecomputer OLDPCNAME /newname:NEWPCNAME /userd:domain\adminaccount /passwordd:password /reboot:10

Note the double ‘d’ for the password parameter, it is needed.


More Info here:


Completely Uninstall All Modern Apps From Windows 8 and 8.1

Windows 8 is basically focused on Modern (Metro) Apps and comes with some pre-installed Modern Apps in order to make the users get started with Windows 8. However, there are some folks, who may not have use for Modern Apps and may want to uninstall them. While one can uninstall Windows 8 apps, there is no easy way to completely remove them from your disk.

In this article, I’ll share the way to completely remove all the Modern apps from Windows 8, 8.1 and 8.1 update 1.

Please note that, when you uninstall a Modern App from usual options, the app is removed temporarily and goes to a staged condition discussed later in this article. Thus, when you create a new user account on Windows 8, it will again have all the pre-installed apps, since Modern Apps are not removed completely from the system.

To completely remove and erase all default pre-installed apps, you must be signed in as Administrator of you Windows Account – and you need to remove it in two places:

  1. Remove the provisioned package
  2. Remove the “installed” package from the administrator account.

Completely Uninstall & Erase All Pre-Installed Modern Apps

1. Firstly, press Windows Key + Q, and in the search box, type powershell. From results, pick the Windows PowerShell. Right click on it, select Run as administrator from bottom options.

Remove-Mordern-Apps-Windows-8

2. In the Windows PowerShell window, type following command to enlist all the apps pre-installed on your Windows 8.

Get-AppxPackage -AllUsers

Remove-Mordern-Apps-Windows-8-1

Command to remove all the Modern Apps from your system account

3. Run the following command to remove all Modern Apps:

Get-AppXProvisionedPackage -online | Remove-AppxProvisionedPackage -online

That’s it! Now whenever you create a new user account on your Windows 8, there will no be no pre-installed Modern apps on that account as well.

Whenever we uninstall a Modern App, its status in PowerShell window is displayed as Staged. That means, the app still lies in Windows. In other words, the application is prepared to get automatic installation when a new user account is created.

Remove-Mordern-Apps-Windows-8-3

4. If you’d like to remove all Modern Apps for the current account only, use following command:

Get-AppXPackage | Remove-AppxPackage

5. In case you want to remove all Modern Apps for a specific user then add the -User part in above command, so it is:

Get-AppXPackage -User | Remove-AppxPackage

6. Finally, let us know the command to remove all Modern Apps from all the account on your Windows 8:

Get-AppxPackage -AllUsers | Remove-AppxPackage

That’s it! The apps will now be completely uninstalled and erased from your system!

iSCSI Storage in Windows Server 2012

Storage is one of the most important aspects of our IT infrastructure.  In this day and age of virtualization it is even more important because our entire server infrastructure may be stored on a limited set of devices.

Of course that is a lot easier said than done, especially for smaller companies with limited IT budgets.  Even the simplest SAN devices can be expensive, and the temptation to save our virtual machines on direct attached storage often wins over the ability to live-migrate virtual
machines between hosts.

In April, 2011 Microsoft released the iSCSI Software Target 3.3 as a free (and supported) download, and suddenly iSCSI SANs were available to the masses.

While Hyper-V has made virtualization available to the masses, I feel the iSCSI Software Target has been one of the tools that has best enabled me to teach true datacentre virtualization to the masses, because after all without Live Migration and Failover Clustering virtualization is really limited to the capacity of a single box.

In Windows Server 2012 Microsoft has taken us one step further: The ISCSI Software Target is actually included in the box.  Enabling and creating a target is as simple as following the steps in this article.

Environment

As with most of my articles, the screen captures will be from servers in my production environment.  As with any technology, if you are going to play with this one I strongly suggest you do it in a lab environment before bringing it into your production network.

Target Server:

I have created a virtual machine called SWMITarget on one of my virtualization hosts.  The resource requirements are pretty simple… as it is not performing any other function, it seldom needs more than 512 MB of RAM; using dynamic memory I give it that as a minimum, but allow it up to 2048 (2GB) for a maximum… in case it really needs it.  I should mention that in a production environment I would never recommend virtualizing your SAN… try to pick up an inexpensive server with a bunch of good drives in it.

While I do not recommend this in most companies, For this environment I am using the same network as my production environment.  In a production environment I would recommend a separate network for the SAN environment for two reasons: security and bandwidth.  As my network is a closed loop with 10GigE switches neither is an issue.

The storage for the target is separated into two: a 40GB system disk attached to an IDE Controller for the Windows Partition, and a 150GB disk attached to a SCSI controller for the LUN (Logical Unit Number).  In reality I will have a Storage Pool of three 150GB disks for my production environment.  To learn about Storage Pools read my recent article Storage Pools

Host Servers:

Because the iSCSI security model will only expose its LUNs to a server (Initiator) that is pre-specified, you should know the IP Addresses of the servers that will be connecting to the shared storage before building the iSCSI Target.  I will be connecting two hosts to this target, and have checked their addresses: 192.168.0.9 and 192.168.0.10.  This could also be done by DNS Name or IQN (iSCSI Qualified Name), but IP is the easiest.

Preparing the Target Server:
3302.image_52E9D256Although the iSCSI Software Target is included in the box, it is not installed by default.  It is a Role that has to be enabled:

  1. From the Server Manager click Manage, and select Add Roles and Features.  This will launch the Add Roles and Features Wizard.
  2. On the Before you begin page read the instructions and click Next>
  3. On the Select installation type screen ensure that the Role-based or feature-based installation radio is selected and click Next>
  4. On the Select destination server screen ensure that the Select a server from the server pool radio is selected, and under Server Pool select the server onto which you want to install the role, then clickNext>
  5. On the Select server roles screen under Roles expand File and iSCSI Services, select File Server and iSCSI Target Software, then click Next>
  6. On the Select features screen click Next>
  7. On the Confirm installation selections page review the options and click Install.  Optionally, you could also select the Restart the destination server automatically if required box, but if you are only installing these roles then a reboot should not be necessary.

Now that the role is installed, you should now see the iSCSI option under the File and Storage Services tab.

Creating the iSCSI LUN

Before you actually create the iSCSI Target you first have to create the iSCSI virtual disk, and from within the New iSCSI Virtual Disk Wizard you will create the target.

NOTE: If you will be using this target for a Failover Cluster you may want to create a second virtual disk that is 1GB and add it to the same iSCSI Target.  This disk will be used as the disk witness (or Quorum Disk).

  • From the Server Manager console navigate to the File and Storage Services tab.
  • In File and Storage Services click on iSCSI in the navigation pane.
  • In the details pane under iSCSI VIRTUAL DISKS click To create an iSCSI virtual disk, start the New iSCSI Virtual Disk Wizard.
  • In the New iSCSI Virtual Disk Wizard ensure that your server is selected under Server, and the disk where you want to store
    the Target disk is selected under Select by volume.  Click Next>
  • 3806.image_17B5F68B
  • In the Specify iSCSI virtual disk name screen type a name for the disk and click Next>
  • In the Specify iSCSI virtual disk size screen enter the size for the target disk and click Next>
  • In the Assign iSCSI target screen ensure the New iSCSI target radio is selected and click Next>
  • In the Specify target name screen type a name for your target.  Remember that this target name will be integrated into the IQN which is replete with dashes… I strongly recommend avoiding them here!
  • In the Specify access servers screen click Add... to open the Add initiator ID window.
    • Ensure the Enter a value for the selected type radio is selected.
    • In the Type: dropdown select IP Address
    • In the Value box type the IP Address of the first host that you want to connect, then click OK.

    NOTE: You will have to run this process separately for each server that you plan to add.

  • In the Specify access servers screen click Add... to open the Add initiator ID window.
    • Ensure the Enter a value for the selected type radio is selected.
    • In the Type: dropdown select IP Address
    • In the Value box type the IP Address of the first host that you want to connect, then click OK.
  • Before going forward make sure that all of the hosts that you want to access this target are listed in the Specify access servers list, then click Next>3302.image_16715DAC
  • In the Enable Authentication screen click Next>.  While CHAP and reverse CHAP are options, I will not go into them here.  Because iSCSI is an open protocol, CHAP (Control Handshake Authentication Protocol) is the only authentication method available for iSCSI SANs, and it has not changed or advanced in over a dozen years.  As such it is not considered very secure.
  • In the Confirm selections screen ensure that your selections are correct, and click Create.Once the wizard is complete you should see a results screen like this.  You can close it… your target is done!5468.image_152CC4CD
  • Accessing the Target:The iSCSI loop consists of two distinct parts – the Target, which is the device being accessed, and theInitiator, which is the server (or client) accessing it.  Every Microsoft OS that you might use in a business has the iSCSI Initiator software included… it is simply a matter of enabling it, and \once it is enabled it will start automatically every time your system reboots.

    NOTE: The following steps must be performed on each server that will be connecting to the iSCSI Target.

    To enable the iSCSI Initiator, simply search for iSCSI Initiator and run it.  You will get a dialog box that says:

    The Microsoft iSCSI service is not running. The service is required to be started for iSCSI to function correctly. To start the service now and have the service start automatically each time the computer restarts, click the Yes button.

    Click the Yes button.  The iSCSI Initiator Properties box will come up.  To connect to your target:

  • In the Target box (in the Targets tab) enter the IP address of your Target Server, and click Quick Connect…2728.image_019F652CIf your initiator connects successfully to the target it should take only a second or two for the Quick Connectwindow to appear with the successful acknowledgement (see screen capture).  If it takes longer than more likely than not something went wrong.  Make sure that the IP address of the Target is right, and if it is then go back into the Target and confirm that you correctly entered the IP address of the Initiators.
  • Click Done
  • In the iSCSI Initiator Properties box navigate to the Volumes and Devices tab and click Auto Configure.  You should get entries for your LUNs that look like this:1346.image_2413F3E7There will be one entry for each disk that you connected to the iSCSI Target.
  • Click OK.NOTE: The following steps must be performed on only one server that will be connecting to the iSCSI Target.
    • Open the Disk Management console (right-click in the bottom left corner of the screen and click Disk Management).
    • There should be disks that are offline and unallocated – if you created two then there will be two, and so forth.  Right-click on the disks and bring them both on-line.
    • Right-click on one of the disks and select Initialize Disk.  All of the uninitialized disks should appear.  Ensure they are all selected and click OK.
    • Right-click on each disk and create a simple volume, and format them.

    If you were to return to the iSCSI Initiator Properties now, select the Volumes and Devices tab and click Auto Configure again, you would get entries that look like this:

    3480.image_499D7148

    However this step is unnecessary.

    You’re Done!

    Okay, you aren’t quite done, but you have created your iSCSI Target, and connected your hosts to it.  In my next article I will show you how to enable and configure Failover Clustering, how to make your existing virtual machines highly available, and how to create new Highly Available Virtual Machines.


Storage Pools feature in Windows Server 2012

Storage Pools are a new feature in Windows Server 2012 that at first glance (at the terminology) may look like  software RAID arrays that have been around for years, but are really a new concept, or at least several generations of advancement on the old concept.  They give us the ability to use disks of different sizes and bus types and create a single ‘pooled disk.’

While Storage Pools are easy to create and use, the technology under the hood is quite complex, and certainly years ahead of anything we had seen before.  Storage Pools leverage the power of virtual hard disks and ‘thin provisioning in order to deliver ‘on demand’ storage.

Let’s create a scenario in which we see the true value of Storage Pools:

Someone in your organization is working on a virtual server that will start small but will necessarily grow over time.  They request 185GB of storage for their VM.  Because of the importance of the project they request the fastest solid-state drives (SSDs) available.  You have one 64GB drive available immediately, but the part is on backorder and will take several weeks to get in.

Rather than simply installing the disk into a server and provisioning the VM onto that disk, you connect it, create a Storage Pool, and add the disk.  You then create a virtual disk on the Storage Pool, and then create a volume on that pool.  You should now have a volume of about 63GB (formatted capacity) ready to allocate to the VM.  The project proceeds.

A few weeks later you receive your new SSDs, and not a minute too soon because the VM is growing.  You install the new disks into the server, and from the Storage Pools screen in Server Manager you add the new drives to the pool, expand the virtual disk, and then extend the volume.  Within minutes you have the 200GB volume (on SSDs) that was requested.

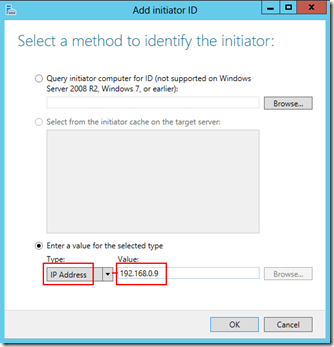
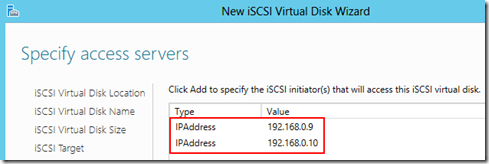
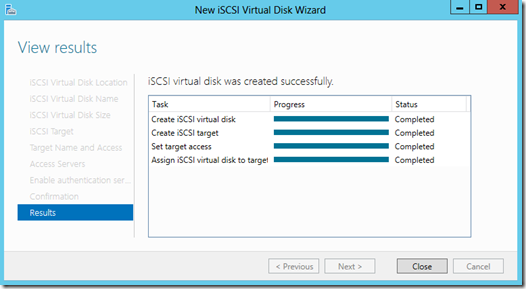
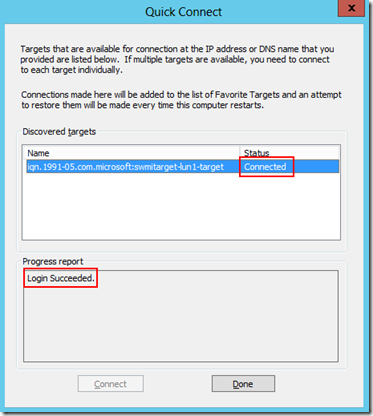
Let’s extend beyond the single server though.  You may need an iSCSI SAN, but do not have the budget for it.  Rather than make do without, you take a NAS (Network-Attached Storage) or JBOD (Just a Bunch Of Disks) appliance which are both much less expensive, and create your Storage Pool using those disks.  Then from within Windows Server 2012 you use the iSCSI Software Target to start creating LUNs on the appliance, thus creating the SAN device you couldn’t afford.

The hardware

I will preface this by saying that for servers I always strongly recommend server-grade hardware.  However sometimes we do not have the budget for the best hardware, and we have to use what is available.  Storage Spaces are supported on any type of drive you can connect to your computer, be it SATA or IDE, SCSI or SAS, iSCSI, or USB.  With that being said, if you are going to use your Storage Space for failover, only SAS and iSCSI are supported by Microsoft.  However it is even possible to create a Storage Pool of USB keys, as long as they are connected to your computer.

Creating your Storage Pool

5430.image_322666D7

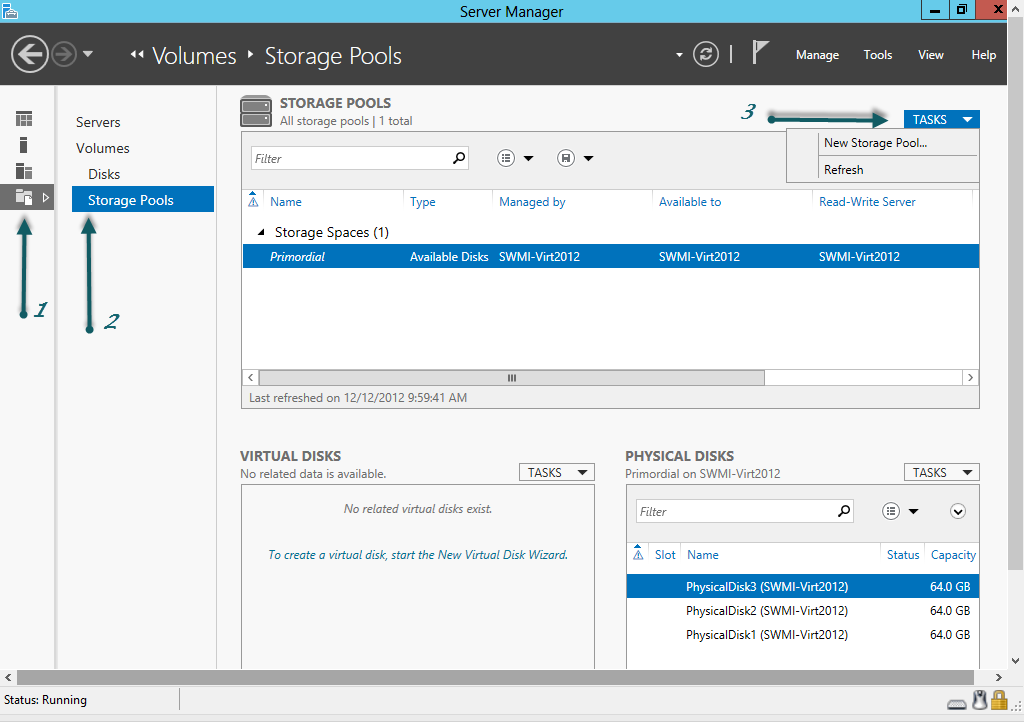
  1. From within Server Manager click on the File and Storage Services workspace.
  2. In the navigation pane select the Storage Pools context.
  3. To the top-right of the Storage Pools workspace click on the TASKS drop-down and click New Storage Pool…

1638.image_49716B48

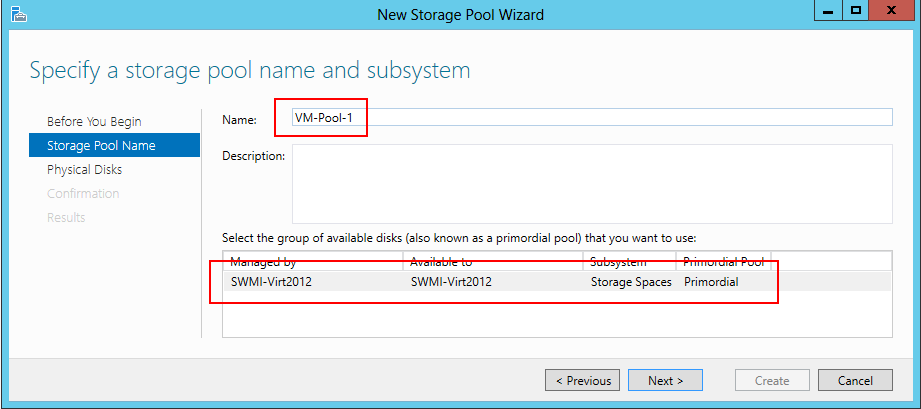
  1. In the Specify a storage pool name and subsystem window name your pool, and select the group of available disks that you will use and click Next.0243.image_0F15F567
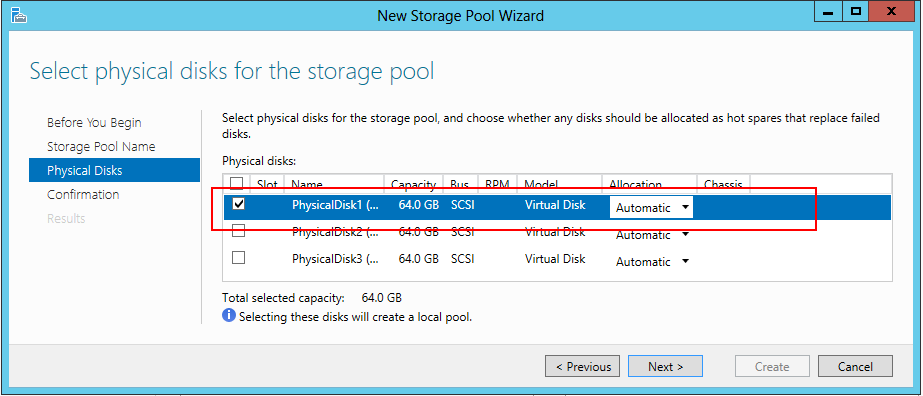
    5. Select the physical (or in this case virtual) disks that you would like to add to your pool and click Next.

4265.image_3B527C4B

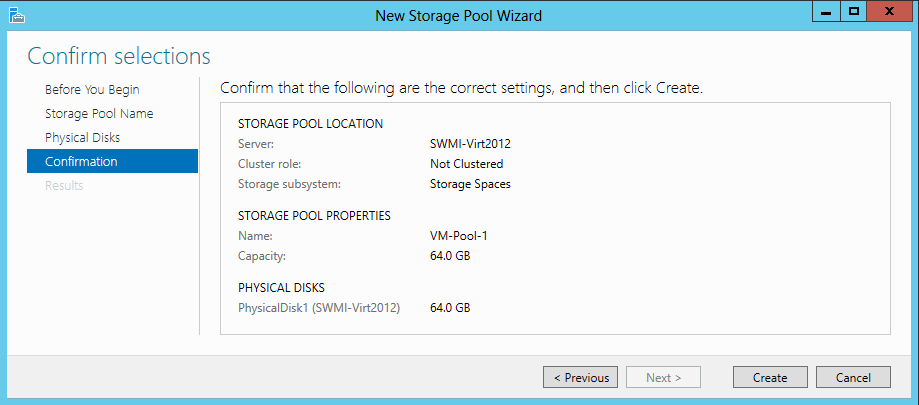
6. On the Confirm selections page click Create.

5751.image_251C60F9

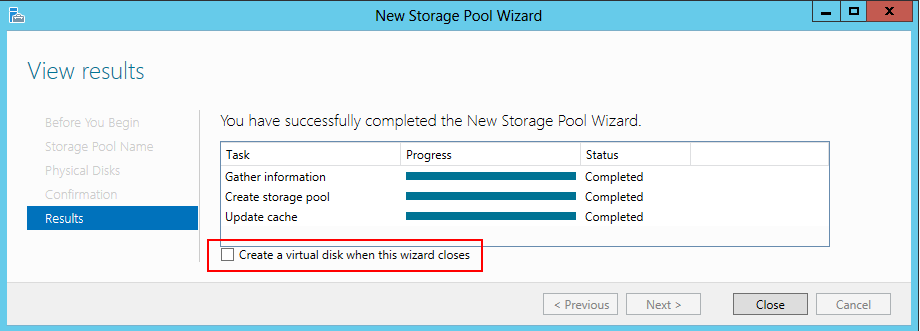
It will not take very long, and you will get a message that you have successfully created a Storage Pool.  Before you close the dialogue box, notice that near the bottom there is a checkbox asking if you want to create a virtual disk when the wizard closes.  Select this checkbox and then click Close.  The New Virtual Disk Wizard will come up automatically.

7. In the New Virtual Disk Wizard select your newly created Storage Pool onto which to create the virtual disk, and then name the disk as you would.

8. In the Select the storage layout screen you are asked to select between Simple, Mirror, or Parity.

Simple: data is striped across the disks, maximizing the capacity and increasing throughput, but without offering any redundancy thus decreasing reliability.  You are not protected from disk failures.

Mirror: data is duplicated on two (or three) disks which increases reliability, but reduces capacity.  A mirror requires at least two disks to protect from a single failure, and five disks to protect from two simultaneous disk failures.

Parity: data and parity information are striped across the disks, increasing reliability but reducing capacity.  It requires at least three disks, and cannot be used in a failover cluster.

9. In the Specify provisioning type screen you can choose either thin-provisioned (your virtual disk starts small and grows as needed) or fixed-provisioned (your virtual disk is created as the fully provisioned file).

4375.image_58E4574A

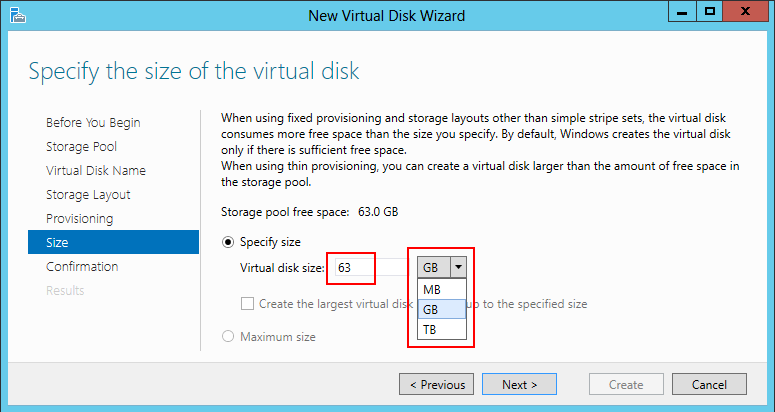
10. In the Specify the size of the virtual disk page enter the size of disk, and from the drop-down list select the unit of measurement – megabytes, gigabytes, or terabytes.  Click Next.

On the Confirm selections screen verify that your settings are right and click Create.  This process should not take very long.

1651.image_3B8EFF80

Once again, at the bottom of the View results page we have a checkbox, this time asking if we want to create a volume.  Leaving this checked will bring up the New Volume Wizard.

The wizard will look a little different than it did in Server 2008, owing to the fact that you can now provision storage both locally and remotely.  On the first screen you select the server and the disk; on the second screen you select the volume size (which cannot exceed the size of the disk); you then assign a drive letter or, if you prefer, a directory to mount it to (or don’t assign a letter at all); finally you select the file system, unit size, and volume label.  On the last screen you confirm your selections and click Create.

2727.image_16250C12

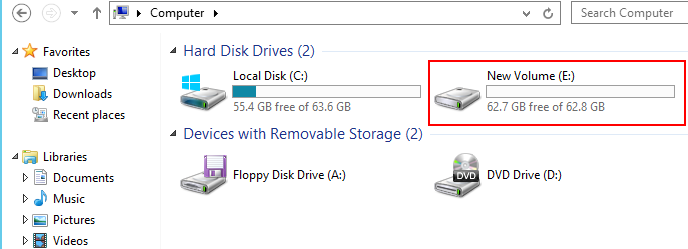
The volume will not take long to create, and you are now done.  You can navigate to Computer in Windows Explorer and your newly provisioned drive is ready to use!

Growing your Storage Pool

Creating it is one thing, but let’s now see how easy it is to extend the volume by adding drives.

0488.image_46D813BD

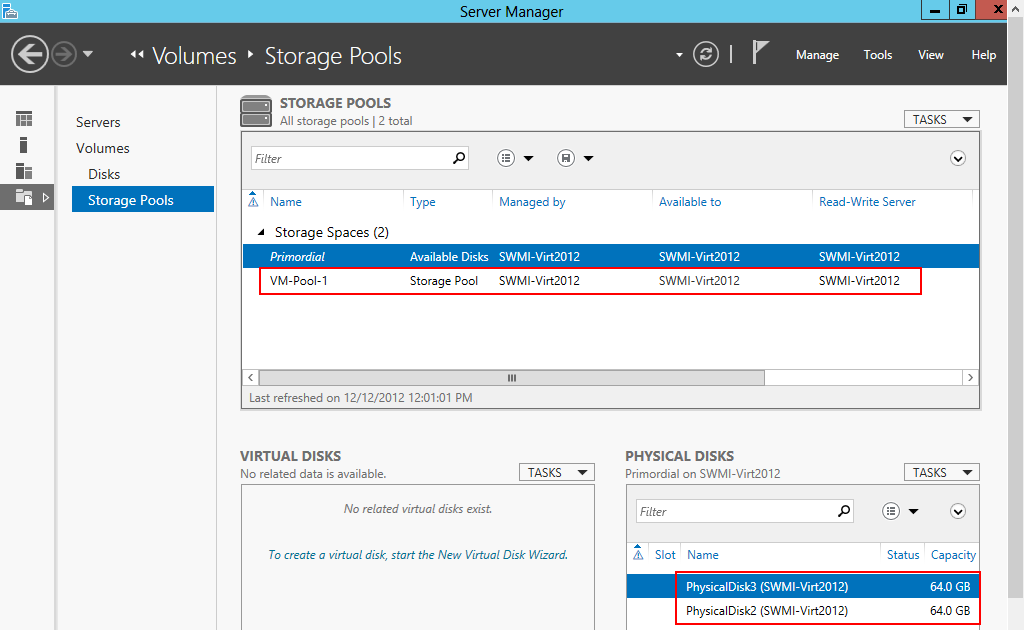
When we navigate back to our Storage Pools workspace in Server Manager we see that our newly created pool is there; we also see (under Physical Disks) that we have two 64 GB disks that are unused (thus primordial).

8883.image_2C2B77A4

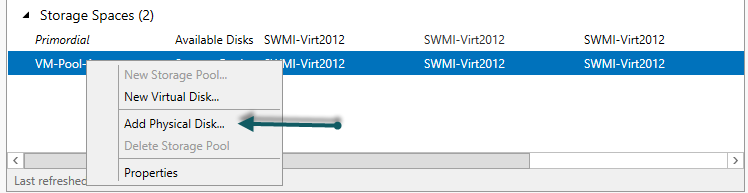
  1. Right-click on your storage pool and click Add Physical Disk…
  2. Your available disks will be listed.  Select the ones you wish to add and click Next.1256.image_562B75CC
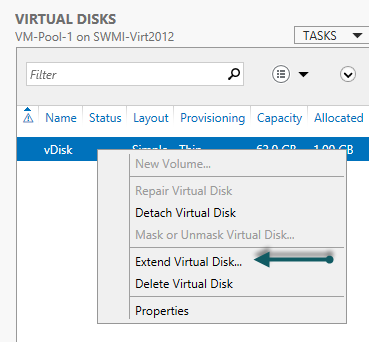
  3. In the VIRTUAL DISKS context on the Storage Pools workspace right-click on your virtual disk and click Extend Virtual Disk…6443.image_69D85F60
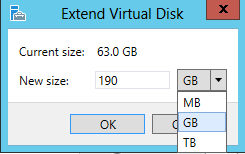
  4. In the Extend Virtual Disk window enter the desired new size and click OK. 0676.image_0FCE0FB7
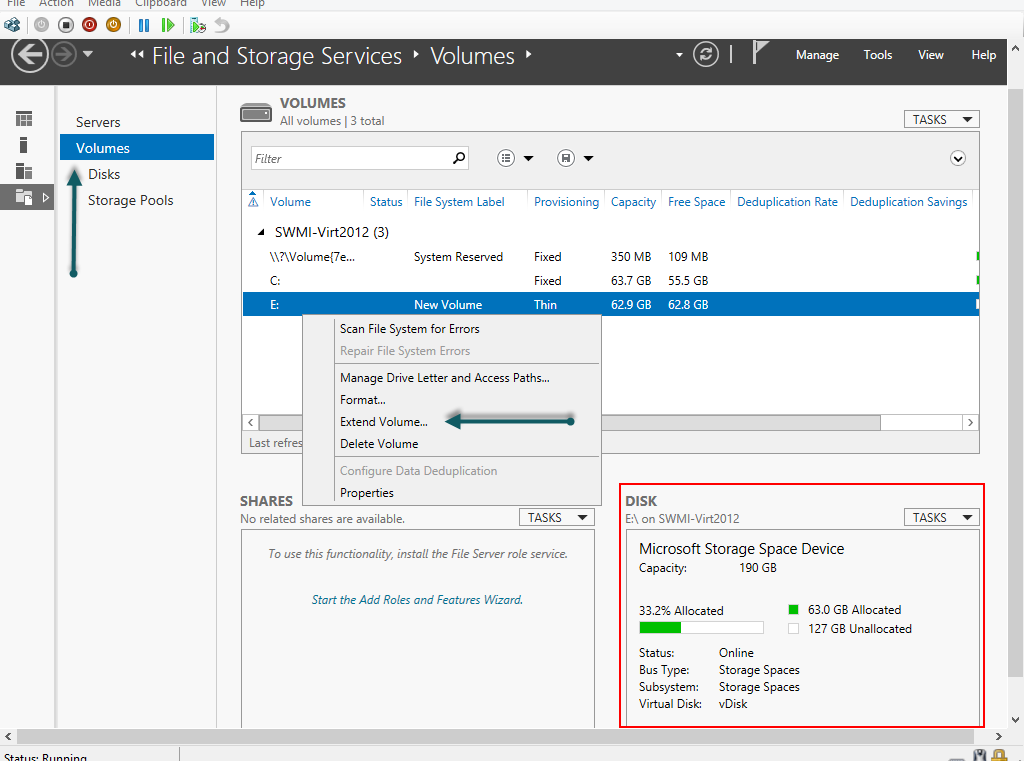
  5. Now you are going to change the context to the Volumes workspace.  Right-click on the volume that you created and click Extend Volume.  Notice when you click on the volume the Disk is listed as belonging to a Microsoft Storage Space Device.  It lists the capacity, both allocated and unallocated, as well as the status and virtual disk name.4380.image_58384EC8
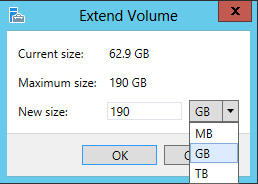
  6. The Extend Volume window looks identical to the Extend Virtual Disk window.  Enter the new size and click OK.2148.image_5040AC66
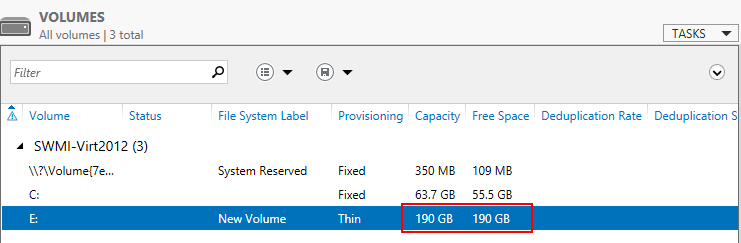
  7. Extending the volume only takes a few seconds, and when you are done you will see that the capacity has been extended. 2148.image_4AF1C5B5

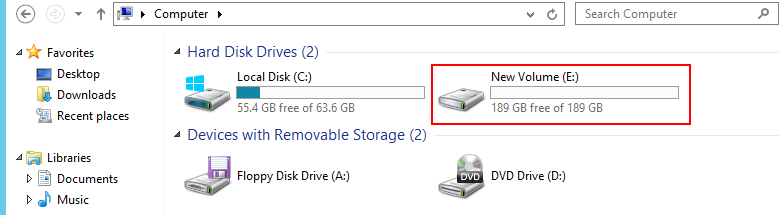
If you want to double-check, go to Windows Explorer and navigate to Computer in Windows Explorer and (once you hit refresh) your newly extended drive is ready to use!

Conclusion

Storage Spaces are going to revolutionize the way we (as administrators) think about storage.  We can now hot-add drives to volumes and extend them in seconds and not hours, and because there is no downtime involved we will not have to do any of this after hours.

Going forward we are going to stop thinking about the disk as the main storage unit of storage in our environment, but rather it will be one piece of the equation.  Our volume sizes will not be limited to the size of a disk, but what we need, whether that be measured in gigabytes or terabytes.

Add to the fact that we are not tied to any specific architecture, and you will see very quickly that our storage costs and complexity will drop – even as we add features like mirroring, failover disks, and parity.