Category Archives: IT Stuff

Link Aggregation on Cisco Switch

First, you need to access the console of your Cisco Switch.

In our example, we are going to use an Opensource software named Putty and a computer running Windows.

The Putty software is available on the putty.org website.

After finishing the download, run the software and wait for the following screen.

To access the console of a Cisco Switch model 2960 or 3750, you will need to select the Serial Connection category and use the following options:

• Connection type: Serial
• Serial line: COM1
• Speed: 9600

If COM1 does not work you will need to try to use COM2, COM3, COM4 or the next.

Using either the console, telnet or ssh, connect to the command-line of your switch and log in with a user who has administrative privileges.

On the prompt screen, enter the administrative login information.

After a successful login, the console command-line will be displayed.

Switch>

Use the enable command to enter the privilege mode.

Switch> enable

Use the configure terminal command to enter the configuration mode.

Switch# configure terminal

Create a new vlan, select an identification number and add a brief description.

Switch(config)# vlan 100
Switch(config-vlan)# name Voip Network
Switch(config)# vlan 200
Switch(config-vlan)# name Data Network
Switch(config-vlan)# exit

On the configuration mode, you need to clear all the configuration from the switch port.

Switch(config)# default interface gigabitEthernet 0/21
Switch(config-if)# default interface gigabitEthernet 0/22

On the configuration mode, add the switch ports to a link aggregation group.

Switch(config)# interface gigabitethernet0/21
Switch(config-if)# channel-group 1 mode active
Switch(config)# interface gigabitethernet0/22
Switch(config-if)# channel-group 1 mode active
Switch(config-if)# exit

In our example, the switch ports 21 and 22 were configured as members of the link aggregation group 1.

To configure the link aggregation ports as a Vlan member, you need to use the following commands.

Switch(config)# interface Port-channel 1
Switch(config)# switchport mode access
Switch(config-if)# switchport access vlan 200
Switch(config-if)# exit
Switch(config)# exit

In our example, the Switch port group 1 was configured as a member of VLAN 200.

To configure the link aggregation ports as a Trunk, you need to use the following commands.

Switch(config)# interface Port-channel 1
Switch(config)# switchport mode trunk
Switch(config-if)# switchport trunk native vlan 1
Switch(config-if)# switchport trunk allowed vlan add 1,100,200
Switch(config-if)# exit

In our example, the Switch port group 1 was configured as a trunk.

The trunk configuration allows the communications of Vlans 1, 100 and 200.

Don’t forget to save your switch configuration.

Switch# copy running-config startup-config

You have successfully configured a link aggregation on a Cisco switch 🙂

WinSCP as Sudo Root

To allow for a WinSCP session to operate as sudo the following string can be added.  Thai ia most useful when attempting to change the content of config files that are owned by the root account.

sudo su -c /usr/lib/sftp-server

Found on the advanced settings page for your site:


Restart Veeam Services

If the occasion arises that requires a restart of your Veeam backup server, you can try restarting the Veeam services to avoid restarting the host server.

Open Powershell as Admin and use the following commands:

Get-process | where {($_.Name -like “Veeam*”)} | stop-process -Force
Get-Service | where {($_.Name -like “Veeam*”)-and ($_.Status -eq “Running”)} | Stop-service -Force
Get-Service | where {($_.Name -like “Veeam*”)-and ($_.Status -eq “Stopped”)} | Start-service


Veeam Rename HyperVisor host

If you have renamed HyperV Hostname and Veeam cannot connect to enumerate the VMs running, use this script to change the hostname of the HyperVisor:

Asnp VeeamPSSnapin
$server = Get-VBRServer | ?{$_.name -eq "IpOfVC"}
$server.SetName("NewIP")

This will rename the host from the existing in Veeam to the new one you have set.  No reboot required.


SMB Guest Share Access

After Upgrading to Windows 10 1709 (Fall Creators Update) you may not be able to connect to network shares or your NAS with the guest account.  Windows 10 1709 onwards (including Server 2016 and Server 2019) Cannot Access SMB2 Shares via the Guest account.  The following error may be shown:

An error occurred while reconnecting X: to Share
Microsoft Windows Network: You can’t access this shared folder because your organization’s security policies block unauthenticated guest access. These policies help protect your PC from unsafe or malicious devices on the network.

Cause

Starting with Windows 10 1709, Windows prevents you from accessing network shares with guest access enabled. Guest access means connecting to network shares without authentication, using the built-in “guest” account.

This has no reference to the SMB1 protocol which was disabled in the latest Windows 10 release and all new Server installs from 2016.

Resolution

To enable guest access again, configure the following GPO:

Computer configuration > administrative templates > network > Lanman Workstation: "Enable insecure guest logons" = Enabled


Registry Key

The corresponding registry key is located under:

[HKEY_LOCAL_MACHINESYSTEM>CurrentControlSet>Services>LanmanWorkstationParameters]"AllowInsecureGuestAuth"=dword:1

Download

You can also download the reg file to simply click and set the registry key from here: AllowInsecureGuestAuth

MDM Policy

There is also an MDM Policy available, starting with Windows 10 1803: https://docs.microsoft.com/en-us/windows/client-management/mdm/policy-csp-lanmanworkstation

About guest access

Guest access is often used to access data stored on Network Attached Storage, e.g. on a Synology NAS. Every user from any device has access to these shares. Generally it’s never recommended to use guest access because it’s a huge security risk. Within the time of ransomware, encrypting whole drives it’s definitely not a good idea. I strongly recommend to use LDAP Support to authenticate against your NAS.

Reference

Reset 120 Day RDS Grace Period 2012R2 2016 2019

When you home lab and you don’t have Microsoft license for RDS, you have two options. Reinstall the server (redeploy the VM) or cheat a bit. Yes, in fact, there is cool hack which allows you to reset the 120 day grace period on Windows Server 2012 R2 RDS, and we’ll show you how. I like doing posts which shows some cool hacks, and this is exactly this kind of post – How To Reset 120 Day RDS Grace Period on 2012 R2 Server.

Normally you would need to activate the RDS/TS CAL License server and point the Server to License server with User/Device License and will resolve the problem. However, we don’t want to do that because we have no license from Microsoft, in our lab. (and many other IT pros who test stuff in the lab too).

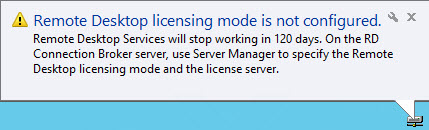
What we will do is simply reset the default timer which is 120 days grace time, when you first add the RDS role. In fact, you do not need to reboot the server either. Simply log out and back in and the message changes from let’s say 54 days left to 120 days left. And that’s it.

Note: This tip works also on Windows Server 2016 and Windows server 2019

For every admin who runs homelab or has a cloud lab, this is a must known hack.

Step 1: Connect to your RDS Server as an admin and open regedit.

Navigate to the following key:

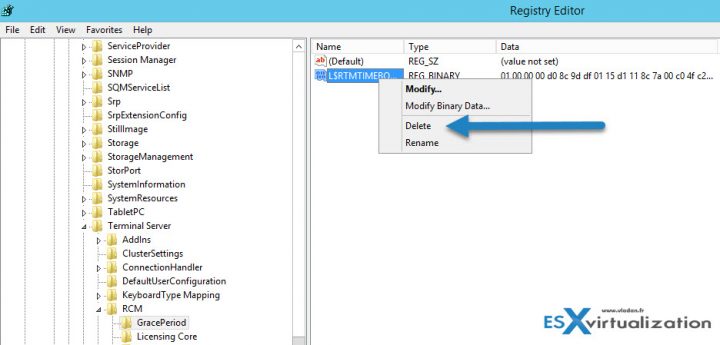
The solution is to delete the REG_BINARY in:

HKEY_LOCAL_MACHINESYSTEMCurrentControlSetControlTerminal ServerRCMGracePeriod

It’s called a “TimeBomb” … -:)

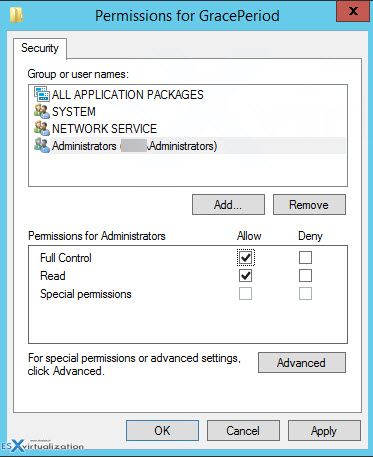
Note: You must first take an ownership and give admins the full rights.

Like this:

Go to menu Edit > Permissions

Once you delete the Registry key you must reboot the host. Some users have reported that when not rebooting the host you will see the message changing, but no connections are possible.

Update: Well, in fact, you can just restart the Service “Remote Desktop Services” which will momentarily disconnect all the active sessions and then after a minute or so you can reconnect to the sessions.

You should see the message changing at the taskbar area….

Note that you have also a possibility to check how many days its left… Go to the command prompt and enter this command (not tested).

wmic /namespace:\rootCIMV2TerminalServices PATH Win32_TerminalServiceSetting WHERE (__CLASS !=””) CALL GetGracePeriodDays

Apparently, you can delete this key every time it expires ….. indefinitely. Wow. That’s good to know too.

This is it my friends. Today’s tip for home labs.

Second Tip:

Download a PowerShell script from Microsoft allowing you to reset the RDS grace period. Mirror here: Reset-TSGracePeriod.ps1

Quote from Microsoft Technet:

The PowerShell script can be used to query and reset terminal server grace period to default 120 days if it is nearing to the end. We often need to deploy Terminal Server (Remote Desktop Session Host in 2012) for testing purposes in development environments allowing more than 2 concurrent Remote Desktop Sessions on it. When it is installed, by default if no RDS or TS Licensing server is specified via either GPO or Registry, it is in default Grace period which is 120 days and it works fine until then.

Once Grace period expires, the server does not allow even a single Remote Desktop session via RDP and all we are left with is to logon to the Console of machine using Physical/Virtual console depending on Physical or Virtual machines or try to get in using mstsc /admin or mstsc /console, then remove the role completely and restart the terminal server (RDS Server) and post that it starts accepting default two RDP sessions.


Show Hidden Devices server 2008R2

In order to work around this display phantom/hidden device when using the Show hidden devices in Device Manager you need to set the correct variable. See the following couple of steps:

  1. Bring up a Command Prompt.
  2. At the command prompt, type the BOLDED lines, pressing ENTER after each line:
    1. set devmgr_show_nonpresent_devices=1
    2. start devmgmt.msc
  3. Click on the View menu and select Show hidden devices.

You will now see the hidden devices

Composer Update for Snipe-IT

To update Snipe-IT on Windows Server 2016 with Composer, the following commands will assist:

composer install --no-dev --prefer-source
composer dump-autoload
php artisan migrate
php artisan config:clear
php artisan config:cache

Thats it

Zabbix Appliance extend Volume

We use Zabbix to monitor almost everything, from UPS boxes through to routers, switches, even printers.  Today we were welcomed with the following issue:

Warning: Free disk space is less than 20% on volume /

As it the error suggests, the stock 20Gb VHD file for Zabbix Appliance is filling up.  It wasn’t a straight forward process to extend the volume once you had made the changes in HyperV.  The following steps will allow this volume to be extended and then applied to Zabbix Appliance.

To Extend the volume of Zabbix Appliance:

1: Extend the VHDX through HyperV disk manager

2: Boot Zabbix VM via a live bootable distro and load Gpartd – I used ‘Parted Magic’ but any live distro will do.

3: Extend volume, if unable to extend volume and can see the Padlock or Key icon, select ‘deactivate’ and resize.

4: Exit Gpartd and shutdown Zabbix Appliance

5: Remove bootable ISO and start Zabbix Appliance

6: Login to Zabbix Appliance via command line and enter the following:

sudo lvextend –l +100%FREE [MOUNTPOINT]

expand filesystem:

sudo resize2fs [MOUNTPOINT]

if you need to find the Mountpoint, use

sudo lvdisplay

You should now have an extended disk size in your Zabbix Appliance

IPSec Tunnel Mikrotik RouterOS to Azure IKE2

Now that Azure uses IKEv2 for IPSec tunnels, here is an up to date script to bring up IPSec between RouterOS and Azure.  Note that RouterOS must be Version 6.38 and above for IKEv2.

/ip ipsec mode-config
add name="AZURE CONFIG" system-dns=no
/ip ipsec proposal
set [ find default=yes ] disabled=yes
add enc-algorithms=aes-256-cbc,aes-128-cbc lifetime=1h name=AZURE pfs-group=none
/ip ipsec peer
add address=<AZURE PUBLIC IP> dpd-interval=disable-dpd enc-algorithm=aes-256,aes-128 exchange-mode=ike2 generate-policy=port-strict local-address=<SRC PUBLIC IP> secret=<IPSEC SECRET>
/ip ipsec policy
set 0 disabled=yes
add comment="IPsec Tunnel to Azure" dst-address=<DEST LAN SUBNET> proposal=AZURE sa-dst-address=<AZURE PUBLIC IP> sa-src-address=<SRC PUBLIC IP> src-address=<SRC LAN SUBNET> tunnel=yes