Category Archives: IT Stuff

Aftermarket SFP GBIC in Cisco Switches

Many companies are seeking for Cisco SFP alternatives to help cut down the costs on these expensive modules.

A frequent customer problem with Cisco’s new line of Catalyst switches is that they do not support 3rd party (non-Cisco) SFPs – or at least they do not seem to…

If you’ve just replaced your network switches and tried using any 3rd party SFPs to connect your network backbone, you’ll quickly stumble across an error similar to the following:

%PHY-4-UNSUPPORTED_TRANSCEIVER: Unsupported transceiver found in Gi1/0/0
%GBIC_SECURITY_CRYPT-4-VN_DATA_CRC_ERROR: GBIC in port 65538 has bad crc

Congratulations!  The Catalyst switch has just disabled the GBIC port! This happens because Cisco Catalyst switches are configured by default not to work with non-Cisco SFPs.

When a SFP is inserted into a switch’s GBIC port, the switch immediately reads a number of values from the SFP and if it doesn’t like what it sees, it throws the above error message and disables the port.

All SFP modules contain a number of recorded values in their EEPROM and include:

  • Vendor Name
  • Vendor ID
  • Serial Number
  • Security Code
  • CRC

HOW TO FORCE YOUR CISCO SWITCH TO USE 3RD PARTY SFPS

Despite the error displayed, which leaves no hope for a solution, keep smiling as you’re about to be given one.

There are two undocumented commands which can be used to force the Cisco Catalyst switch to enable the GBIC port and use the 3rd party SFP:

3750G-Stack(config)# service unsupported-transceiver

Warning: When Cisco determines that a fault or defect can be traced to
the use of third-party transceivers installed by a customer or reseller,
then, at Cisco's discretion, Cisco may withhold support under warranty or
a Cisco support program. In the course of providing support for a Cisco
networking product Cisco may require that the end user install Cisco
transceivers if Cisco determines that removing third-party parts will
assist Cisco in diagnosing the cause of a support issue.

3750G-Stack(config)# no errdisable detect cause gbic-invalid

When entering the service unsupported-transceiver command, the switch will automatically throw a warning message as a last hope to prevent the usage of a 3rd party SFP.

The no errdisable detect cause gbic-invalid command will help ensure the GBIC port is not disabled when inserting an invalid GIBC.

Since the service unsupported-transceiver  is undocumented, if you try searching for the command with the usual method (?), you won’t find it:

3750G-Stack(config)# service ?
compress-config              Compress the configuration file
  config                             TFTP load config files
  counters                         Control aging of interface counters
  dhcp                               Enable DHCP server and relay agent
  disable-ip-fast-frag           Disable IP particle-based fast fragmentation
  exec-callback                   Enable exec callback
  exec-wait                       Delay EXEC startup on noisy lines
  finger                            Allow responses to finger requests
  hide-telnet-addresses     Hide destination addresses in telnet command
  linenumber                    enable line number banner for each exec
  nagle                             Enable Nagle's congestion control algorithm
  old-slip-prompts             Allow old scripts to operate with slip/ppp
  pad                              Enable PAD commands
  password-encryption      Encrypt system passwords
  password-recovery        Disable password recovery
  prompt                         Enable mode specific prompt
  pt-vty-logging               Log significant VTY-Async events
  sequence-numbers        Stamp logger messages with a sequence number
  slave-log                      Enable log capability of slave IPs
  tcp-keepalives-in          Generate keepalives on idle incoming network connections
  tcp-keepalives-out       Generate keepalives on idle outgoing network connections
  tcp-small-servers         Enable small TCP servers (e.g., ECHO)
  telnet-zeroidle             Set TCP window 0 when connection is idle
  timestamps                 Timestamp debug/log messages
  udp-small-servers       Enable small UDP servers (e.g., ECHO)

3750G-Stack(config)# service 

The same applies for the no errdisable detect cause gbic-invalid command.

We tried both service unsupported-transceiver & no errdisable detect cause gbic-invalid commands on 2960G, 3560G, 3750G, 4507R and 4507R-E Catalyst switches and all accepted the commands without a problem. In fact if the Catalyst switch is running IOS 12.2(25)SE and above, the undocumented commands are available.

SHOULD 3RD PARTY SFPS BE USED?

There are mixed feelings about this. We certainly do not recommend using non-Cisco SFP’s in production environments, however in a lab environment, its most probably a cheap way out.

When using 3rd party GBICs, one must keep in mind that Cisco TAC will not provide any support for problems related to the SFPs as they are totally unsupported. Here is a small portion from the Cisco Catalyst 3750G Q&A that refers to the usage of 3rd party SFP modules on the switch:

Q. Do the Cisco Catalyst 3750 Series Switches interoperate with SFPs from other vendors?

A. Yes, starting from 12.2(25)SE release, the user has the option via CLI to turn on the support for 3rd party SFPs. However, the Cisco TAC will not support such 3rd party SFPs. In the event of any link error involving such 3rd party SFPs the customer will have to replace 3rd party SFPs with Cisco SFPs before any troubleshooting can be done by TAC.

TLDR;

To allow the Cisco iOS to use the non-branded SFP’s the following needs to be done at the switch terminal:

Technical:

From the Enable command line on the Cisco Switch enter:

2960x(config)# service unsupported-transceiver <press enter>
2960x(config)# no errdisable detect cause gbic-invalid <press enter>

Save running config to switch. Profit.
Adding a TCP/IP Route to the Windows Routing Table

The Routing table dictates where all packets go when they leave your system. On most environments, all packets that leave your system will be forwarded over to your router or hub, and from there out to the internet.

In some circumstances, you may have a testing network configured to duplicate another environment, or you may be configuring a more complex network topology that requires the use of additional routes. Adding routes to your machine is a useful testing tool for some of these situations.

Syntax:

route ADD xxx.xxx.xxx.xxx MASK xxx.xxx.xxx.xxx  xxx.xxx.xxx.xxx

Means:

route ADD “network” MASK “subnet mask”  “gateway ip”

For example, if you were on the 192.168.1.0 network, and you had a gateway on 192.168.1.12 configured to access the 10.10.10.0/24 network, you would use a route add statement like this:

route ADD 10.10.10.0 MASK 255.255.255.0 192.168.1.12

Your routing table should now reflect that change, and all traffic to the 10.10.10.x range will now be sent over to the gateway machine.

The route add change will only stick across reboots if you add it with the -p flag, as in the following:

route -p ADD 10.10.10.0 MASK 255.255.255.0 192.168.1.12

Allow non-administrators RDP Access to Domain Controller

By default, only the members of Domain Admins group have the remote RDP access to the domain controllers. In this article we’ll show how to grant domain users  RDP access to the domain controllers.

Many can quite reasonably object why ordinary domain users should have access to the DC desktop. Indeed, in small or middle size infrastructures, when several administrators with the privileges of domain admins maintain them, you’ll hardly need this. However, in large corporate networks maintained by many administrators, it may become necessary to grant RDP access to the DC for different server administration groups, monitoring team, duty administrators, or other technical specialists. Also, sometimes some third-party services, not managed by the domain administrators, are deployed on the DC, and there’s a need to maintain these services.

Tip. The simultaneous operation of Active Directory Domain Services and Remote Desktop Service (terminal) roles is not supported on a single server. If there is only one physical server, on which both DC and terminal services have to be deployed, you’d better use virtualization, since Microsoft license policy allows to run two virtual servers under one Windows Server 2012 Standard license.

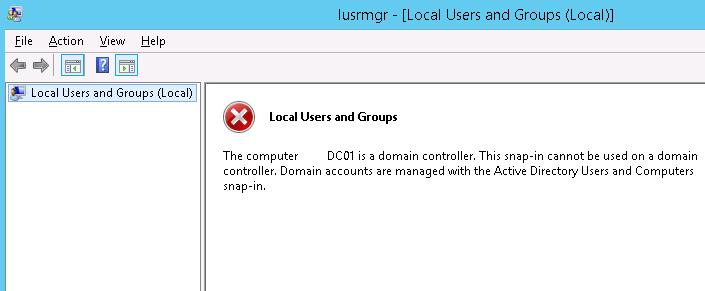
After the server has been promoted to a domain controller, when trying to open Local Users and Groups(lusrmgr.msc) console, it returns the following error:

The computer xxx is a domain controller. This snip-in cannot be used on a domain controller. Domain accounts are managed with the Active Directory Users and Computers snap-in.

local-user-msc-computer-is-a-domain-controller

So it feels that there are no local groups on the domain controller. Actually, local groups on the domain controller don’t disappear. They can be managed from the command prompt.

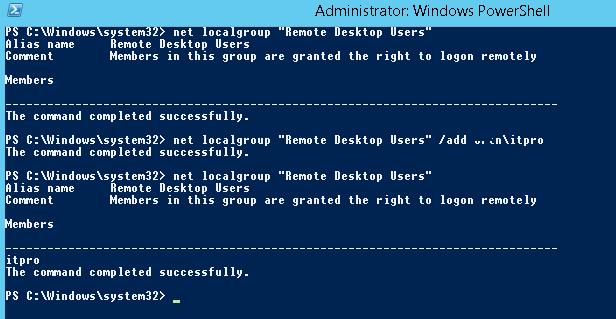
Display the members of the local group Remote Desktop Users on the domain controller:

net localgroup "Remote Desktop Users"

As you can see, it is empty. Add a domain user it-pro to it. (In our example, it-pro is a standard domain user without administrative privileges.)

net localgroup "Remote Desktop Users" /add corpit-pro

Make sure that the user is added to this group:

net localgroup "Remote Desktop Users"

net-localgroup-remote-desktop-users

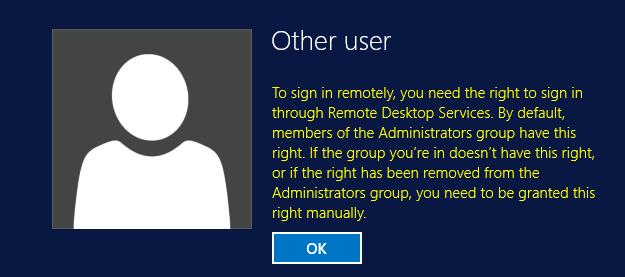
However, after that a user still cannot connect to the DC using Remote Desktop.

to-sign-in-remotely-you-need-rds-rights

To sign in remotely, you need the right to sign in through Remote Desktop Services. By default members of the Administrators group have this right. If the group you’re in does not have the right, or  if the right has been removed from the Administrators group, you need to be granted the right manually.

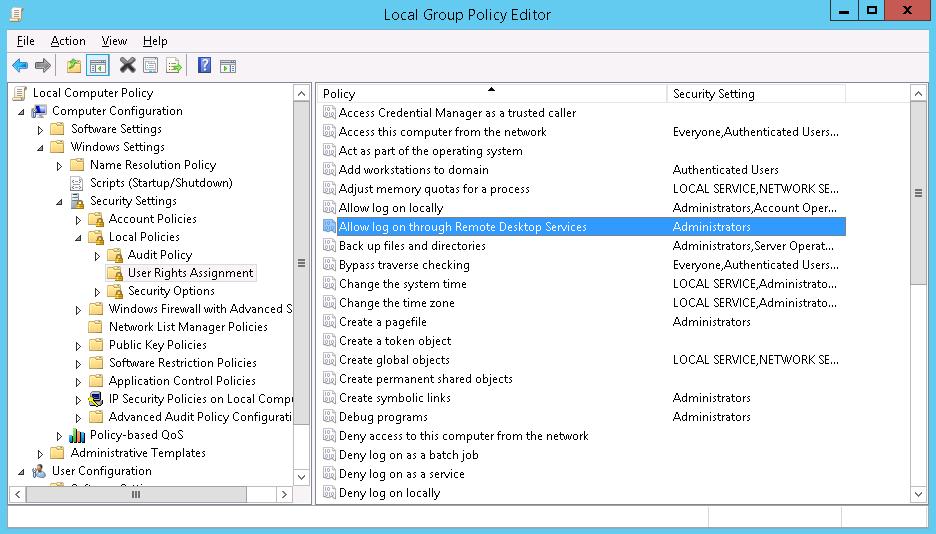
The matter is that the possibility of the RDP connection in Windows is determined by Allow log on through Remote Desktop Services policy (In Windows 2003 or earlier this policy is called Allow log on through terminal services). After the server is promoted to the DC, only the Administrators group is left in this policy.

To allow connection to the domain controllers members of the Remote Desktop Users group you need to:

  • Start local policy editor (gpedit.msc)
  • Go to Computer Configuration -> Windows settings -> Security Settings -> Local policies -> User Rights Assignment
  • Find the policy Allow log on through Remote Desktop Services policy-allow-log-on-through-remote-desktop-services
  • Edit the policy by adding the local group Remote Desktop Users (like this: dc-nameRemote Desktop Users), a domain user, or a group (like this: domainsomegroupname) to it
  • Run the update of the local policies gpupdate /force

After the changes are made, the users or groups specified above will have the opportunity to connect to the domain controller using RDP.

Repairing Windows 2012 R2 Startup

Method 1:

===============
1. Put the Windows Server 2012 R2 installation disc into the disc drive, and then start the computer.
2. Press a key when the message indicating “Press any key to boot from CD or DVD …”. appears.
3. Select a language, a time, a currency, and a keyboard or another input method, and then click Next.
4. Click Repair your computer.
5. Click the operating system that you want to repair, and then click Next.
6. In the System Recovery Options dialog box, click Command Prompt.
7. Type sfc /scannow, and then press ENTER.

Method 2:
===============
1. Put the Windows Server 2012 R2 installation disc in the disc drive, and then start the computer.
2. Press any key when the message indicating “Press any key to boot from CD or DVD …”. appears.
3. Select a language, time, currency, and a keyboard or another input method. Then click Next.
4. Click Repair your computer.
5. Click the operating system that you want to repair, and then click Next.
6. In the System Recovery Options dialog box, click Command Prompt.
7. Type Bootrec /RebuildBcd, and then press ENTER.

Method 3:
===============
1. Put the Windows Server 2012 R2 installation disc into the disc drive, and then start the computer.
2. Press a key when the message indicating “Press any key to boot from CD or DVD …”. appears.
3. Select a language, a time, a currency, and a keyboard or another input method, and then click Next.
4. Click Repair your computer.
5. Click the operating system that you want to repair, and then click Next.
6. In the System Recovery Options dialog box, click Command Prompt.
7. Type BOOTREC /FIXMBR, and then press ENTER.
8. Type BOOTREC /FIXBOOT, and then press ENTER.
9. Type Drive:bootBootsect.exe /NT60 All, and then press ENTER.

Note: In this command, Drive is the drive where the Windows Server 2012 R2 installation media is located.

Find out what printers a user has mapped remotely

Well, you can take a look at the Win32_Printer WMI class,

Get-WMIObject Win32_Printer -ComputerName $Comp

But, I think this will get you even better results:

New-PSSession $Comp | Enter-PSSession
Get-ChildItem Registry::HKEY_Users$UserSIDPrintersConnections
Exit

Without using PS Remoting, you could do this instead:

$Printers = [Microsoft.Win32.RegistryKey]::OpenRemoteBaseKey(Microsoft.Win32.RegistryHive]::Users, $ServerName)

You get the idea. Basically, you need to access that user’s registry key with whatever method and enumerate whatever you find in PrintersConnections.

ReInstall Group Policy Software

Group Policy Software Installation (GPSI) is one of the greatest gifts that Microsoft has given you! It is a free and semi-robust application deployment solution. Almost any organization can manage their entire application infrastructure with it. GPSI does have a few limitations though. One notable limit is the all or nothing redeployment option.

ReInstall Applications Deployed Through Group Policy Software Installation

Wouldn’t it be awesome if you could selectively reinstall applications for a specific computer or for a small group of computers? Today, we are going to learn how to reinstall an application on a single machine and on multiple computers.

Reinstall a GPSI Application on a Single Machine

When you deploy an application through Group Policy, the local machine stores the GPSI information within HKLMSOFTWAREMicrosoftWindowsCurrentVersionGroup PolicyAppMgmt . Each installed application has a unique ID assigned to it. This ID is the same for every machine. In the screenshot below, you can see an example of a deployed application named Mochasoft. It’s unique registry ID is {606…..}.

ReInstall Applications Deployed Through Group Policy Software Installation

We can trigger an automatic reinstall by deleting the {606….} registry key and rebooting the machine. The Group Policy client will initiate a reinstall of the application at startup. Deleting a registry key this way can be a bit time consuming.

To make this easier, you can use a free app to list and delete these IDs. Before we continue, head over to the Tools page and download the MSI Manager App. It is located under the Active Directory/Group Policy section. Pin it to your Start Menu/Start Screen. You will use it often!

When you first launch MSI Manager, enter a computer name and press Scan. For testing, you can enter in your local machine name. MSI Manager will connect to the machine and list all of the GPSI applications. You can select an application and press Go to remove the registry entry and to trigger a GPUpdate.

ReInstall Applications Deployed Through Group Policy Software Installation

The force reboot option will reboot the machine and allow the application to reinstall without waiting. If you have Verbose Mode enabled, you can even watch the application install. Go ahead and try this out on a machine. It is pretty sweet!


Reinstall a GPSI Application on Multiple Machines

Occasionally, you might need to reinstall an application on a small group of computers. Group Policy Registry Preferences can make this possible! In this example, we are wanting to reinstall our Mochasoft application on a specific lab of computers. In Active Directory, we will create a new security group namedReInstall_APP_Mochasoft and add our computers to this group.

Next, we will edit our APP_Mochasoft GPO which deploys our application. We will expand to Computer Configuration/Preferences/Windows Settings/Registry . Finally, we will create a new Registry Item and set the Action to Delete.

Under the keypath, we will enter SOFTWAREMicrosoftWindowsCurrentVersionGroup PolicyAppMgmtREGISTRY ID

ReInstall Applications Deployed Through Group Policy Software Installation

To streamline this preference, we will click on the Common tab and check Apply once and do not reapply. We also want this preference to apply to our specific group of computers. We will select Item-level targeting and configure a new Security Group target that scopes this preference down to your ReInstall security group.

On the next GPUpdate, our machines will remove the specific GPSI registry key. On the next reboot, they will reinstall the application! This is how I selectively reinstall GPSI applications on specific computers and on computer groups.

Antivirus on HyperV Host Servers

To safely run antivirus on HyperV Hosts you will need to whitelist some locations so they are not scanned by your Antivirus Software:


C:\ClusterStorage;
%windir%\SoftwareDistribution\DataStore\DataStore.edb;
%windir%\SoftwareDistribution\DataStore\Logs\*.log;
%windir%\SoftwareDistribution\DataStore\Logs\*.jrs;
%windir%\SoftwareDistribution\DataStore\Logs\*.chk;
%windir%\SoftwareDistribution\DataStore\Logs\*.edb;
%windir%\Security\Database\*.edb;
%windir%\Security\Database\*.sdb;
%windir%\Security\Database\*.log;
%windir%\Security\Database\*.chk;
%windir%\Security\Database\*.jrs;
%SystemRoot%\System32\GroupPolicy\registry.pol;
%ALLUSERSPROFILE%\NTuser.pol;
%PROGRAMDATA%\Microsoft\Windows\Hyper-V;

Slow Logon Remote Desktop after Veeam Restore – Smart Cards

After performing a Bare Metal restore with Veeam for a 2012 R2 server OS you may find logging in remotely via Remote Desktop taking longer than usual.  You may experience a delay at the logon screen for about 10-20 seconds before logging in and the following three errors may be found in the Windows System Event log, all logged as Event ID 7011 with the source Service Control Manager:

A timeout (30000 milliseconds) was reached while waiting for a transaction response from the UmRdpService service.


A timeout (30000 milliseconds) was reached while waiting for a transaction response from the ScDeviceEnum service.


The Smart Card Device Enumeration Service service failed to start due to the following error: The service did not respond to the start or control request in a timely fashion.

The reason for this is the RDP service is attempting to use Smart Cards for authentication when a client attempts to connect.   It seems that the Windows Server OS enables the Smart Card service after a restore to new hardware (partial OOBE). To fix this, change the Startup Type of the the Smart Card Device Enumeration Service from Manual (Trigger Start) to Disabled.  After doing so the unwanted delay on remote logon will be resolved.


Disable or Uninstall OneDrive Embedded in Windows 10

OneDrive (previously SkyDrive, Windows Live SkyDrive and Windows Live Folders) is a personal cloud file hosting, storage and sync service from Microsoft. In Windows 10, the OneDrive desktop app is installed and comes natively with the operating system. And if you sign into Windows 10 with a Microsoft Account (MSA), OneDrive is also enabled by default.

However, not everyone uses OneDrive. Some may prefer other similar cloud storage services such as Dropbox, Google Drive, Apple iCloud Drive, Box and many more. Or many may simply not using any cloud storage service or file hosting service at all, especially at computers used in businesses, corporations, enterprises, schools and educational institutions.

Unlike Windows 8.1, Windows 8, Windows 7 or earlier Windows operating systems, OneDrive desktop app is tightly integrated with Windows 10. OneDrive folder is in File Explorer’s navigation pane right from the moment you starting to use Windows 10. In fact, by default Windows 10 does not provide a way for users to uninstall and remove OneDrive app, whether it’s from “Programs and Features” of “Control Panel” or Windows Store. You simply won’t find any OneDrive entry to initiate the uninstallation process.

However, there are several ways available in Windows 10 to deal with OneDrive app, depending on whether you want to hide, disable, remove or uninstall the OneDrive. The tutorial provides all the options available with step-by-step guide.

Disable OneDrive Everywhere in Windows and Apps Completely

  1. Press Win + R keyboard accelerator to open Run dialog box.
  2. Type GPedit.msc and hit Enter or OK to open Local Group Policy Editor.
  3. Navigate to Local Computer Policy -> Computer Configuration -> Administrative Templates -> Windows Components-> OneDrive.
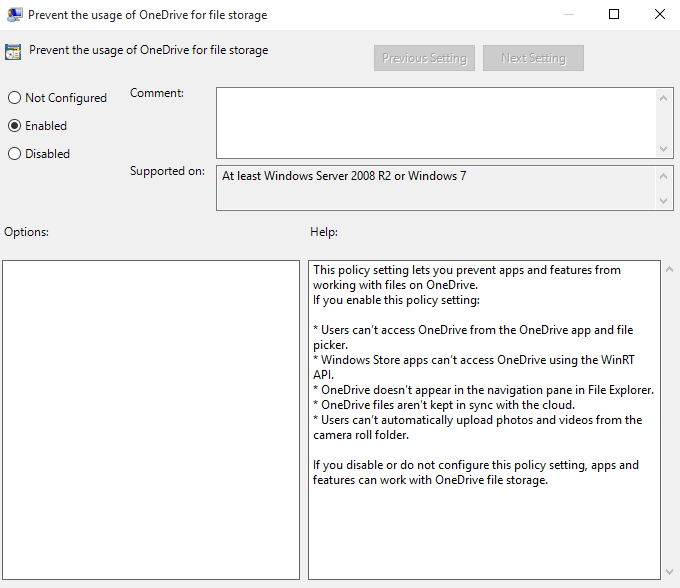
  4. In the right pane, double click on policy named Prevent the usage of OneDrive for file storage.
  5. Select the Enabled radio button.disable-onedrive-windows
  6. Click or tap OK when done.

That’s it. OneDrive icon is hidden from Explorer, and OneDrive app is completely disabled and prevented from running, and access or work with files on OneDrive from any desktop apps or modern apps is blocked. For example:

  • Can’t access OneDrive from the OneDrive app and file picker.
  • Windows Store apps can’t access OneDrive using the WinRT API.
  • OneDrive doesn’t appear in the navigation pane in File Explorer.
  • OneDrive files aren’t kept in sync with the cloud.
  • Can’t automatically upload photos and videos from the camera roll folder.
  • Sign out and sign in again, or restart the computer.
Registry Settings

The policy above is actually set a setting in Registry, which is useful for people who prefer to use Registry Editor. In addition, Windows 10 Home does not come with Group Policy Editor too.Here’s how to use Registry Editor to turn off OneDrive everywhere completely:

  1. Press Win + R keyboard accelerator to open Run dialog box.
  2. Type RegEdit.exe and hit Enter or OK to open Registry Editor.
  3. Navigate to the following registry key:HKEY_LOCAL_MACHINE\Software\Policies\Microsoft\Windows
  4. Right click on Windows and select New -> Key. Name the new key as OneDrive.Note: If OneDrive key already exists, skip this step.
  5. Right click on OneDrive registry key, and select New -> DWORD (32-bit) Value. Name the new value name asDisableFileSyncNGSC
  6. Set the data for DisableFileSyncNGSC registry value as 1.DisableFileSyncNGSCNote: DisableFileSync registry value only works in Windows 7, Windows 8 and Windows 8.1 and does not work in Windows 10.
  7. Close Registry Editor.
  8. Sign out and sign in again, or restart the computer.

Hide and Remove OneDrive from Navigation Pane of Windows Explorer

If you just want to remove the OneDrive entry in the navigation pane (also known as side panel or folder tree) in the File Explorer, or the OneDrive folder still exists in File Explorer after disabling OneDrive, follow the guide to remove OneDrive from Windows 10 File Explorer Navigation Side Panel.

Complete Remove and Uninstall OneDrive

It’s impossible to manually uninstall and remove OneDrive in Windows 10 by the step-by-step guide below. Run the commands to be executed in the process below in an Administrator Command Prompt.

Uninstall OneDrive

  1. Terminate any process of OneDrive by running the following command:
    taskkill /f /im OneDrive.exe
  2. Uninstall OneDrive app by running one of the following command:In 32-bit Windows 10 (x86):
    %SystemRoot%\System32\OneDriveSetup.exe /uninstall

    In 64-bit Windows 10 (x64):

    %SystemRoot%\SysWOW64\OneDriveSetup.exe /uninstall

One you ran the above command, OneDrive desktop app is uninstalled completely and cleanly. Most of the time, no progress bar nor confirmation dialog is shown. However, when you search for OneDrive, the app no longer be found.

Cleaning and Removing OneDrive Remnants

However, as OneDrive is a cloud storage service which is dealing with user data, there are remnants and leftovers from OneDrive app that are still available on the system as uninstallation does not remove user data, most prominently been the OneDrive folder. Run the commands below to clean up those remnants by deleting OneDrive related folders and their contents:

Important
Make sure that the following folders no longer contain any user data before proceeding with the following commands.
rd "%UserProfile%\OneDrive" /Q /S
rd "%LocalAppData%\Microsoft\OneDrive" /Q /S
rd "%ProgramData%\Microsoft OneDrive" /Q /S
rd "C:\OneDriveTemp" /Q /S

Delete and Remove OneDrive in File Explorer Folder Tree Registry Key

OneDrive has registry keys which add itself to the Navigation Pane of File Explorer in Windows 10. After uninstalling OneDrive, these registry keys are orphaned, and can be removed.

REG Delete "HKEY_CLASSES_ROOT\CLSID\{018D5C66-4533-4307-9B53-224DE2ED1FE6}" /f
REG Delete "HKEY_CLASSES_ROOT\Wow6432Node\CLSID\{018D5C66-4533-4307-9B53-224DE2ED1FE6}" /f