Category Archives: IT Stuff

ReInstall Group Policy Software

Group Policy Software Installation (GPSI) is one of the greatest gifts that Microsoft has given you! It is a free and semi-robust application deployment solution. Almost any organization can manage their entire application infrastructure with it. GPSI does have a few limitations though. One notable limit is the all or nothing redeployment option.

ReInstall Applications Deployed Through Group Policy Software Installation

Wouldn’t it be awesome if you could selectively reinstall applications for a specific computer or for a small group of computers? Today, we are going to learn how to reinstall an application on a single machine and on multiple computers.

Reinstall a GPSI Application on a Single Machine

When you deploy an application through Group Policy, the local machine stores the GPSI information within HKLMSOFTWAREMicrosoftWindowsCurrentVersionGroup PolicyAppMgmt . Each installed application has a unique ID assigned to it. This ID is the same for every machine. In the screenshot below, you can see an example of a deployed application named Mochasoft. It’s unique registry ID is {606…..}.

ReInstall Applications Deployed Through Group Policy Software Installation

We can trigger an automatic reinstall by deleting the {606….} registry key and rebooting the machine. The Group Policy client will initiate a reinstall of the application at startup. Deleting a registry key this way can be a bit time consuming.

To make this easier, you can use a free app to list and delete these IDs. Before we continue, head over to the Tools page and download the MSI Manager App. It is located under the Active Directory/Group Policy section. Pin it to your Start Menu/Start Screen. You will use it often!

When you first launch MSI Manager, enter a computer name and press Scan. For testing, you can enter in your local machine name. MSI Manager will connect to the machine and list all of the GPSI applications. You can select an application and press Go to remove the registry entry and to trigger a GPUpdate.

ReInstall Applications Deployed Through Group Policy Software Installation

The force reboot option will reboot the machine and allow the application to reinstall without waiting. If you have Verbose Mode enabled, you can even watch the application install. Go ahead and try this out on a machine. It is pretty sweet!


Reinstall a GPSI Application on Multiple Machines

Occasionally, you might need to reinstall an application on a small group of computers. Group Policy Registry Preferences can make this possible! In this example, we are wanting to reinstall our Mochasoft application on a specific lab of computers. In Active Directory, we will create a new security group namedReInstall_APP_Mochasoft and add our computers to this group.

Next, we will edit our APP_Mochasoft GPO which deploys our application. We will expand to Computer Configuration/Preferences/Windows Settings/Registry . Finally, we will create a new Registry Item and set the Action to Delete.

Under the keypath, we will enter SOFTWAREMicrosoftWindowsCurrentVersionGroup PolicyAppMgmtREGISTRY ID

ReInstall Applications Deployed Through Group Policy Software Installation

To streamline this preference, we will click on the Common tab and check Apply once and do not reapply. We also want this preference to apply to our specific group of computers. We will select Item-level targeting and configure a new Security Group target that scopes this preference down to your ReInstall security group.

On the next GPUpdate, our machines will remove the specific GPSI registry key. On the next reboot, they will reinstall the application! This is how I selectively reinstall GPSI applications on specific computers and on computer groups.

Antivirus on HyperV Host Servers

To safely run antivirus on HyperV Hosts you will need to whitelist some locations so they are not scanned by your Antivirus Software:


C:\ClusterStorage;
%windir%\SoftwareDistribution\DataStore\DataStore.edb;
%windir%\SoftwareDistribution\DataStore\Logs\*.log;
%windir%\SoftwareDistribution\DataStore\Logs\*.jrs;
%windir%\SoftwareDistribution\DataStore\Logs\*.chk;
%windir%\SoftwareDistribution\DataStore\Logs\*.edb;
%windir%\Security\Database\*.edb;
%windir%\Security\Database\*.sdb;
%windir%\Security\Database\*.log;
%windir%\Security\Database\*.chk;
%windir%\Security\Database\*.jrs;
%SystemRoot%\System32\GroupPolicy\registry.pol;
%ALLUSERSPROFILE%\NTuser.pol;
%PROGRAMDATA%\Microsoft\Windows\Hyper-V;

Slow Logon Remote Desktop after Veeam Restore – Smart Cards

After performing a Bare Metal restore with Veeam for a 2012 R2 server OS you may find logging in remotely via Remote Desktop taking longer than usual.  You may experience a delay at the logon screen for about 10-20 seconds before logging in and the following three errors may be found in the Windows System Event log, all logged as Event ID 7011 with the source Service Control Manager:

A timeout (30000 milliseconds) was reached while waiting for a transaction response from the UmRdpService service.


A timeout (30000 milliseconds) was reached while waiting for a transaction response from the ScDeviceEnum service.


The Smart Card Device Enumeration Service service failed to start due to the following error: The service did not respond to the start or control request in a timely fashion.

The reason for this is the RDP service is attempting to use Smart Cards for authentication when a client attempts to connect.   It seems that the Windows Server OS enables the Smart Card service after a restore to new hardware (partial OOBE). To fix this, change the Startup Type of the the Smart Card Device Enumeration Service from Manual (Trigger Start) to Disabled.  After doing so the unwanted delay on remote logon will be resolved.


Disable or Uninstall OneDrive Embedded in Windows 10

OneDrive (previously SkyDrive, Windows Live SkyDrive and Windows Live Folders) is a personal cloud file hosting, storage and sync service from Microsoft. In Windows 10, the OneDrive desktop app is installed and comes natively with the operating system. And if you sign into Windows 10 with a Microsoft Account (MSA), OneDrive is also enabled by default.

However, not everyone uses OneDrive. Some may prefer other similar cloud storage services such as Dropbox, Google Drive, Apple iCloud Drive, Box and many more. Or many may simply not using any cloud storage service or file hosting service at all, especially at computers used in businesses, corporations, enterprises, schools and educational institutions.

Unlike Windows 8.1, Windows 8, Windows 7 or earlier Windows operating systems, OneDrive desktop app is tightly integrated with Windows 10. OneDrive folder is in File Explorer’s navigation pane right from the moment you starting to use Windows 10. In fact, by default Windows 10 does not provide a way for users to uninstall and remove OneDrive app, whether it’s from “Programs and Features” of “Control Panel” or Windows Store. You simply won’t find any OneDrive entry to initiate the uninstallation process.

However, there are several ways available in Windows 10 to deal with OneDrive app, depending on whether you want to hide, disable, remove or uninstall the OneDrive. The tutorial provides all the options available with step-by-step guide.

Disable OneDrive Everywhere in Windows and Apps Completely

  1. Press Win + R keyboard accelerator to open Run dialog box.
  2. Type GPedit.msc and hit Enter or OK to open Local Group Policy Editor.
  3. Navigate to Local Computer Policy -> Computer Configuration -> Administrative Templates -> Windows Components-> OneDrive.
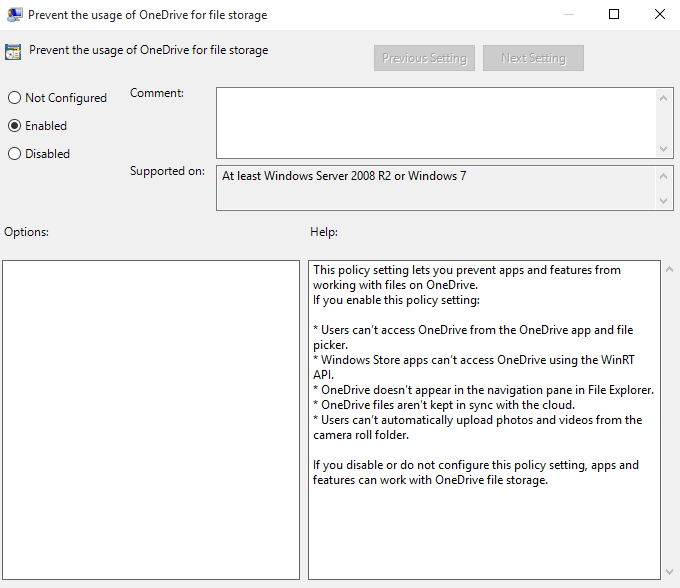
  4. In the right pane, double click on policy named Prevent the usage of OneDrive for file storage.
  5. Select the Enabled radio button.disable-onedrive-windows
  6. Click or tap OK when done.

That’s it. OneDrive icon is hidden from Explorer, and OneDrive app is completely disabled and prevented from running, and access or work with files on OneDrive from any desktop apps or modern apps is blocked. For example:

  • Can’t access OneDrive from the OneDrive app and file picker.
  • Windows Store apps can’t access OneDrive using the WinRT API.
  • OneDrive doesn’t appear in the navigation pane in File Explorer.
  • OneDrive files aren’t kept in sync with the cloud.
  • Can’t automatically upload photos and videos from the camera roll folder.
  • Sign out and sign in again, or restart the computer.
Registry Settings

The policy above is actually set a setting in Registry, which is useful for people who prefer to use Registry Editor. In addition, Windows 10 Home does not come with Group Policy Editor too.Here’s how to use Registry Editor to turn off OneDrive everywhere completely:

  1. Press Win + R keyboard accelerator to open Run dialog box.
  2. Type RegEdit.exe and hit Enter or OK to open Registry Editor.
  3. Navigate to the following registry key:HKEY_LOCAL_MACHINE\Software\Policies\Microsoft\Windows
  4. Right click on Windows and select New -> Key. Name the new key as OneDrive.Note: If OneDrive key already exists, skip this step.
  5. Right click on OneDrive registry key, and select New -> DWORD (32-bit) Value. Name the new value name asDisableFileSyncNGSC
  6. Set the data for DisableFileSyncNGSC registry value as 1.DisableFileSyncNGSCNote: DisableFileSync registry value only works in Windows 7, Windows 8 and Windows 8.1 and does not work in Windows 10.
  7. Close Registry Editor.
  8. Sign out and sign in again, or restart the computer.

Hide and Remove OneDrive from Navigation Pane of Windows Explorer

If you just want to remove the OneDrive entry in the navigation pane (also known as side panel or folder tree) in the File Explorer, or the OneDrive folder still exists in File Explorer after disabling OneDrive, follow the guide to remove OneDrive from Windows 10 File Explorer Navigation Side Panel.

Complete Remove and Uninstall OneDrive

It’s impossible to manually uninstall and remove OneDrive in Windows 10 by the step-by-step guide below. Run the commands to be executed in the process below in an Administrator Command Prompt.

Uninstall OneDrive

  1. Terminate any process of OneDrive by running the following command:
    taskkill /f /im OneDrive.exe
  2. Uninstall OneDrive app by running one of the following command:In 32-bit Windows 10 (x86):
    %SystemRoot%\System32\OneDriveSetup.exe /uninstall

    In 64-bit Windows 10 (x64):

    %SystemRoot%\SysWOW64\OneDriveSetup.exe /uninstall

One you ran the above command, OneDrive desktop app is uninstalled completely and cleanly. Most of the time, no progress bar nor confirmation dialog is shown. However, when you search for OneDrive, the app no longer be found.

Cleaning and Removing OneDrive Remnants

However, as OneDrive is a cloud storage service which is dealing with user data, there are remnants and leftovers from OneDrive app that are still available on the system as uninstallation does not remove user data, most prominently been the OneDrive folder. Run the commands below to clean up those remnants by deleting OneDrive related folders and their contents:

Important
Make sure that the following folders no longer contain any user data before proceeding with the following commands.
rd "%UserProfile%\OneDrive" /Q /S
rd "%LocalAppData%\Microsoft\OneDrive" /Q /S
rd "%ProgramData%\Microsoft OneDrive" /Q /S
rd "C:\OneDriveTemp" /Q /S

Delete and Remove OneDrive in File Explorer Folder Tree Registry Key

OneDrive has registry keys which add itself to the Navigation Pane of File Explorer in Windows 10. After uninstalling OneDrive, these registry keys are orphaned, and can be removed.

REG Delete "HKEY_CLASSES_ROOT\CLSID\{018D5C66-4533-4307-9B53-224DE2ED1FE6}" /f
REG Delete "HKEY_CLASSES_ROOT\Wow6432Node\CLSID\{018D5C66-4533-4307-9B53-224DE2ED1FE6}" /f

Remove Windows 10 Builtin Apps

So you’ve installed Windows 10 on an older device and want to get rid of some of the bloat, or you just want your Windows 10 installation to be less complicated or cluttered you can remove most of the inbuilt applications that ship wit the OS.

To remove the applications, Open a PowerShell window as Admin and run he following commands:

Get-AppxPackage *3dbuilder* | Remove-AppxPackage
Get-AppxPackage *windowsalarms* | Remove-AppxPackage
Get-AppxPackage *windowscommunicationsapps* | Remove-AppxPackage
Get-AppxPackage *officehub* | Remove-AppxPackage
Get-AppxPackage *skypeapp* | Remove-AppxPackage
Get-AppxPackage *getstarted* | Remove-AppxPackage
Get-AppxPackage *zunemusic* | Remove-AppxPackage
Get-AppxPackage *windowsmaps* | Remove-AppxPackage
Get-AppxPackage *bingfinance* | Remove-AppxPackage
Get-AppxPackage *zunevideo* | Remove-AppxPackage
Get-AppxPackage *bingnews* | Remove-AppxPackage
Get-AppxPackage *onenote* | Remove-AppxPackage
Get-AppxPackage *people* | Remove-AppxPackage
Get-AppxPackage *windowsphone* | Remove-AppxPackage
Get-AppxPackage *bingsports* | Remove-AppxPackage
Get-AppxPackage *bingweather* | Remove-AppxPackage
Get-AppxPackage *xboxapp* | Remove-AppxPackage
Get-AppxPackage *soundrecorder* | Remove-AppxPackage
Get-AppxPackage *photos* | Remove-AppxPackage
Get-AppxPackage *windowsstore* | Remove-AppxPackage
Get-AppxPackage *solitairecollection* | Remove-AppxPackage
Get-AppxPackage *windowscamera* | Remove-AppxPackage
Get-AppxPackage *windowscalculator* | Remove-AppxPackage

You can use any or all of the above commands to remove specific packages.

Network Location to Private in Windows 8.1/Server 2012 R2

One of those annoyances that sometimes happen with the new Network Location in Windows 8.x is that the network gets mis-identified as Public when it should be Private, or the other way around. Changing this in the GUI is certainly possible, but annoying, so let’s take advantage of the improved Windows PowerShell support in Windows 8.1 and do it quickly and easily. First, let’s open up an elevated PowerShell window from our limited user session:

PSH> Start-Process WindowsPowerShell.exe -verb RunAs

Now, in that window, let’s find out what our current network location is set to:

PSH> Get-NetConnectionProfile
Name : Unidentified network
InterfaceAlias : vEthernet (Local-10)
InterfaceIndex : 18
NetworkCategory : Public
IPv4Connectivity : LocalNetwork
IPv6Connectivity : LocalNetwork

From this, we see that the problem interface has an Interface Index of 18, so:

PSH> Set-NetConnectionProfile  -InterfaceIndex 18 -NetworkCategory Private

And we’re done.

Customise the System Tray Icons in Windows 10

1385252928546277415

In Windows 7 and 8, you could customise icons in the “system tray” to permanently show on the taskbar, or hide them away in the pop-up drawer. These options have moved in Windows 10.

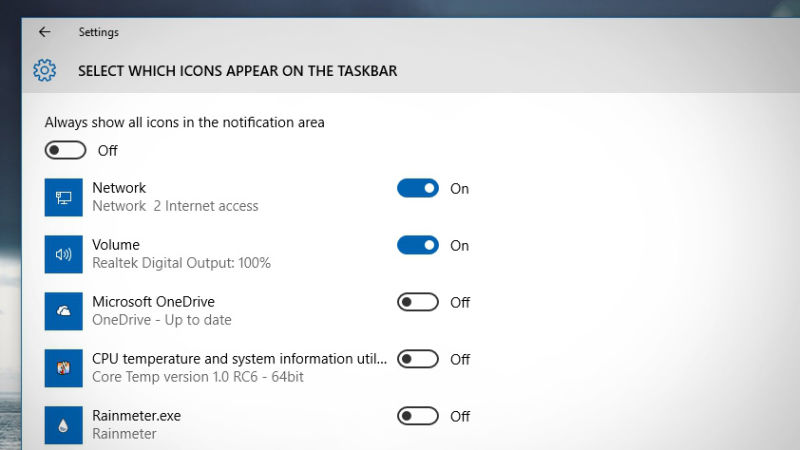
Previously, you could click the “Customize” button at the bottom of the system tray popup. In Windows 10, you have to right-click on the Taskbar, choose Properties, and then click the Customize button.

From here, click “Select which icons appear on the taskbar”. Now you can switch an app to “on” to permanently show it on the right-hand side of the taskbar. You can also move items like Network and Volume to the system tray popup. You can also select “Turn System Icons On or Off” from the original Customize screen to remove icons like Volume or Notifications entirely.

Strangely, these options aren’t as flexible as they were in Windows 7 or 8—there’s no “Show Only Notifications” option like there was before—but at least most of the main options are still available. They’ve just moved.

Suggested Max Memory Settings for SQL Server

It is pretty important to make sure you set the Max Server memory setting for SQL Server to something besides the default setting (which allows SQL Server to use as much memory as it wants, subject to signals from the operating system that it is under memory pressure). This is especially important with larger, busier systems that may be under memory pressure.

This setting controls how much memory can be used by the SQL Server Buffer Pool.  If you don’t set an upper limit for this value, other parts of SQL Server, and the operating system can be starved for memory, which can cause instability and performance problems. It is even more important to set this correctly if you have “Lock Pages in Memory” enabled for the SQL Server service account (which I always do for x64 systems with more than 4GB of memory).

These settings are for x64, on a dedicated database server, only running the DB engine, (which is the ideal situation).

Physical RAM                        MaxServerMem Setting
2GB                                           1500
4GB                                           3200
6GB                                           4800
8GB                                           6400
12GB                                         10000
16GB                                         13500
24GB                                         21500
32GB                                         29000
48GB                                         44000
64GB                                         60000
72GB                                         68000
96GB                                         92000
128GB                                       124000

If you are running other SQL Server components, such as SSIS or Full Text Search, you will want to allocate less memory for the SQL Server Buffer Pool. You also want to pay close attention to how much memory is still available in Task Manager. This is how much RAM should be available in Task Manager while you are under load (on Windows Server 2003):

Physical RAM            Target Avail RAM in Task Manager
< 4GB                               512MB – 1GB
4-32GB                              1GB – 2GB
32-128GB                            2GB – 4GB
> 128GB                              > 4GB

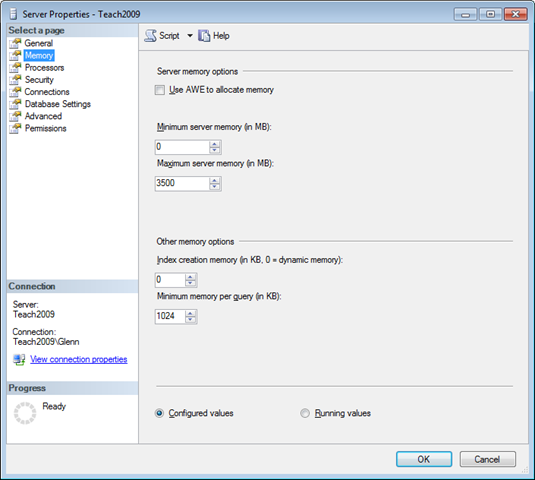
You can use T-SQL to set your MaxServerMemory setting. The sample below sets it to 3500, which is the equivalent of 3.5GB. This setting is dynamic in SQL Server 2005/2008, which means that you can change it and it goes into effect immediately, without restarting SQL Server.

— Turn on advanced options
EXEC  sp_configure‘Show Advanced Options’,1;
GO
RECONFIGURE;
GO

— Set max server memory = 3500MB for the server
EXEC  sp_configure‘max server memory (MB)’,3500;
GO
RECONFIGURE;
GO

-- See what the current values are
EXEC sp_configure;

You can also change this setting in the SSMS GUI, as you see below:

d3ca9ddc3320b216b59350a5daa2d869

Finally, I have learned that it is a good idea to temporarily adjust your MaxServerMemory setting downward by a few GB if you know you will be doing a large file copy on your database server (such as copying a large database backup file).

Change RemoteApp Icon in RDS 2012R2

Browse to %WINDIR%\RemotePackages\CPubFarms\CPubRemoteApps on each server holding the RD Connection Broker role and you will see all the .ico files.

In the following example, I have a RemoteApp called ‘Notepad’.  If i want to change the icon I’d remove “notepad.ico” and copy another .ico file of my choice and rename it to “notepad.ico”.
This will replace the icon for the RemoteApp in your Remote Apps and Desktop Connections application on the next refresh. For RD Web Access you’ll have to stop and start the Web application on the RD Web Access server.

This will only work for .ico files. If your icon is in a .exe or .dll you’ll still have to use powershell.

Cloned machine WSUS error

To fix WSUS errors with a cloned machines that was not sysprepped you will need to firstly delete the machine form the WSUS console then run he following commands on the PC/server that has been cloned:

gpupdate
net stop wuauserv /y
net stop BITS /y
rd C:\WINDOWS\SoftwareDistribution /s /Q
del "c:\windows\windowsupdate.log"
regsvr32 WUAPI.DLL /s
regsvr32 WUAUENG.DLL /s
regsvr32 WUAUENG1.DLL /s
regsvr32 ATL.DLL /s
regsvr32 WUCLTUI.DLL /s
regsvr32 WUPS.DLL /s
regsvr32 WUPS2.DLL /s
regsvr32 WUWEB.DLL /s
regsvr32 msxml3.dll /s
net start wuauserv /y
wuauclt.exe /resetauthorization /detectnow

Then restart the PC/Server and re-run Windows Update