Category Archives: IT Stuff

Exchange 2013 Move Transport Database

When designing an Exchange 2013 environment I always recommend using an additional disk to store the Transport Database and accompanying transaction log files to a separate disk. When things with SMTP get out-of-control and the Queue database grows too much your boot- and system disk do not fill up.

The Exchange Transport Configuration is stored in a CONFIG file called EdgeTransport.exe.config which is stored in the C:\Program Files\Microsoft\Exchange Server\V15\Bin directory.

When you open this file with Notepad and scroll down you’ll find something like:

<add key=”QueueDatabasePath” value=”C:\Program Files\Microsoft\Exchange Server\V15\TransportRoles\data\Queue” />

<add key=”QueueDatabaseLoggingPath” value=”C:\Program Files\Microsoft\Exchange Server\V15\TransportRoles\data\Queue” />

<add key=”IPFilterDatabasePath” value=”C:\Program Files\Microsoft\Exchange Server\V15\TransportRoles\data\IpFilter” />

<add key=”IPFilterDatabaseLoggingPath” value=”C:\Program Files\Microsoft\Exchange Server\V15\TransportRoles\data\IpFilter” />

<add key=”TemporaryStoragePath” value=”C:\Program Files\Microsoft\Exchange Server\V15\TransportRoles\data\Temp” />

This is shown in the following Figure:

image211

These are the location where you will find the Transport Queue database and the IpFilter database files and their corresponding transaction log files.

You can changes these directories to for example D:\TransportRoles\data\… and after you restart the Transport service the new location is used. The problem is that the ‘old’ Queue database is not moved. When the Transport service is restarted a new Queue database is created in the new location. If you have any (SMTP) mail in the old queue this gets lost.

Microsoft has created a scripts called Move-TransportDatabase.ps1 (located in the $ExScripts directory) which changes the location, moves the Queue Database and restarts the Transport service automatically. The Move-TransportDatabase.ps1 script takes the following parameters:

  • queueDatabasePath
  • queueDatabaseLoggingPath
  • iPFilterDatabasePath
  • iPFilterDatabaseLoggingPath
  • temporaryStoragePath

Resulting in a command like this:

.\Move-TransportDatabase.ps1 -queueDatabasePath ‘D:\TransportRoles\data\Queue’ -queueDatabaseLoggingPath ‘D:\TransportRoles\data\Queue’ -iPFilterDatabasePath ‘D:\TransportRoles\data\IpFilter’ -iPFilterDatabaseLoggingPath ‘D:\TransportRoles\data\IpFilter’ -temporaryStoragePath ‘D:\TransportRoles\data\Temp’

Note: take care about the ‘ character in the different values!

When you run this command you’ll see some requirement information, creation of the new directories, moving the databases and restarting the Transport service as shown in the following Figure:

image212

When you use the Move-TransportDatabase.ps1 script no mail gets lost and the original database is stored on the new location.

The trust relationship between this workstation and the primary domain failed

If you Google “the trust relationship between this workstation and the primary domain failed”, you get plenty of information from support blogs and Microsoft articles; however, most of them ask you to rejoin your machine to the domain. That’s not always possible.

TL;DR

You got this error and you can’t simply unjoin and rejoin because the machine is a Certificate Authority. Run this command from PowerShell:

Reset-ComputerMachinePassword [-Credential ] [-Server ]

What’s the problem and how did I get here?

The underlying problem when you see this error is that the machine you are trying to access can no longer communicate securely with the Active Directory domain to which it is joined. The machine’s private secret is not set to the same value store in the domain controller. You can think of this secret as a password but really it’s some bits of cryptographic data called a Kerberos keytab stored in the local security authority. When you try to access this machine using a domain account, it fails to verify the Kerberos ticket you receive from Active Directory against the private secret that it stores locally. I think you can also come across this error if for some reason the system time on the machine is out of sync with the system time on the domain controller. This solution also fixes that problem.

The standard fix

This problem can be caused by various circumstances, but I most commonly run into it when I reset a virtual machine to a system snapshot that I made months or even years before. When the machine is reset, it is missing all of the automatic password changes that it executed against the domain controller during the intervening months. The password changes are required to maintain the security integrity of the domain.

Support blogs and Microsoft will generally tell you to rejoin the domain to restore the trust relationship. Another option they will give is to delete the computer object and recreate it without a password and rejoin.

Microsoft support article on the topic: http://support.microsoft.com/kb/162797

I’m not a fan of any of these options. This seems heavy handed and sometimes they aren’t even possible.

Recently, when I ran into this problem, the virtual machine that reset was an enterprise certificate authority joined to my test domain. Well, guess what, Microsoft will not allow you to rename or unjoin a computer that is a certificate authority—the button in the computer property page is greyed out. There may be another way to unjoin but I wasn’t going to waste time on it when it isn’t even necessary.

UPDATE: An even better fix (IMO)

Just change your computer password using the Reset-ComputerMachinePassword cmdlet from Powershell v3!

Reset-ComputerMachinePassword [-Credential <PSCredential>] [-Server <String>]

I haven’t looked at this problem for a while, but it seems to come up very often and there has been a lot of positive response. I wanted to point out an improvement (a more up-to-date method) that came from Lord_Arokh. Powershell v3 shipped with a cmdlet for resetting computer passwords. For those with Powershell skills, this is a much better option. Powershell v3 ships with the latest version of Windows and can be downloaded from Microsoft:

http://www.microsoft.com/en-us/download/details.aspx?id=34595

I noticed that on my Windows 8 install, I only received partial help when I issued the Get-Help Reset-ComputerMachinePassword command. You can fix this by opening Powershell with administrative rights and running Update-Help.

You can use the Get-Credential cmdlet for a secure way to generate a PSCredential, which can be stored in a variable and used in a script. You will want to generate a credential for an Active Directory user with sufficient rights to change the computer’s password. The Server parameter is the domain controller to use when setting the machine account password.

Good Luck! Thanks for the update Lord_Arokh.

A better fix

Just change your computer password using netdom.exe!

netdom.exe resetpwd /s:<server> /ud:<user> /pd:*

<server> = a domain controller in the joined domain

<user> = DOMAIN\User format with rights to change the computer password

Here are the full steps:

  1. You need to be able to get onto the machine. I normally just log in with the local Administrator account by typing, “.\Administrator” in the logon window. I hope you remember the password. If you’re creative and resourceful you can hack your way in without the password. Another option is to unplug the machine from the network and log in with domain user. You will be able to do disconnected authentication, but in the case of a reset machine, remember that you may have to use an old password. Your domain user’s cached credential has the same problem as the machine’s private secret.
  2. You need to make sure you have netdom.exe. Where you get netdom.exe depends on what version of Windows you’re running. Windows Server 2008 and Windows Server 2008 R2 ship with netdom.exe you just have to enable the Active Directory Domain Services role. On Windows Vista and Windows 7 you can get it from the Remote Server Administration Tools (RSAT). Google can help you get them. For other platforms see this link: http://technet.microsoft.com/en-us/library/ee649281(WS.10).aspx
  3. Extra steps if the machine is a domain controller. If the broken machine is a domain controller it is a little bit more complicated, but still possible to fix the problem. I haven’t done this for a while, but I think this works:
    1. Turn off the Kerberos Key Distribution Center service. You can do this in the Services MMC snap-in. Set the startup type to Manual. Reboot.
    2. Remove the Kerberos ticket cache. A reboot will do this for you, or you can remove them using KerbTray.exe. You can get that tool here:http://www.microsoft.com/download/en/details.aspx?displaylang=en&id=17657
    3. Post change steps. Do these in conjunction with 5 below:
      • Turn the Kerberos Key Distribution Center Service back on before rebooting.
      • You should reboot the domain controller and then force replication in the Active Directory Sites and Services MMC snap-in.
  4. Run netdom.exe to change the password. Open an administrative command prompt. On Windows platforms with UAC enabled, you will need to right-click on cmd.exe and select “run as Administrator”. Type the following command: netdom.exe resetpwd /s:<server> /ud:<user> /pd:*
  5. Reboot the machine.

Here is more information on netdom.exe: http://support.microsoft.com/kb/325850

I hope this is helpful. This problem comes up every few months for me, so I wanted to document it for my own use. It is difficult to find when you just search for the error you get in the login window.

Windows Server 2012: Deactivating UAC

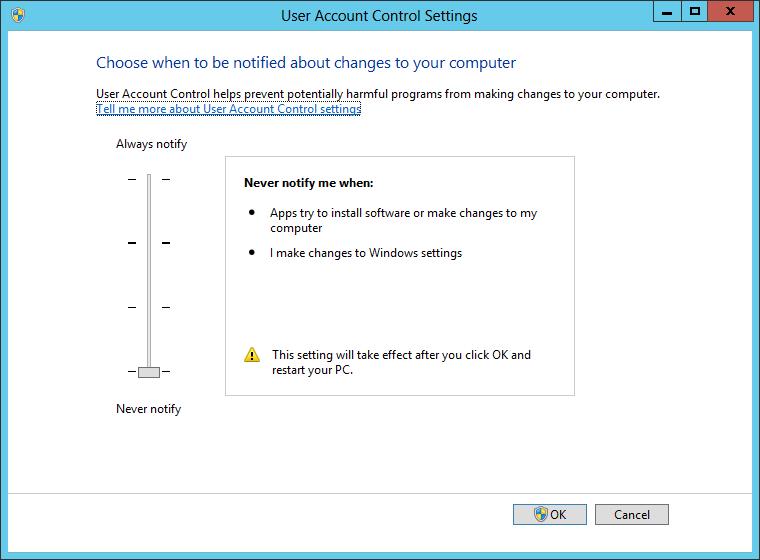
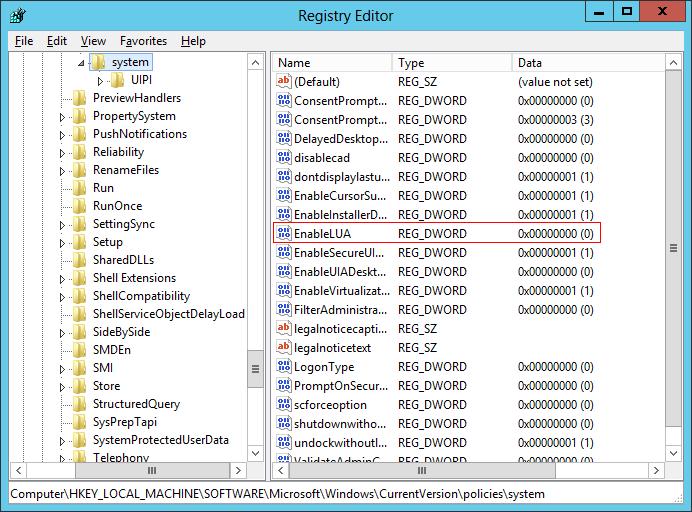
Deactivating UAC in Windows 2008 R2 was possible via running msconfig (for example winkey+r -> msconfig), going to the Tools tab and launching “Change UAC settings”. There, you select “Never notify” to disable UAC. The same approach is still available in Windows Server 2012, though UAC is still active after you selected “Never notify”. You have the option to turn off UAC via registry by changing the DWORD “EnableLUA” from 1 to 0 in “HKEY_LOCAL_MACHINE\SOFTWARE\Microsoft\Windows\CurrentVersion\policies\system”. You will get a notification that a reboot is required. After the reboot, UAC is disabled.

3187.UACdialog

8228.uacregedit

Extracting PPP/SIP passwords from the Netcomm “White Genius” NF4V router

So for a while, Orcon has been distributing the Netcomm NF4V to replace the old Black Genius. Unfortunately, it’s not so easy to extract passwords from this new model, as the config dumps from the Web UI are encrypted in some way, and the passwords are not present in the DOM, so you can’t get them with browser dev tools. Fear not, however! The NF4V is not fort Knox.

  1.     First up, open your router webui. By default, this is 192.168.20.1.
  2.     Log in, then click Management, Access Control, Service Control.
  3.     Click “Enable” under the LAN column beside “Telnet”. Do NOT select the WAN column (this would open your router up to attacks from the internet!)
  4.     Click Save.
  5.     Now you need a telnet client. Windows has one built in, but it’s disabled by default from Win7 and up. To enable it again, follow these instructions. Alternatively, you can use the Putty telnet client.
  6.     Hit Win+R, and type CMD, then press enter.
  7.     Type “telnet 192.168.20.1 -f C:\telnetlog.txt”, press enter. If your router has a different IP for the webUI, then enter that instead.
  8.     Log in with your usual router login.
  9.     Type “dumpsysinfo” and press enter.
  10.     When that finishes, type quit and close the command prompt.
  11.     Type “notepad C:\telnetlog.txt”
  12.     For PPP, Ctrl+F, “<Username>[email protected]</Username>”, your password is right below that. There may be more than one, so search through until you find both and try them until one works.
  13.     For SIP, search “<AuthPassword>”. Again, there appear to be two, I’d like to know what the difference is. Trial and error.
  14.     For the MAC address, search “eth0: MAC Address”. You’ll need this to replace the genius for UFB.
  15.     Get back into your router webui and disable telnet for security purposes.

Replacing the Genius:

  •     UFB: Uses DHCP, so put your new router into DHCP mode on the WAN port, enable VLAN10 on the WAN port, and set the MAC address to the same one as your genius.
  •     ADSL/VDSL: Put your new router into PPPoE mode, enable VLAN10 on the DSL port (I think), and give it your PPP username and password as extracted from your genius. This is untested, I don’t have DSL.

[Mod edit (MF): adding below a disclaimer by Orcon]

  • It is not Orcon policy to make Genius SIP passwords available to users of the Genius service.
  • Connection of a non-Genius device to a Genius service breaks Orcon Terms and Conditions.
  • We don’t support any non-Genius devices on Genius connections in any way whatsoever.
  • Orcon will not provide any explanation of any settings used to provide the Genius Data or SIP services.
  • Our device and software provisioning platform uses automated provisioning and updating procedures. Orcon is not responsible for any interaction with any non-Genius device or responsible for any damage or loss incurred in connection with any such interaction.
  • Orcon cannot block automated actions provisioning platform actions by account or mac address.
  • If you need to report a service issue please replace the Orcon Genius device and ensure the issue still exists while using the Orcon Genius device prior to logging any support calls. Should the fault be diagnosed later to be due to the non-Genius device then the user will be responsible for any costs incurred by Orcon.
  • Should the SIP service be compromised in the non-Genius device then Orcon has no liability for any resulting fraudulent call charges.

How to Sign Certificate using Microsoft Certificate Authority (CA) in windows server

In this tutorial you will learn how to install and configure Microsoft Certificate Authority windows server 
1
 
On the server in which we have saved the CSR. if you don’t know how to Create Certificate Signing Request (CSR) Click Here
 
Go to Start ->  Internet Explorer
2

If you installed  Microsoft Certificate Authority (CA) on the same server in which you are hosting the website then in the Address Bar type http://localhost/certsrv and if you have install Microsoft Certificate Authority (CA) some where else you have to type IP Address that server For example:  http://192.168.1.76/certsrv
Once you have open the Microsoft Certificate Services page Click On Request a certificate

3
Click On advanced certificate request
4
Click On Submit a certificate request by using a base-64-encoded CMC or PKCS #10 file, or submit a renewal request by using a base-64-encoded PKCS #7 file. 
5
In the empty box you have to copy the text from .CSR file and past it into the text box as shown below in Image 6 
6
Copy all the text from the Certificate Signing Request (CSR) file
7
Past the copied text in the box as shown in the image. now click on Submit. 
 
8
After you submit certificate request the certificate pending page will appear close this window.
9
Go to Start -> Administrative Tools -> Certification Authority
10
From the left pane expand the “Certification Authority (Local)”
11


Click On Pending Requests folder ->  right click request id, select All Tasks, and then click on Issue.
 
12

After Issuing the certificate verify the Certificate is Issued properly by Clicking On Issued Certificates.  Now close Certificate Authority window.

13

Now open Microsoft Certificate Services Webpage. In the Address Bar type http://localhost/certsrv and if you have install Microsoft Certificate Authority (CA) some where else you have to type IP Address that server For example:  http://192.168.1.76/certsrv


Click -> View the status of a pending certificate request.

14


Click Save-Request Certificate ( DAY-MONTH-DATE-YEAR)
 
15

Select DER encoded -> Click Download Certificate

16

Click on Save

17

Browser to folder where you want to save the Certificate.

18

Click Open to view the Certificate.

19


Here you can view all the details of the Certificate.
 
You successfully Issued Certificates using Microsoft Certificate Authority (CA) on windows server  and downloaded the Certificate.


Powershell Script is not digitally signed

If you have tried to run a PowerShell script that isn’t signed, you’ve likely run into the security error “File … cannot be loaded.  The file is not digitally signed.  The script will not be executed on the system. “  This means that the script is not trusted to be run on your system.

If you’d like to sign the script, here is a walkthrough:

http://blogs.technet.com/b/heyscriptingguy/archive/2010/06/17/hey-scripting-guy-how-can-i-sign-windows-powershell-scripts-with-an-enterprise-windows-pki-part-2-of-2.aspx

Alternatively, you can change your signing policy.  This tends to be the practice most of the time… 😉

http://technet.microsoft.com/en-us/library/ee176961.aspx

You can choose, “Set-ExecutionPolicy Unrestricted” or, replace unrestricted with “Restricted”, “AllSigned”, or “RemoteSigned”

Enable Disk Cleanup tool on Windows Server 2008 R2

For some odd reason Microsoft decided to leave this feature disabled by default, and place it within a optional feature set called “Desktop Experience“.

If your hard drive is getting full and you wish to do a disk cleanup, there are two ways to enable the Disk Cleanup tool. We recommend using option #2 below for several reasons:

– Installing the Desktop Experience feature will not only intall Disk Cleanup, but a lot of other utilities you likey don’t need on a server (sound recorder, desktop themes, etc).

– Installing the Desktop Experience feature will require a server reboot

How to enable the Disk Cleanup tool:

1) Go to Programs & Features, and in the Features section, enable/install “Desktop Experience”.   The downside to this is that you will need to reboot your server after installating this and it installs other components you do not need on a server.

2) [RECOMMENDED] –  All you really need to do is copy some files that are already located on your server into specific system folders, as described at http://technet.microsoft.com/en-us/library/ff630161(WS.10).aspx


The location of the files you need to copy depend on your version of Windows:

Operating System Architecture File Location
Windows Server 2008 R2 64-bit C:\Windows\winsxs\amd64_microsoft-windows-cleanmgr_31bf3856ad364e35_6.1.7600.16385_none_c9392808773cd7da\cleanmgr.exe
Windows Server 2008 R2 64-bit C:\Windows\winsxs\amd64_microsoft-windows-cleanmgr.resources_31bf3856ad364e35_6.1.7600.16385_en-us_b9cb6194b257cc63\cleanmgr.exe.mui
Windows Server 2008 64-bit C:\Windows\winsxs\amd64_microsoft-windows-cleanmgr.resources_31bf3856ad364e35_6.0.6001.18000_en-us_b9f50b71510436f2\cleanmgr.exe.mui
Windows Server 2008 64-bit C:\Windows\winsxs\amd64_microsoft-windows-cleanmgr_31bf3856ad364e35_6.0.6001.18000_none_c962d1e515e94269\cleanmgr.exe.mui
Windows Server 2008 32-bit C:\Windows\winsxs\x86_microsoft-windows-cleanmgr.resources_31bf3856ad364e35_6.0.6001.18000_en-us_5dd66fed98a6c5bc\cleanmgr.exe.mui
Windows Server 2008 32-bit C:\Windows\winsxs\x86_microsoft-windows-cleanmgr_31bf3856ad364e35_6.0.6001.18000_none_6d4436615d8bd133\cleanmgr.exe


Once you’ve located the files move them to the following locations:

  1. Copy Cleanmgr.exe to %systemroot%\System32.
  2. Copy Cleanmgr.exe.mui to %systemroot%\System32\en-US.

You can now launch the Disk cleanup tool by running Cleanmgr.exe from the command prompt.