Category Archives: IT Stuff

Which should I use PCL or PS driver?

First I’ll give my own answer

You should go with PCL 6. Here’s why: You don’t need PostScript. If you did need it you would know it and you wouldn’t be asking this question. PostScript is more problematic than is PCL, so if you don’t need it it’s better avoided. It’s more problematic in these ways and more: harder to find drivers (for a Win ME computer for example), more resource hungry (both on the printer, the workstation, and the network), HP’s PostScript drivers are going to be much buggier than their PCL drivers, the quality of HP’s PostScript emulation (that is, a third-party clone of Adobe’s PostScript program) is highly questionable whereas the PCL is an HP product and therefore a better risk, PostScript tends to throw obscure errors when printing and requires obscure expertise to troubleshoot (very frustrating)-PCL does this less, PostScript tends to run the printer out of memory easier, PostScript drivers offer lots of obscure settings that are useful only to industry pros (like color separations, e.g.) and will only confuse normal people and give them more ways to cause themselves problems, and on difficult prints PostScript will often be slower. All that off the top of my head.

PCL6 is a powerful page description language and will do anything you ever need to do. Quality is not an issue, PCL works fine and can print the same vector graphics and vector fonts as can PostScript. Photos and other bit mapped graphics are outside the realm of PostScript’s power and thus the two languages will print them the same, except that PostScript will render the photo in text and blow up its binary size, thus taking longer to download it to the printer (it has to do this because PostScript is a language of text, there is nothing binary there. Everything is rendered into text characters).

PostScript offers many advantages, but mostly to printing industry pros. An example is that if you want to print something on a super-high resolution image setter at some local high end printing shop they will likely accept the file only in Adobe Photoshop or PostScript formats, thus if you are using the PostScript driver you have a way to make such a file. However, PDF format can be used now in many situations where PostScript was formerly required. PostScript drivers do tend to offer more features than the PCL driver and some may be useful to you (like Booklet printing e.g.) but at this late date and age it’s more likely that the PCL driver offers everything you would ever need, and the PostScript driver may not offer much at all extra that you could use.

SQL User account not found

When mounting a SQL database as the default user and get an error user not found, use the following accounts:

Service/Database Accounts –

NT SERVICE\MSSQLSERVER
NT SERVICE\SQLSERVERAGENT

Error during a paging operation on HyperV guest OS

I started getting this error on the Guest OS.
* Source: Disk
* Event Log: System
* Type: Warning Event
* Event ID: 51
* An error was detected on device \Device\Harddisk0\DR0 during a paging operation.

The HyperV host does not show any errors in any event logs.

Windows guest operating systems that are using virtual disks on non-local datastores might experience unexpected blue screens.

This problem occurs when the responses from the storage array take longer than the guest operating system expects to wait. The default disk timeout period in Windows is too short to handle the longer delays that can occur in a SAN, NFS, or iSCSI environment, and a blue screen error is the result of exceeding this timeout.

Increase the disk timeout to 60 seconds in the Windows virtual machines by editing the Windows registry as described below:

1. In the registry, go to HKEY_LOCAL_MACHINE/System/CurrentControlSet/Services/Disk.
2. Click Edit/Add value.
3. Set the value name to TimeOutValue.
4. Set the data type to REG_DWORD.
5. Set the data to 0x03c hex (or 60 decimal).
6. Reboot the virtual machine.

Note:

* Contact your Storage vendor to confirm whether a specific TimeOutValue setting has been identified for your particular environment.
* Increasing this disk timeout setting does not affect the performance of the guest operating system or virtual machine under normal operating conditions, but you must verify how the applications you are running in the guest operating system handle disk access delays.

Adobe Reader XI – An internal error occurred

adobe_reader_an_internal_error_occurred

I installed Adobe Reader XI on our Windows Server 2012 R2 RDS servers, and we start to get this error when we started Adobe Reader.

After some time on Google i found out that disabling Adobe Reader XI sandbox protection mode fixed the error.

go to the registry and find this key:
HKEY_LOCAL_MACHINE\SOFTWARE\Policies\Adobe\Acrobat Reader\11.0\FeatureLockDown

Create a new REG_DWORD

Value Name
bProtectedMode

Value Data
0

ASG Remote Desktop Windows 8.1 NLA issue RDP

I have found this issue may not be due to a problem with the Remote Desktop tool but an issue with windows 8.1.

This is with the Windows 8.1 release from MSDN/Technet

• Configure Network Level Authentication
1. Open Regedit.
2. In the navigation pane, locate and then click the following registry
subkey: HKEY_LOCAL_MACHINE\SYSTEM\CurrentControlSet\Control\Lsa
3. In the details pane, right-click Security Packages, and then click Modify.
4. In the Value data box, type tspkg. Leave any data that is specific to other SSPs, and then click OK.
I was left with “” and tspkg
5. In the navigation pane, locate and then click the following registry subkey:
HKEY_LOCAL_MACHINE\SYSTEM\CurrentControlSet\Control\SecurityProviders
6. In the details pane, right-click SecurityProviders, and then click Modify.
7. In the Value data box, type credssp.dll. Leave any data that is specific to other SSPs, and then click OK. (This was already in my config so I didn’t change it)
8. Exit Registry Editor.
9. Restart the computer.

Once done, ASG RD worked fine for all my connections again.

SHA1 Thumbprints for trusted .rdp publishers

Remote Desktop Connection (RDC) has a Group Policy setting that determines which publishers are to be considered trusted when launching connections (typically .rdp files served in various ways).

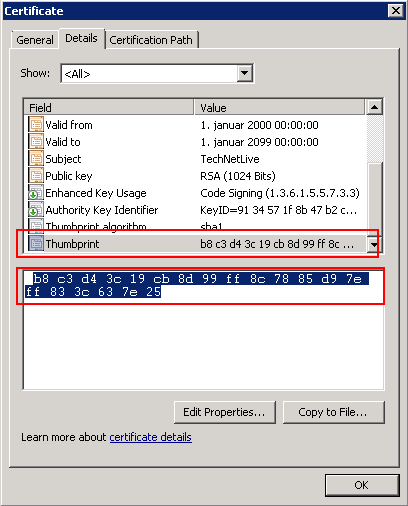
The publisher is identified by the SHA1 thumbprint of the certificate of the publisher (the certificate used to sign the .rdp file). You get the thumbprint from the certificate:

image8

The setting is located under:
Computer Configuration\Policies\Administrative Templates\Windows Components\Remote Desktop Services\Remote Desktop Connection Client

Setting:
Specify SHA1 thumbprints of certificates representing trusted .rdp publishers

Description:
This policy setting allows you to specify a list of Secure Hash Algorithm 1 (SHA1) certificate thumbprints that represent trusted Remote Desktop Protocol (.rdp) file publishers.

If you enable this policy setting, any certificate with an SHA1 thumbprint that matches a thumbprint on the list is trusted. If a user tries to start an .rdp file that is signed by a trusted certificate, the user does not receive any warning messages when they start the file. To obtain the thumbprint, view the certificate details, and then click the Thumbprint field.

If you disable or do not configure this policy setting, no publisher is treated as a trusted .rdp publisher.

Notes:

You can define this policy setting in the Computer Configuration node or in the User Configuration node. If you configure this policy setting for the computer, the list of certificate thumbprints trusted for a user is a combination of the list defined for the computer and the list defined for the user.

This policy setting overrides the behavior of the “Allow .rdp files from valid publishers and user’s default .rdp settings” policy setting.

If the list contains a string that is not a certificate thumbprint, it is ignored.

As you can see; no mention of how the thumbprint is to be entered!

I found out the hard way that you have to remove all spaces and convert all letters to uppercase for the thumbprint to be valid. You are not informed if the format you enter is incorrect, it is just silently ignored if not recognized as a valid thumbprint.

This quick PowerShell command will do these two operations:

(“<your thumbprint here>”).ToUpper().Replace(” “,””)

If this Group Policy setting is not in effect, either because you have not set it or the thumbprint is incorrect/invalid, your users will get a warning when connecting, even if the certificate used to sign the .rdp file is trusted:

image9

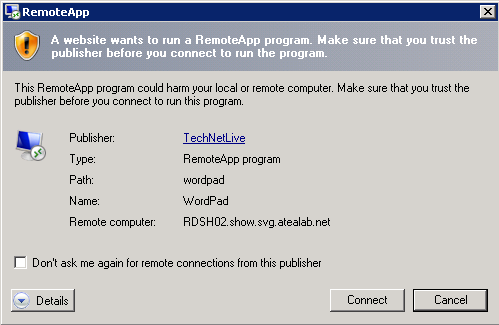
Error: A website wants to run a RemoteApp program. Make sure that you trust the publisher before you connect to run the program.

It is interesting to note that the rdpsign.exe command line utility that is used to sign .rdp files manually, requires that the thumbprint of the certificate must be provided in just this way: http://technet.microsoft.com/en-us/library/cc753982(WS.10).aspx

More info:

A note on copying the thumbprint

If you look at the highlighted/selected thumbprint in the image above you will see what looks like a leading whitespace. If you select the whole string (not as above), you will get a strange leading character in your thumbprint. Have a look at this zoomed image:

image10

I do not know what character this is, but it invalidates the thumbprint string if you paste it into the SHA1 thumbprint field in your GPO. Even stranger is that it does not show up in the pasted text in the GPO object; it just “looks” right. As I said, I have no explanation, but remember to skip the leading whitespace when you copy your thumbprint.

This is how it should look:

image11

Google Update Service

Get rid of pesky Google Update services on your PC/Server after installing Chrome or several other Google type apps:

@echo off
sc stop gupdate
sc delete gupdate
sc stop gupdatem
sc delete gupdatem

This should remove the Google Update services.

Upgrading Windows Server 2012 to 2012 R2

System Requirements:

  • Windows Server 2012
  • Windows Server 2012 R2

The Problem:

This article outlines a few tips to be mindful of when performing an in-place upgrade from Windows Server 2012 to Windows Server 2012 R2.

More Info

Without wishing to be verbose on this one, the simple answer is that it appears to be a bug / limitation / “feature” of the iSCSI Target component of Server 2012. It was not a client issue.

Operating System Features

The following core features will not be available after upgrading from 2012 to 2012 R2

  • Servermanagercmd.exe
  • Slmgr.vbs
  • System Image Backup
  • Windows Server Resource Manager

Network

The network profiles for non-domain adapters will drop back to Public after the upgrade, altering the active firewall configuration.

iSCSI / SAN

After the upgrade install, the Windows Firewall will inherit most firewall configuration settings from the previous configuration, however the port configurations for the iSCSI Target services will be in a disabled state, preventing your iSCSI Initiators from connecting to the service.

The upgrade process will fully de-install your NIC’s, although in general most of the main configuration settings are retained and re-applied after the upgrade (IP, Net mask etc), the advanced adapter settings are not applied. In particular, and Jumbo Frame settings designed to support extended MTU’s on your SAN NIC’s will have been reset to the standard 1500 bytes. This will have a performance hit on SAN access and Hyper-V live migration performance. You should manually re-enable the Jumbo frame settings (9014 or 9000 bytes) but be aware that it will cause the NIC to drop and re-initialise when you hit apply.

SysInternals

A number of the SysInternals apps, for example BGInfo, that work fine under 2012 have small issues under 2012 R2. BGInfo has a recent update that makes it aware of 2012 R2 and IE 11 rather than reporting that the OS is Windows 6.2 running MSIE 9.0.11.

WSUS 3.0 SP3

Ensure that any legacy WSUS 3.0 servers are patched to SP2 with KB2828185 installed. After re-synchronising, changing the product configuration and synchronising a second time that you server can update from your existing WSUS infrastructure. Be prepared for any 2012 R2 Data Center servers to report in WSUS as Windows 2000 Data Centre however!

Removing the Windows.old uninstall cache without installing Desktop Experience

Unfortunately you can no longer copy/paste the two cleanmgr.exe files out of WinSxS like you used to be able to do with 2008 (the store is compressed). I found that a few loops of the following will eventually remove the Windows.old upgrade cache from the root of the OS drive.

  :: This is very slow as it is disk intensive: run out of hours!!
  takeown /F C:\windows.old /R /D Y
  takeown /F c:\Windows.old\* /R /A /D Y
  takeown /F C:\windows.old /R /D Y
  takeown /F c:\Windows.old\* /R /A /D Y
  cacls C:\windows.old /T /G Administrators:F
  rd /s /q C:\windows.old

p.s. run each line manually, the above is not setup as a batch script and will ask for yes / no input. Several runs may be required.

General

Your desktop wallpaper will be reset to the default grey Windows Server logo, re-create as necessary

Don’t forget to activate against your KMS or enter your key.

Dell iDRAC 7 is now completely inaccessible to any of the 2012 R2 servers because IE11 is not yet supported. To run it, disable Protected mode and add the IP address of the DRAC server to the Compatibility Mode view


Installing Windows 8.1 from a USB Stick with UEFI and Secure Boot

When Building a Windows UEFI system there are a few things to know that are different from when building an old BIOS based machine. First your USB install stick has be be formatted with FAT32 and Not NTFS. Second your UEFI motherboard probably has a Compatibility Support Module (CSM) mode that is set for BIOS compatibility. You need to turn that off if you want to enable UEFI, Secure Boot, and booting from a GPT partitioned disk.

The 11 steps for manually preparing / building a USB Disk to be a bootable Win 8.1 Install.
This bootable USB stick will work for both older BIOS installs as well as the newer UEFI installs.

1. Diskpart (Run from a CMD prompt)
2. List Disk
3. Select Disk # (Where # is the number of your USB disk)
4. Clean (removes any partitions on the USB disk, including any hidden sectors)
5. Create Partition Primary (Creates a new primary partition with default parameters)
6. Select Partition 1 (Focus on the newly created partition)
7. Active (Sets the selected partition to an active valid system partition state)
8. Format FS=fat32 quick (Formats the partition with the FAT32 file system. FAT32 is needed instead of NTFS so that it can load under the secure boot UEFI BIOS.)
9. Assign (Assigns the USB drive a drive letter)
10. Exit
11. Copy all the files from the Windows 8.1 DVD to the USB Stick.

For More information on on UEFI and Installing Windows to these machines here are some links:

For more information on UEFI BIOS and Secure Boot in Windows 8.1
http://answers.microsoft.com/en-us/windows/forum/windows8_1-security/uefi-secure-boot-in-windows-81/65d74e19-9572-4a91-85aa-57fa783f0759

Installing Windows on UEFI-based Computers
http://technet.microsoft.com/en-us/library/hh290675(v=WS.10).aspx#BootingUEFImode

Deploy Java 7 Through GPO

First off we need to download the latest .exe for Java. I tend to get it through Oracle’s site as you get a better listing and can obtain earlier versions/the JDK (Java Development Kit) if you want it as well. Any who, Java comes in 3 flavours:


1. JDK – Java Development Kit
2. Server JRE – “Server Java Runtime Environment” Doesn’t include the web plugins but allows you to run RIA’s (Rich Internet Applications)
3. JRE – Java Runtime Environment (The stock standard app you’ll pick up to distribute on your network)


Obtain the version you require from here: http://bit.ly/jdkjre

Once you’ve chosen your flavour, accepted the license agreement and downloaded the Windows x86 Offline version “jre-7uXX-windows-i586.exe” where XX is whatever update they are up to. (~30MB) you can open the .exe with admin rights.

Once it pops up with the java installer window you will find hidden under “%userprofile%\appdata\locallow\Sun\Java” the Java .msi. You can get there by copying and pasting that into a run prompt. Copy the latest Java folder to your server share (mine was jre1.7.0_45) and don’t worry about the Deployment folder. Within this java folder is an .MSI and .cab. We now need to make a transform so the Java Update utility doesn’t annoy users.

Using either Orca or instEd to create an .MSI transform, under the property table set:

  • AUTOUPDATECHECK      0 (turns off looking for updates)
  • ENDDIALOG       0 (Turns off install finished notice)
  • IEXPLORER          1 (Installs to IE)
  • JAVAUPDATE     0 (Turns off updating)
  • JU           0 (Turns off updating)
  • MOZILLA              1 (Install to firefox)
  • RebootYesNo    0 (Stops auto restart after install)


Once that’s all done and you’ve generated/saved your Transform to the network shared Java folder, load up Microsoft’s Group Policy Management console and right click on the Organisational Unit (OU)  that you’ve added your network computers to and select “Create a GPO…”

Name the policy “Java 7uXX” or whatever you would like it to be named, then under:

“Computer Configuration – Policies – Software Settings – Software Installation”

right click in the right hand window, or on the software installation icon and choose “New… – Package”. Find the Java folder you put on your server and select the .MSI and choose “Advanced” as the deployment method.

Once the panel opens up, go to the Modifications tab and select Add. Locate your Transform and click Ok. The package will now be loaded into MS GPO and you can exit out of the window as it is already saved.


To delete the Start Menu icons run this script at shutdown (or startup) (.bat)

@echo off

if exist "%PROGRAMDATA%\Microsoft\Windows\Start Menu\Programs\Java" (
    rmdir "%PROGRAMDATA%\Microsoft\Windows\Start Menu\Programs\Java" /s /q
)

In terms of uninstallation download the JavaUninstall.bat file. This will uninstall Java up to version:

  • 8.0
  • 7u51
  • 6u71
  • 5u23
  • 1.4.2_19
  • 1.3.1_25


Uninstall Script + SuperJRE Download:

JavaUninstall.bat:  http://bit.ly/jreUninstall
SuperJRE (All Java 7 updates with Transform – 439.04MB): http://www.mediafire.com/download/crlxvyq7vdceas0/SuperJRE.zip
JRE Installations per version (~30MB):

JRE 7u51.zip (MSI+CAB+Transform) : http://bit.ly/jre170_51
JRE 7u45.zip (MSI+CAB+Transform) : http://bit.ly/jre170_45
JRE 7u40.zip (MSI+CAB+Transform) : http://bit.ly/jre170_40_1
JRE 7u25.zip (MSI+CAB+Transform) : http://bit.ly/jre170_25
JRE 7u21.zip (MSI+CAB+Transform) : http://bit.ly/jre170_21
JRE 7u17.zip (MSI+CAB+Transform) : http://bit.ly/jre170_17
JRE 7u15.zip (MSI+CAB+Transform) : http://bit.ly/jre170_15
JRE 7u13.zip (MSI+CAB+Transform) : http://bit.ly/jre170_13
JRE 7u11.zip (MSI+CAB+Transform) : http://bit.ly/jre170_11
JRE 7u10.zip (MSI+CAB+Transform) : http://bit.ly/jre170_10
JRE 7u09.zip (MSI+CAB+Transform) : http://bit.ly/jre170_09
JRE 7u07.zip (MSI+CAB+Transform) : http://bit.ly/jre170_07
JRE 7u06.zip (MSI+CAB+Transform) : http://bit.ly/jre170_06
JRE 7u05.zip (MSI+CAB+Transform) : http://bit.ly/jre170_05
JRE 7u04.zip (MSI+CAB+Transform) : http://bit.ly/jre170_04
JRE 7u03.zip (MSI+CAB+Transform) : http://bit.ly/jre170_03
JRE 7u02.zip (MSI+CAB+Transform) : http://bit.ly/jre170_02
JRE 7u01.zip (MSI+CAB+Transform) : http://bit.ly/jre170_01
JRE 7u00.zip (MSI+CAB+Transform) : http://bit.ly/jre170_00