Over time WIndows update can fill up your svs folder. To collapse updates into the base image run the follwoing in Powershell as Admin –
dism.exe /online /Cleanup-Image /StartComponentCleanup /ResetBase
That will free up some space on your C Drive
Over time WIndows update can fill up your svs folder. To collapse updates into the base image run the follwoing in Powershell as Admin –
dism.exe /online /Cleanup-Image /StartComponentCleanup /ResetBase
That will free up some space on your C Drive
Summary
Instructions to resolve unknown device appearing labeled Hardware ID BTH\MS_BTHPAN after installing Windows Server 2019 or 2022 and all drivers for Intel® NUC8i3/v5/v7PN products.
Description
After installing Windows Server 2019 and all available drivers, an Unknown Device appears in Device Manager.
Resolution
Perform the following steps to install drivers for the unknown device:
After Upgrading to Windows 10 1709 (Fall Creators Update) you may not be able to connect to network shares or your NAS with the guest account. Windows 10 1709 onwards (including Server 2016 and Server 2019) Cannot Access SMB2 Shares via the Guest account. The following error may be shown:
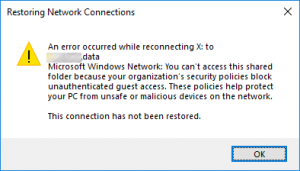
An error occurred while reconnecting X: to Share
Microsoft Windows Network: You can’t access this shared folder because your organization’s security policies block unauthenticated guest access. These policies help protect your PC from unsafe or malicious devices on the network.
Starting with Windows 10 1709, Windows prevents you from accessing network shares with guest access enabled. Guest access means connecting to network shares without authentication, using the built-in “guest” account.
This has no reference to the SMB1 protocol which was disabled in the latest Windows 10 release and all new Server installs from 2016.
To enable guest access again, configure the following GPO:
Computer configuration > administrative templates > network > Lanman Workstation: "Enable insecure guest logons" = Enabled

The corresponding registry key is located under:
[HKEY_LOCAL_MACHINESYSTEM>CurrentControlSet>Services>LanmanWorkstationParameters]"AllowInsecureGuestAuth"=dword:1
You can also download the reg file to simply click and set the registry key from here: AllowInsecureGuestAuth
There is also an MDM Policy available, starting with Windows 10 1803: https://docs.microsoft.com/en-us/windows/client-management/mdm/policy-csp-lanmanworkstation
Guest access is often used to access data stored on Network Attached Storage, e.g. on a Synology NAS. Every user from any device has access to these shares. Generally it’s never recommended to use guest access because it’s a huge security risk. Within the time of ransomware, encrypting whole drives it’s definitely not a good idea. I strongly recommend to use LDAP Support to authenticate against your NAS.
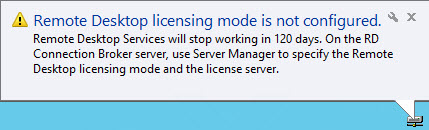
When you home lab and you don’t have Microsoft license for RDS, you have two options. Reinstall the server (redeploy the VM) or cheat a bit. Yes, in fact, there is cool hack which allows you to reset the 120 day grace period on Windows Server 2012 R2 RDS, and we’ll show you how. I like doing posts which shows some cool hacks, and this is exactly this kind of post – How To Reset 120 Day RDS Grace Period on 2012 R2 Server.
Normally you would need to activate the RDS/TS CAL License server and point the Server to License server with User/Device License and will resolve the problem. However, we don’t want to do that because we have no license from Microsoft, in our lab. (and many other IT pros who test stuff in the lab too).
What we will do is simply reset the default timer which is 120 days grace time, when you first add the RDS role. In fact, you do not need to reboot the server either. Simply log out and back in and the message changes from let’s say 54 days left to 120 days left. And that’s it.
Note: This tip works also on Windows Server 2016 and Windows server 2019
For every admin who runs homelab or has a cloud lab, this is a must known hack.
Step 1: Connect to your RDS Server as an admin and open regedit.
Navigate to the following key:
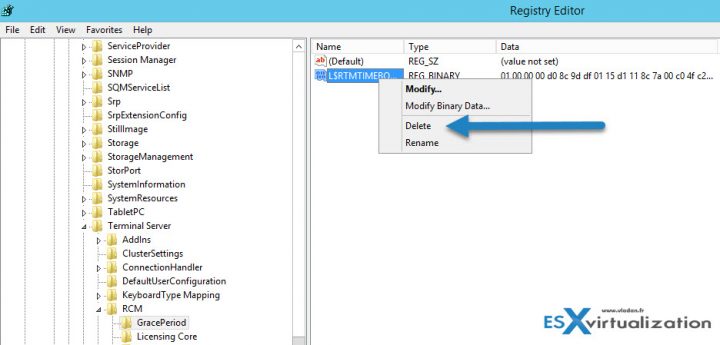
The solution is to delete the REG_BINARY in:
HKEY_LOCAL_MACHINESYSTEMCurrentControlSetControlTerminal ServerRCMGracePeriod
It’s called a “TimeBomb” … -:)
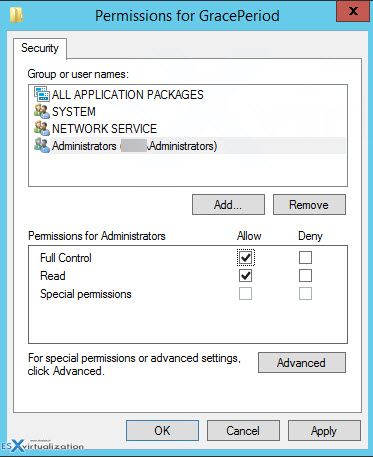
Note: You must first take an ownership and give admins the full rights.
Like this:
Go to menu Edit > Permissions
Once you delete the Registry key you must reboot the host. Some users have reported that when not rebooting the host you will see the message changing, but no connections are possible.
Update: Well, in fact, you can just restart the Service “Remote Desktop Services” which will momentarily disconnect all the active sessions and then after a minute or so you can reconnect to the sessions.
You should see the message changing at the taskbar area….
Note that you have also a possibility to check how many days its left… Go to the command prompt and enter this command (not tested).
wmic /namespace:\rootCIMV2TerminalServices PATH Win32_TerminalServiceSetting WHERE (__CLASS !=””) CALL GetGracePeriodDays
Apparently, you can delete this key every time it expires ….. indefinitely. Wow. That’s good to know too.
This is it my friends. Today’s tip for home labs.
Second Tip:
Download a PowerShell script from Microsoft allowing you to reset the RDS grace period. Mirror here: Reset-TSGracePeriod.ps1
Quote from Microsoft Technet:
The PowerShell script can be used to query and reset terminal server grace period to default 120 days if it is nearing to the end. We often need to deploy Terminal Server (Remote Desktop Session Host in 2012) for testing purposes in development environments allowing more than 2 concurrent Remote Desktop Sessions on it. When it is installed, by default if no RDS or TS Licensing server is specified via either GPO or Registry, it is in default Grace period which is 120 days and it works fine until then.
Once Grace period expires, the server does not allow even a single Remote Desktop session via RDP and all we are left with is to logon to the Console of machine using Physical/Virtual console depending on Physical or Virtual machines or try to get in using mstsc /admin or mstsc /console, then remove the role completely and restart the terminal server (RDS Server) and post that it starts accepting default two RDP sessions.
To enable LAN users (not domain-joined) to be able to access folders and printers without getting prompted for a username and a password.
Start > Local Security Policy > Local Policies > Security Options
EnabledEnabledDisabled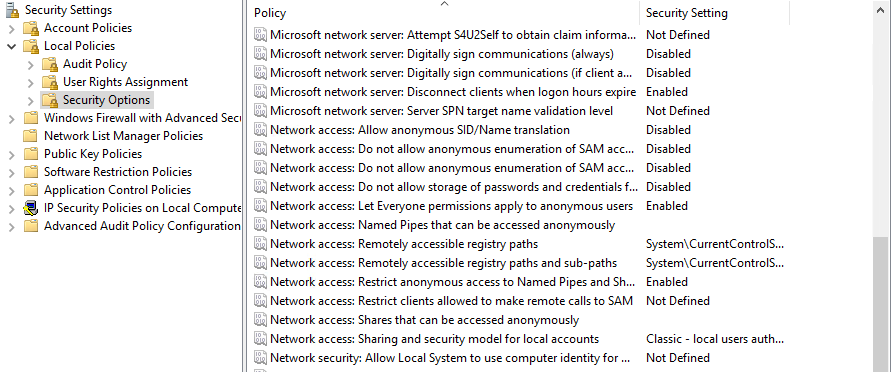
Locate the folder you want to share > Right Click on it > Properties . . .
Sharing tab: Advanced Sharing > Permissions > Add . . . > Add Everyone > Check Read and Change 
Security tab: Edit . . . > Add . . . > Add Everyone > Check Full Control (or appropriate file permissions) 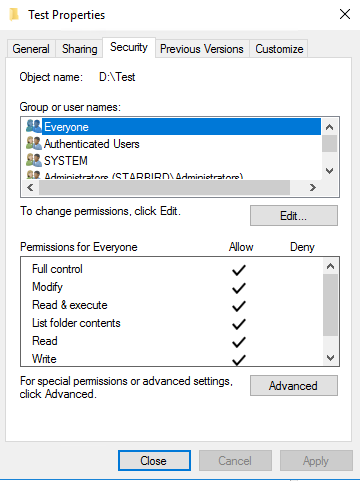
Start > Devices and Printers > Locate the printer to share and right-click on it > Printer properties
Share this printer: ticked, Render print jobs on client computers: ticked 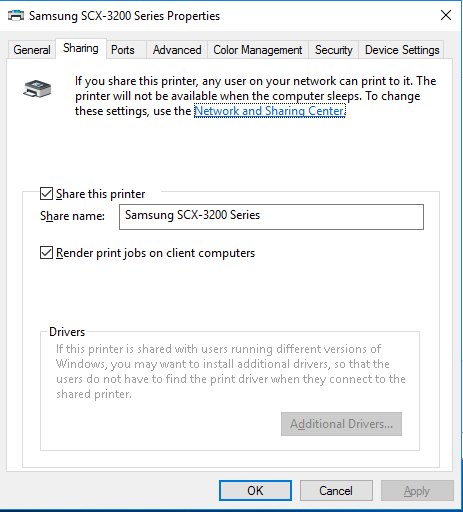
Add . . . > Add Everyone > Check all boxes 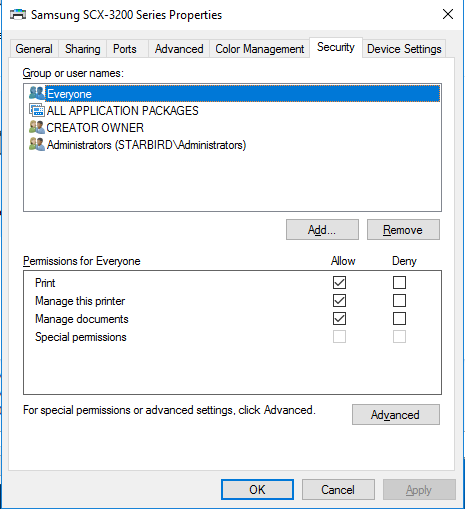
The following AVMA keys can be used for Windows Server 2019.
| Edition | AVMA key |
|---|---|
| Datacenter | H3RNG-8C32Q-Q8FRX-6TDXV-WMBMW |
| Standard | TNK62-RXVTB-4P47B-2D623-4GF74 |
| Essentials | 2CTP7-NHT64-BP62M-FV6GG-HFV28 |
The following AVMA keys can be used for Windows Server, version 1809.
| Edition | AVMA key |
|---|---|
| Datacenter | H3RNG-8C32Q-Q8FRX-6TDXV-WMBMW |
| Standard | TNK62-RXVTB-4P47B-2D623-4GF74 |
The following AVMA keys can be used for Windows Server, version 1803 and 1709.
| Edition | AVMA key |
|---|---|
| Datacenter | TMJ3Y-NTRTM-FJYXT-T22BY-CWG3J |
| Standard | C3RCX-M6NRP-6CXC9-TW2F2-4RHYD |
The following AVMA keys can be used for Windows Server 2016.
| Edition | AVMA key |
|---|---|
| Datacenter | TMJ3Y-NTRTM-FJYXT-T22BY-CWG3J |
| Standard | C3RCX-M6NRP-6CXC9-TW2F2-4RHYD |
| Essentials | B4YNW-62DX9-W8V6M-82649-MHBKQ |
The following AVMA keys can be used for Windows Server 2012 R2.
| Edition | AVMA key |
|---|---|
| Datacenter | Y4TGP-NPTV9-HTC2H-7MGQ3-DV4TW |
| Standard | DBGBW-NPF86-BJVTX-K3WKJ-MTB6V |
| Essentials | K2XGM-NMBT3-2R6Q8-WF2FK-P36R2 |