How to Set Up a Raspberry Pi Web Server

This tutorial aims to host a simple web server on a Raspberry Pi. This produces a very lightweight web server and works well to host a microservice or to test a website without deploying a full web server on the cloud. We will use Docker on Raspbian OS and spin up an Apache 2.4 container from Docker Hub.

Prerequisites

The only prerequisite to following this guide is that you have SSH connection enabled, Raspberry Pi 1, 2, 3, 4 or Pi Zero W with a running Raspbian OS.

Installing Docker to the Raspberry Pi

Step 1: Update and Upgrade

Before installing Docker we need to make sure that the Raspberry Pi is running the latest software.

sudo apt-get update && sudo apt-get upgrade

Step 2: Download the Script to Install Docker on Raspberry Pi

downloading and running the script is very easy just copy and paste the command in the terminal:

curl -fsSL https://get.docker.com -o get-docker.sh

To execute the installation script enter this command:

sudo sh get-docker.sh

Now you have to wait for the script will install all the required packages in Raspberry Pi.

Step 3: Add a Non-Root User to the Docker Group

By default, only root users can run the docker containers. If you are not logged in as the root you will need to use the sudo prefix every time and it’s not recommended. We can easily skip by adding the non-root user to the Docker group here is how to do that:

sudo usermod -aG docker [user_name]

To add the Pi user (the default user in Raspberry Pi OS), use the command:

sudo usermod -aG docker pi

Setting up Apache on Raspberry Pi

One of the best things about the Docker ecosystem is that there are tens of standard docker containers that you can easily download and use.

In this article, we will instantiate an Apache 2.4 container named raspberry-pi-web-server, detached from the current terminal. We will use an image called httpd:2.4 from Docker Hub.

Our plan is to have requests made to raspberry pi’s local IP address on port 8080 be redirected to port 80 on the container. Also, instead of serving content from the container itself, we will serve a simple web page from /home/user/website.

We will do this by mapping /home/user/website/ on the /usr/local/apache2/htdocs/ on the container. Note that you will need to use sudo or login as root to proceed, and do not omit the forward slashes at the end of each directory.

# sudo docker run -dit --name raspberry-pi-web-server -p 8080:80 -v /home/user/website/:/usr/local/apache2/htdocs/ httpd:2.4

At this point, our Apache container should be up and running.

$ sudo docker ps

Now let’s create a simple web page named raspberry-pi-web-server.html inside the /home/user/website directory.

# vi /home/user/website/raspberry-pi-web-server.html

Add the following sample HTML content to the file.

<!DOCTYPE html>
<html lang="en">
<head>
    <meta charset="UTF-8">
    <title>Raspberry Pi Web Server</title>
</head>
<body>
    <h1>Learn Docker</h1>   
</body>
</html>

Next, point your browser to Server-IP:8080/raspberry-pi-web-server.html (where Server-IP is your Raspberry Pi IP address).

If you wish, you can now stop the container.

$ sudo docker stop raspberry-pi-web-server

and remove it:

$ sudo docker rm raspberry-pi-web-server

To finish cleaning up, you may want to delete the image that was used in the container (omit this step if you’re planning on creating other Apache 2.4 containers soon).

$ sudo docker image remove httpd:2.4

Conclusion

In this article, we explained how to Set Up a Raspberry Pi Web Server using docker.

Plex Database Cache Setting

The comands below are for Plex in Docker, however you can change the paths relevant to any Plex install.

To get current cache size…

sqlite3 "/opt/appdata/plex/database/Library/Application Support/Plex Media Server/Plug-in Support/Databases/com.plexapp.plugins.library.db" "PRAGMA default_cache_size;"

Change cache size (and confirm value)

sqlite3 "/opt/appdata/plex/database/Library/Application Support/Plex Media Server/Plug-in Support/Databases/com.plexapp.plugins.library.db" "PRAGMA default_cache_size = 6000000;" "PRAGMA default_cache_size;"

The default cache size is 20000, if you have thousands of movies and tv shows set it to a larger value (I changed it to 6000000, but any number will work for you)

Before making changes to the sqllite database stop the plex server and service then edit and restart.

also change the paths to your plex installation paths as mine are custom.
ALWAYS MAKE A BACKUP FIRST OF YOUR ENTIRE INSTALLATION FOLDER AND DATABASE STUFF!!!

Windows Server 2019/2022 Unknown Device BTH\MS_BTHPAN

Summary

Instructions to resolve unknown device appearing labeled Hardware ID BTH\MS_BTHPAN after installing Windows Server 2019 or 2022 and all drivers for Intel® NUC8i3/v5/v7PN products.

Description

After installing Windows Server 2019 and all available drivers, an Unknown Device appears in Device Manager.

Resolution

Perform the following steps to install drivers for the unknown device:

  1. Open Device Manager and double click the unknown device 
  2. Click the Details tab
  3. Click the dropdown and select Hardware Ids
  4. Confirm that the Hardware ID is BTH\MS_BTHPAN
  5. Click the Driver tab
  6. Click Update Driver > Let me pick from a list of available drivers on my computer > Bluetooth, then click next
  7. Select Microsoft from the Manufacturers list on the left, select Personal Area Network Service from the list on the right
  8. Click Yes on the “Update Driver Warning” dialog that appears

Enable Photo Viewer on Windows Server 2016, 2019 or 2022

How to Enable Photo Viewer in Windows Server 2016+

By default, Photo Viewer isn’t installed or active. The first thing we need to do is check whether or not the DLL’s exist on the server.


Step 1: Check if Photo Viewer DLL’s Exist

Browse to C:\Program Files (x86)\Windows Photo Viewer on the server. If you see .dll files there, that means the files exist but aren’t registered. It should look like this:

If you don’t see those files, simply browse to the path above from a Windows 10 PC & copy the folder contents to the same path on your server.


Step 2: Register the DLL’s

Now that we know the necessary files are present, we need to register them.

Open Command Prompt (type CMD into Start) and right-click to Run as Administrator. Then copy and paste the following code:

regsvr32 “C:\Program Files (x86)\Windows Photo Viewer\PhotoViewer.dll”

Step 3: Download PhotoViewer Registry Keys

Now that the .dll’s are registered, we need to import the registry keys. This allows us to “Open With…” from File Explorer and choose Windows Photo Viewer, as well as set default file associations for various file types, such as .jpg, .jpe, or .jpeg.

Download registry files from here: MS Photoviewer Registry Files.zip

Once downloaded, right-click the .zip file and extract it to a temporary location.


Step 4: Import Registry Keys

From Start, open Regedit.

File > Import > browse to the location you extracted the 4 registry files. You will need to import all 4 of them.

You should now be able to right-click an image file and Open With Windows Photo Viewer!


Step 5: Set Photo Viewer as Default App

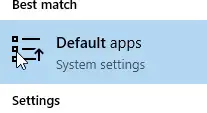
If you’d like to make Photo Viewer your default photo viewing application, search Windows for “Default Apps” and then change Photos to Windows Photo Viewer.


Step 6: Allow Images in Thumbnails

This step is optional, but if you’d like to see a preview of the images from File Explorer (instead of just icons), you can do that by changing the File Explorer options.

Search Windows for Folder Options. Change to the View tab and uncheck “Always show icons, never thumbnails”.

That will change it from looking like this:

to looking like this:

That’s all there is to it! Hopefully this guide helped you out.

How to fix a WordPress HTTPS redirect loop with an NGINX reverse proxy

If your WordPress site is set up to use HTTPS and a reverse proxy, such as an NGINX reverse proxy, is put in front of it you may wind up with an infinite redirect loop.

Following the redirect in dev tools, it looks like this is happening:
https://example.com -> https://example.com

A head scratcher for sure, but understanding what is going on behind the scenes reveals the issue and the solution together.

Here is what is actually happening:

  • Request is made to https://example.com
  • The reverse proxy catches the request and makes it’s own request to http://example.com. Take special note that the schema changed to http.
  • The WordPress site sees a request for http://example.com and says, “Hey, that’s not right, I am at https://example.com” and tells the browser to go there
  • Repeat indefinitely

You could change the site to support http to the exclusion of https, however that is hacky and anything wanting https will still work itself into an infinite redirect.

An easier solution is to trick WordPress into thinking the request is https enabled.

WordPress looks at a server variable when determining the status of https. Open your wp-config.php file and add the following just after the <?php tag:

if ( $_SERVER['HTTP_X_FORWARDED_PROTO'] == 'https' ) {
    $_SERVER['HTTPS'] = 'on';
    $_SERVER['SERVER_PORT'] = 443;
}

And now your site will work as originally anticipated.

Dastardly isn’t it 😉

Invalid JSON response nginx docker

I’ve recently gotten pihole setup in a docker and use nginx to access it via “dockerhostip/pihole” and all is /was working well.

Today I decided to start playing with internal domain names for my lan so I added one to reference the docker host via the “Local DNS records” section. After testing that worked I went back to the admin page to add some more local domains, however I have discovered when ever I go to the “Local DNS records” page while accessing via domain name I get:

DataTables warning: table id=customDNSTable - Invalid JSON response. For more information about this error, please see http://datatables.net/tn/1

but if I revert back to accessing via IP it works fine.

The reason for this behaviour is because The web interface is only available when accessed by the hostname, pi.hole, or the IP address set in /etc/pihole/setupVars.conf.

You can set your hostname to pihole.home if you’d like.

You could also add it as another valid domain by following these instructions:

Add this to /etc/lighttpd/external.conf (or create it if it doesn’t exist):

setenv.add-environment = ( "VIRTUAL_HOST" => "pihole.home" )

Then restart lighttpd: sudo service lighttpd restart

Automatically purge orphaned objects in Docker

Sometimes your Docker host will fill up with orphaned volumes, containers, images and netowrks.  You can use this image to automatically trim your orphaned volumes every 24 hours:

sudo docker run -d \
--name=docker-prune \
-v /var/run/docker.sock:/var/run/docker.sock \
-e INTERVAL=86400 \
-e "OBJECTS=container volume image network" \
-e "OPTIONS=--filter until=24h" \
docker.io/xjokay/prune:latest

Pulled from Docker Prune

Raspberry Pi as Dashboard Controller

Raspberry Pi is a useful embedded computer that can be used for many things including powering informational dashboards.  There are several ways to achieve this with varying complexity however In this tutorial, we will show how to utilise a Raspberry Pi as a Dashboard Controller in a simple straight forward manner.  We are using a Pi 4 revision B however the below has been tested on Pi 3b revisions.

The Pi needs to be configured properly in order to satisfy the following needs:

  • The screen should be fully filled with the view
  • After booting, the predefined screen should be loaded automatically
  • The screen should not sleep after some period of time
  • The mouse cursor should not be visible in the screen
  • Menus and the taskbar should not be visible
  • After an unclean reboot (i.e. after power outage), there should be no browser warning about the unclean shutdown
  • It should be possible to connect to the device remotely to reload or change the view

What you need

  • RaspberryPi
  • 8GB microSD card (preferably with microSD -> SD adapter)
  • (preferably) RaspberryPi case
  • DC charger with 5V output of 2 Amperes and with USB C jack (very common nowadays, as it is used for charging smartphones and tablets).
  • USB keyboard for configuration. A mouse is not necessary

Step 1 – Update your Raspberry Pi

Once you have setup the Raspberry Pi  and are presented with a desktop screen we need to update the device  The following commands are to be run in a Terminal:

sudo apt-get update && sudo apt-get upgrade -y && sudo reboot

Its also a good idea to update the firmware on your Pi:

sudo rpi-update

Once the firmware is updated reboot the device for the next step.

Step 2 – Disable screen timeout

To prevent the screen going blank you need to disable screen timeout.  In the latest versions of RaspbianOS, this is now an option that can be set in the GUI.

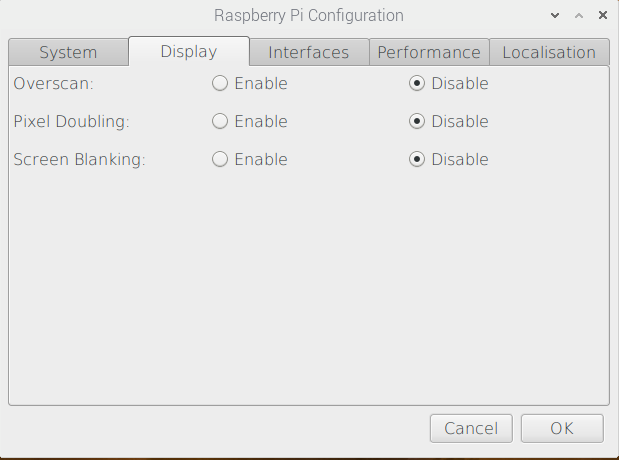
Click Start>Preferences>Raspberry Pi Configuration and select the Display tab:

From here, disable Screen Blanking and click ok.  now reboot your Pi again.

Step 3 – Install Unclutter

Unclutter is a tool to disable the mouse being viable when there is no input.  Simply install with the following command in Terminal:

sudo apt-get install unclutter

Step 4 – Create Autostart for Chromium Browser with LXDE

Create two files in /home/pi/.config/lxsession/LXDE-pi – autostart and desktop.conf this can either be by using nano or creating via a ssh tool like WinSCP.

Add the below to autostart and save the file.  You can place the URL of your dashboard after the –incognito flag:

@lxpanel --profile LXDE-pi
@pcmanfm --desktop --profile LXDE-pi
# @xscreensaver -no-splash
@point-rpi

@xset s off
@xset -dpms
@xset s noblank
@unclutter

@chromium-browser --noerrdialogs --kiosk --disable-infobars --incognito http://URL-GOES-HERE

Add the contents of desktop.conf and save the file:

[Session]
window_manager=openbox-lxde-pi
disable_autostart=no
polkit/command=lxpolkit
clipboard/command=lxclipboard
xsettings_manager/command=build-in
proxy_manager/command=build-in
keyring/command=ssh-agent
quit_manager/command=lxsession-logout
quit_manager/image=/usr/share/lxde/images/logout-banner.png
quit_manager/layout=top
lock_manager/command=lxlock
terminal_manager/command=lxterminal
launcher_manager/command=lxpanelctl

[GTK]
sNet/ThemeName=PiX
sNet/IconThemeName=PiX
sGtk/FontName=Roboto Light 12
iGtk/ToolbarStyle=3
iGtk/ButtonImages=0
iGtk/MenuImages=0
iGtk/CursorThemeSize=18
iXft/Antialias=1
iGtk/AutoMnemonics=1
iGtk/EnableMnemonics=1
sGtk/ColorScheme=selected_bg_color:#4d4d9898f5f5nselected_fg_color:#ffffffffffffnbar_bg_color:#ededececebebnbar_fg_color:#000000000000n
sGtk/CursorThemeName=PiX
iGtk/ToolbarIconSize=1
iNet/EnableEventSounds=1
iNet/EnableInputFeedbackSounds=1
iXft/Hinting=1
sXft/HintStyle=hintfull
sXft/RGBA=rgb

[Mouse]
AccFactor=20
AccThreshold=10
LeftHanded=0

[Keyboard]
Delay=500
Interval=30
Beep=1

[State]
guess_default=true

[Dbus]
lxde=true

[Environment]
menu_prefix=lxde-pi-

Reboot the Pi and after a few moments the display should now show the URL dashboard you enetered in autostart.

To rotate more than one dashboard page

The easiest way to achieve this is by installing Revolver – Tabs from the chrome webstore. this can be done by closing down the dashboard instance of Chromium by pressing CFRL-F4 then opening the Chromium Browser from START>Internet>Chromium Browser and clicking the link above.

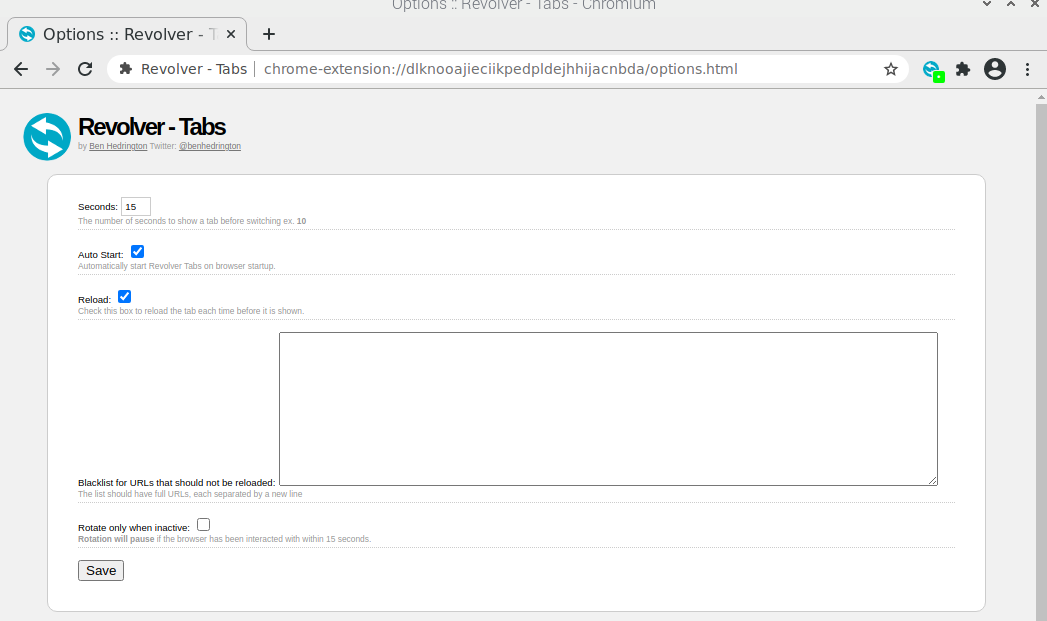
You’ll need to change settigns within Revolver Tabs, notably rotation time in seconds, auto start and optionally reload.  If you have Reload enabled, you can prevent tabs reloading by specifying their URL’s.  Remember to click save.

As we loaded Chromium in Incognito, you need to enable Revolver Tabs for incognito mode is Google chromium extensions settings.

Once setup second and subsequent URLs you have entered in autostart will automatically rotate.  subsequent URLs can be added with a space in between them:

@chromium-browser --noerrdialogs --kiosk --disable-infobars --incognito http://URL-1 http://URL-2 http://url-3


Official Windows 7 SP1 ISO Image Downloads

These are now available for those who currently have Microsoft Windows 7 with Genuine Activation Keys. These are the legitimate downloads, full ISO image to burn to a good quality blank DVD using any good image burning program such as ImgBurn or the like.

These ISO image download have Service Pack 1 integrated into the installation setup, so therefore there is no need to separately install SP1 after the initial install of Windows 7.

~~~~~~~~~~~~~~~~~~~~~~~~~~~~~~~~~~~~~~~~~~~~~~~~~~~~~~~~~~~~~~~~~~~~~~~~~~~~~~~~~~~~~~~~~~~~~~~~~~~

Windows 7 SP1 ISO Download Links Including English and Foreign Language Versions:


These are very high speed downloads which should take anywhere from 30 minutes to about 50 minutes, if you have a high-speed broadband connection.

My download took approximately 18 minutes from start to finish. Both IE9 and Firefox have their own download managers you may use to accomplish the download.

Thеѕе аrе NOT illegal – Thеѕе аrе јυѕt thе download links fοr Windows 7 SP1 ISO whісh іѕ a retail wrap thаt offers a 30-day trial period. Yου need tο activate уουr Windows afterwards wіth a genuine license activation key tο continue using іt. Downloading thеѕе files frοm Digital River іѕ absolutely legal аnԁ completely free οf charge.